
SUPPORT AND SERVICE Offering On-line Pre-and-Post Service and Support
FAQ
Purpose:
Model:
Preparation:
- Download the OpenBMC image for your own device.
- Reference: How to download the current firmware?
- A cable which attached in the original box.
- Putty,Teraterm,SecureCRT,etc...
- OpenSSH
Procedure:
Step1. Copy BMC image to DUT by SCP
1) Confirm MGMT port ifconfig of DUT BMC.
2) Transmit new BMC image to DUT BMC via MGMT port with SCP.
root@bmc:~# ifconfig eth0
eth0      Link encap:Ethernet  HWaddr 3C:2C:99:EC:59:6B
          inet addr:188.188.184.100  Bcast:0.0.0.0  Mask:255.255.0.0
          inet6 addr: fe80::3e2c:99ff:feec:596b/64 Scope:Link
          UP BROADCAST RUNNING MULTICAST  MTU:1500  Metric:1
          RX packets:562 errors:0 dropped:0 overruns:0 frame:0
          TX packets:22 errors:0 dropped:0 overruns:0 carrier:0
          collisions:0 txqueuelen:1000
          RX bytes:0 (0.0 B)  TX bytes:0 (0.0 B)
          Interrupt:3

root@bmc:~#
Transmit new BMC image to DUT via SCP. Username/Password: root/0penBmc) 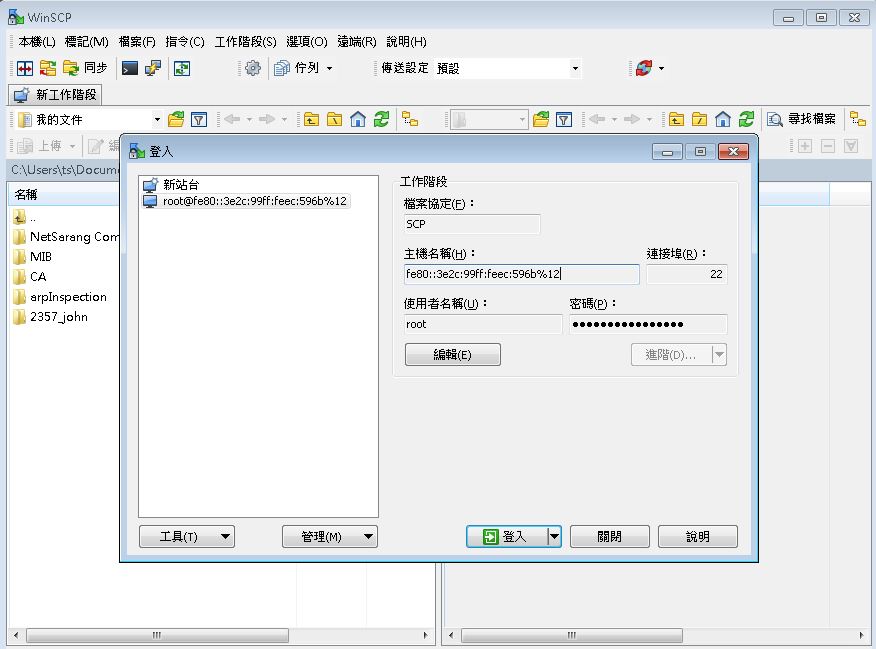

Step 2. Install new BMC image
1) Confirm original BMC version and built date.
cat /etc/issue
cat /etc/version
2) Check MTD configuration
cat /proc/mtd
3) Install new BMC image (flash-mavericks) to MTD (flash0)
flashcp -v flash-mavericks /dev/mtd5
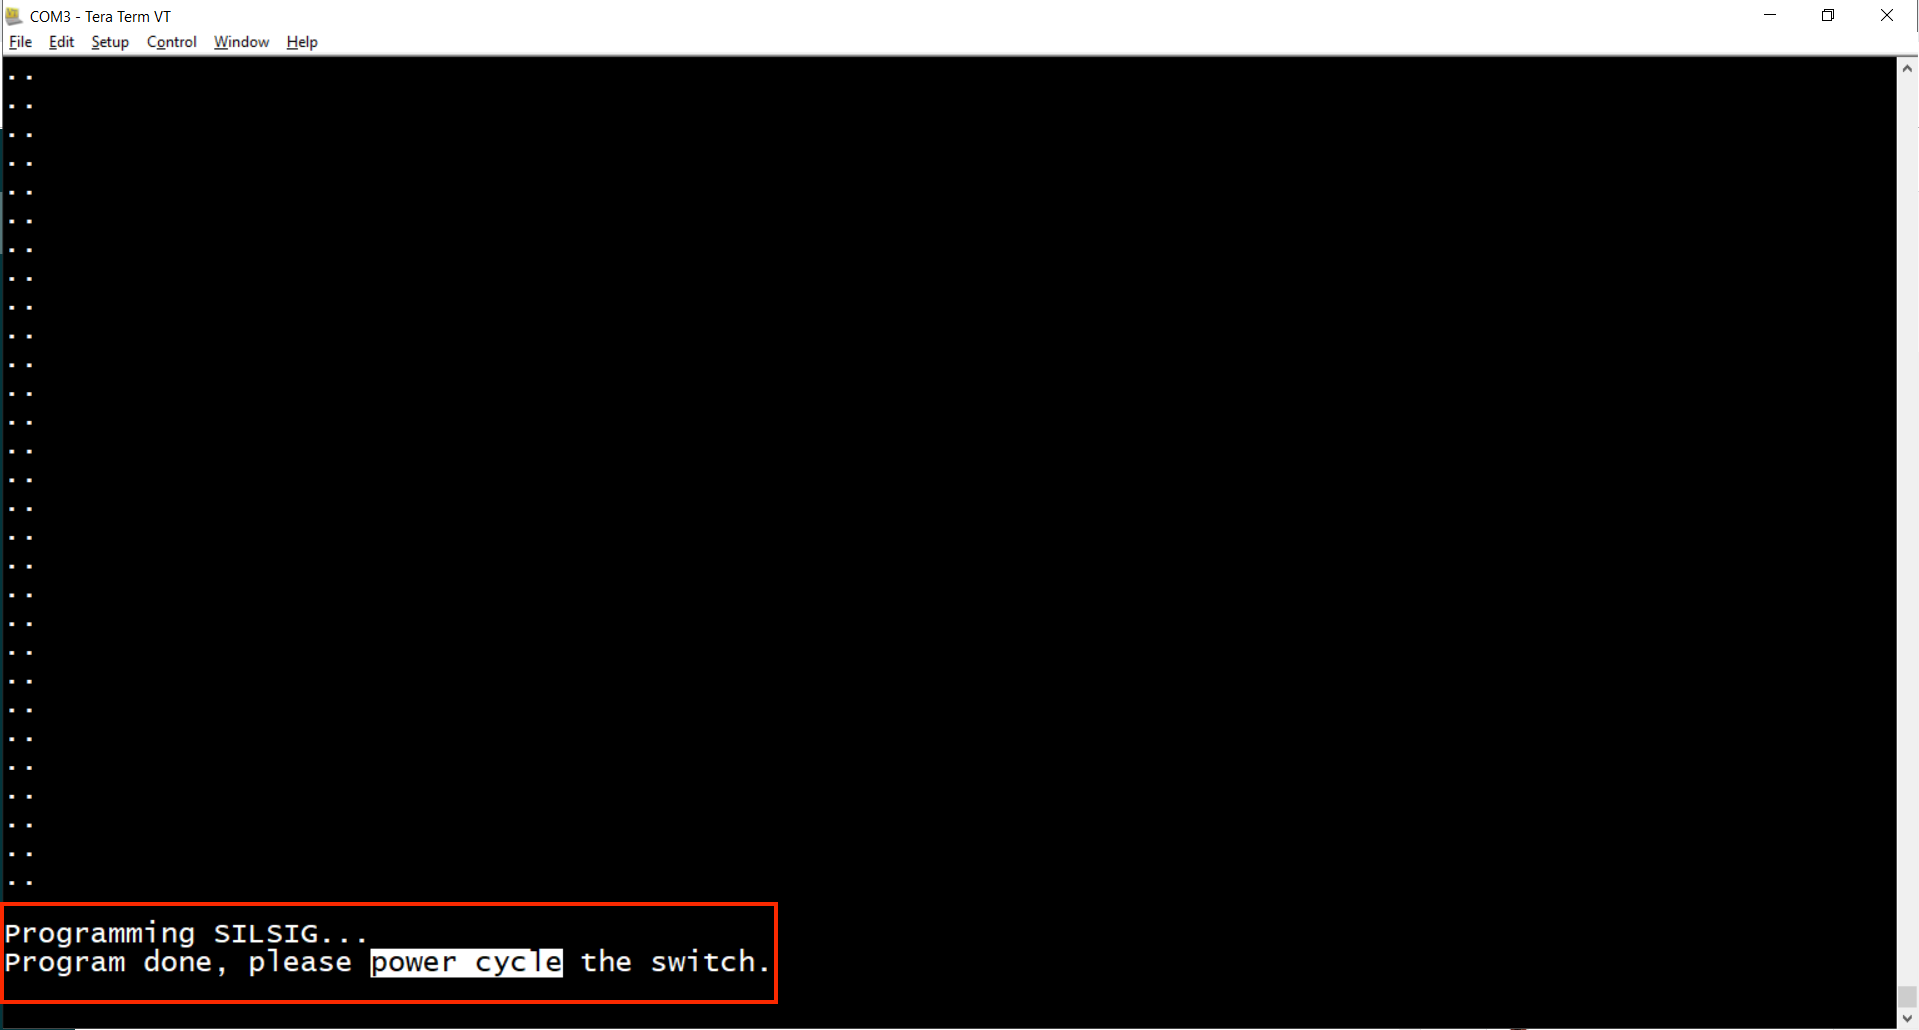
4) Reboot BMC to finish the installation.
reboot
* Do not power off DUT during installation.
(After copy BMC image to DUT BMC by SCP)
root@bmc:~# ls
flash-mavericks
root@bmc:~#
(Confirm original BMC version)
root@bmc:~# cat /etc/issue
OpenBMC Release 1.0.0.13

root@bmc:~# cat /etc/version
201811261457
root@bmc:~#
(Check MTD configuration)
root@bmc:~# cat /proc/mtd
dev:    size   erasesize  name
mtd0: 00060000 00010000 "u-boot"
mtd1: 00020000 00010000 "env"
mtd2: 00280000 00010000 "kernel"
mtd3: 00c00000 00010000 "rootfs"
mtd4: 01100000 00010000 "data0"
mtd5: 02000000 00010000 "flash0"
root@bmc:~#
(Install new BMC image to MTD(flash0) and reboot DUT to finish the installation)
root@bmc:~# flashcp -v flash-mavericks /dev/mtd5
Erasing block: 264/264 (100%)
Writing kb: 16845/16845 (100%)
Verifying kb: 16845/16845 (100%)
root@bmc:~# reboot

… (Omit reboot and log-in messages)
(Confirm version number again)
root@bmc:~# cat /etc/issue
OpenBMC Release 1.0.0.14

root@bmc:~# cat /etc/version
201811261457
root@bmc:~#
Purpose:
This post shows the procedures to recover ONIE on Edgecore ARM platform switch.
Model:
AS4610-30T,AS4610-30P
AS4610-52T,AS4610-52P
Preparation:
A. Personal computer:
B. Serial Console cable:
- A cable which attached in the original box.
C. ISO Image:
- Download the ONIE ISO image for your own device.
- Reference: How to download the current firmware?
D. A console terminal
- Putty,Teraterm,SecureCRT,etc..
E. TFTP Server
- To download the iso image into the switch.
Procedure:
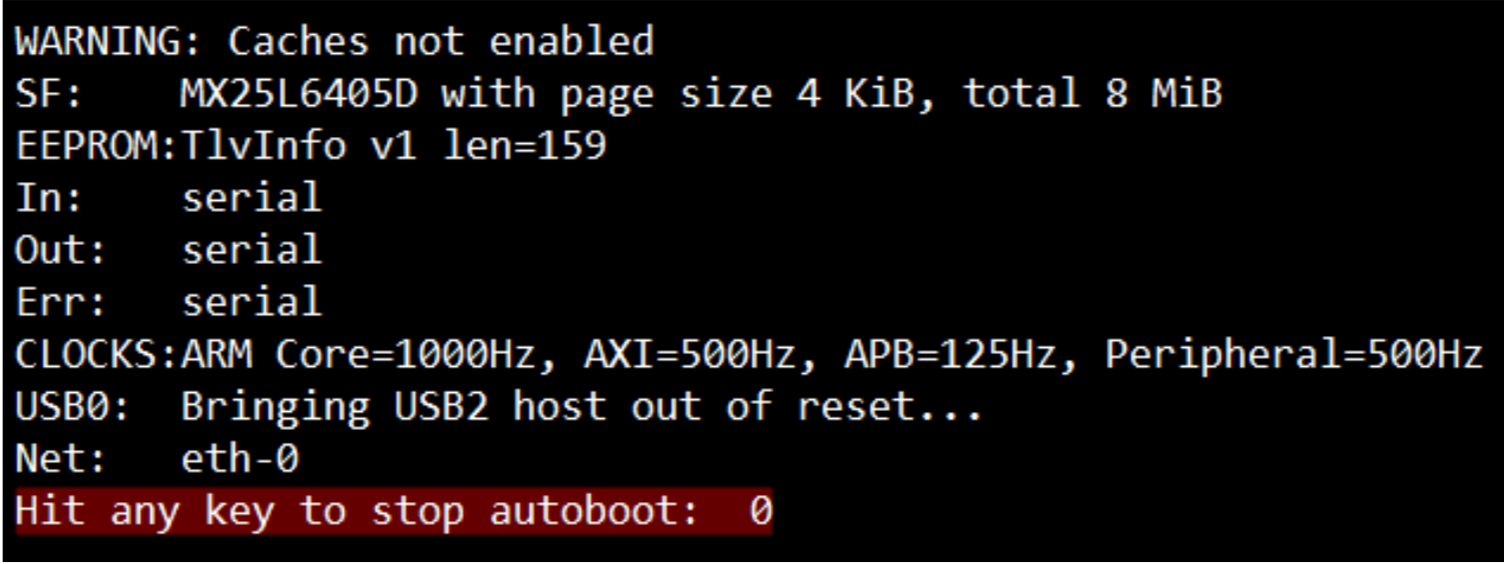
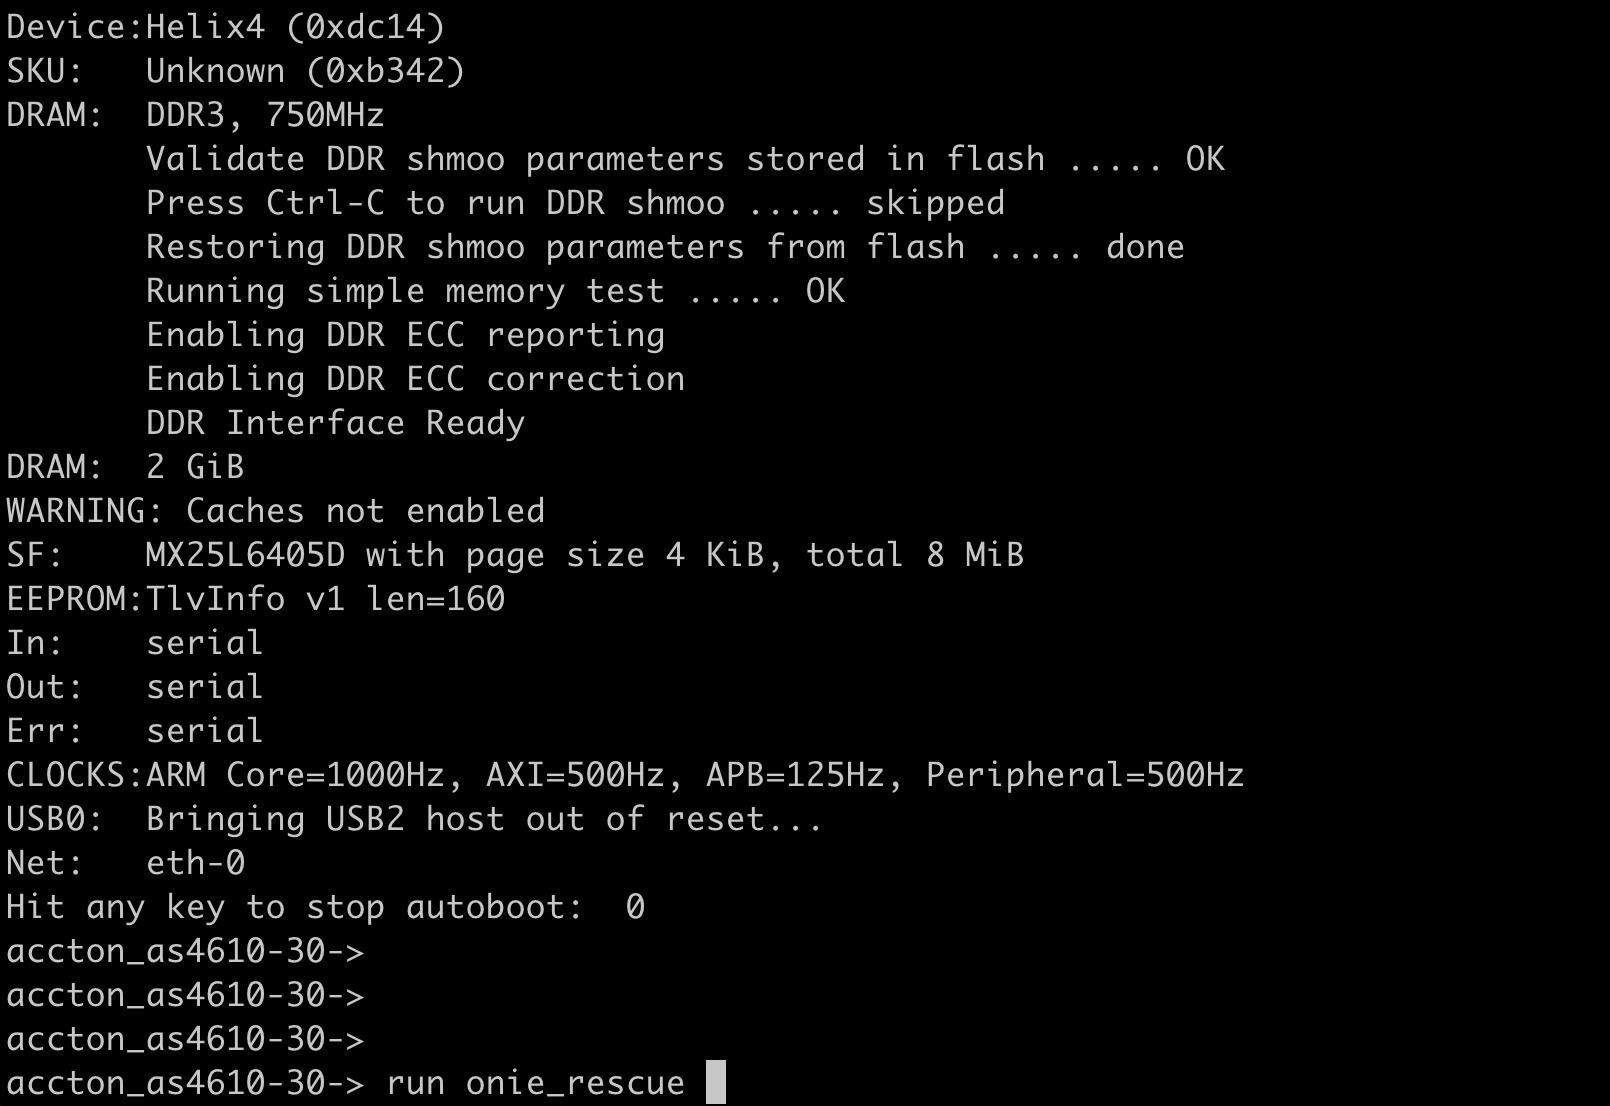
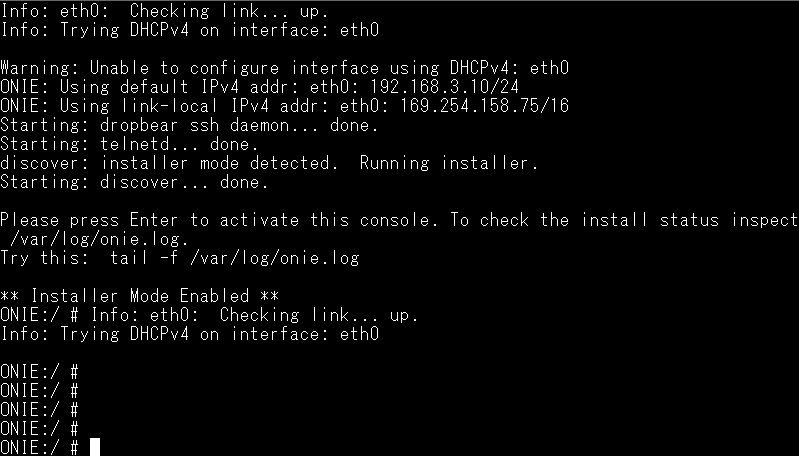
STEP1. Press "any key" to enter the U-Boot mode after booting up the switch.

STEP2. Please follow the command below.
*Cautions: Please make sure that every step needs to be performed, or the switch will not boot up again with any accident.
 A. accton_as4610-30-> setenv ipaddr 188.188.184.100  -->switch IP
 B. accton_as4610-30-> setenv serverip 188.188.99.1   -->TFTP SERVER IP
 C. accton_as4610-30-> tftp 0x70000000 AS4610-30_ONIE_v2016_05_00_04.bin
   --> tftpboot file name

ETH LINK UP: 1000FD

Using eth-0 device

TFTP from server 188.188.99.1; our IP address is 188.188.184.100

Filename 'AS4610-30-r0_ONIE_v2016_05_00_04.bin'.

Load address: 0x70000000

Loading: T #######################################################

 #################################################################

 #################################################################

 #################################################################

 #################################################################

 #################################################################

 ####################

done

Bytes transferred=6013496 (5bc238 hex)-->This number will be use on step F

 D.accton_as4610-30-> sf probe 0
 E.accton_as4610-30-> sf erase 0 0x800000
 F.accton_as4610-30-> sf write 0x70000000 0 0x5bc238
 G.accton_as4610-30-> reset
STEP3. The system will be reset, please wait about 5 mins to restore the switch.
STEP4. Execute "run onie_rescue" to make sure the ONIE is recovered.
accton_as4610-30-> run onie_rescue
Loading Open Network Install Environment ...
Platform: arm-accton_as4610_30-r0
Version : 2016.05.00.04
## Booting kernel from FIT Image at 70000000 ...
.
.
.
.
.
Purpose:
This post shows the procedures to install Accton-Diag via ONIE on Edgecore switch.
Model:
AS4610-30T, AS4610-30P
AS4610-52T, AS4610-52P
Method:
A. USB drive
B. Cable transfer
- TFTP
- FTP
- HTTP
Preparation:
A. Personal computer
B. Onie-updater
- Download the ONIE-updater image for your own device.
- Reference: How to download the current firmware?
C. Serial Console cable:
- A cable which attached in the original box.
D. Console terminal
- Putty,Teraterm,SecureCRT,etc...
E. Empty USB drive or transport protocol tools
- USB drive
- TFTP server
- FTP server
- Http file server
Procedure:
STEP1. Press "any key" to enter the U-Boot mode after booting up the switch.
STEP2. Execute "accton_as4610-30-> run onie_rescue".
accton_as4610-30-> run onie_rescue
STEP3. Start the upgrade process (5 examples)
- USB drive
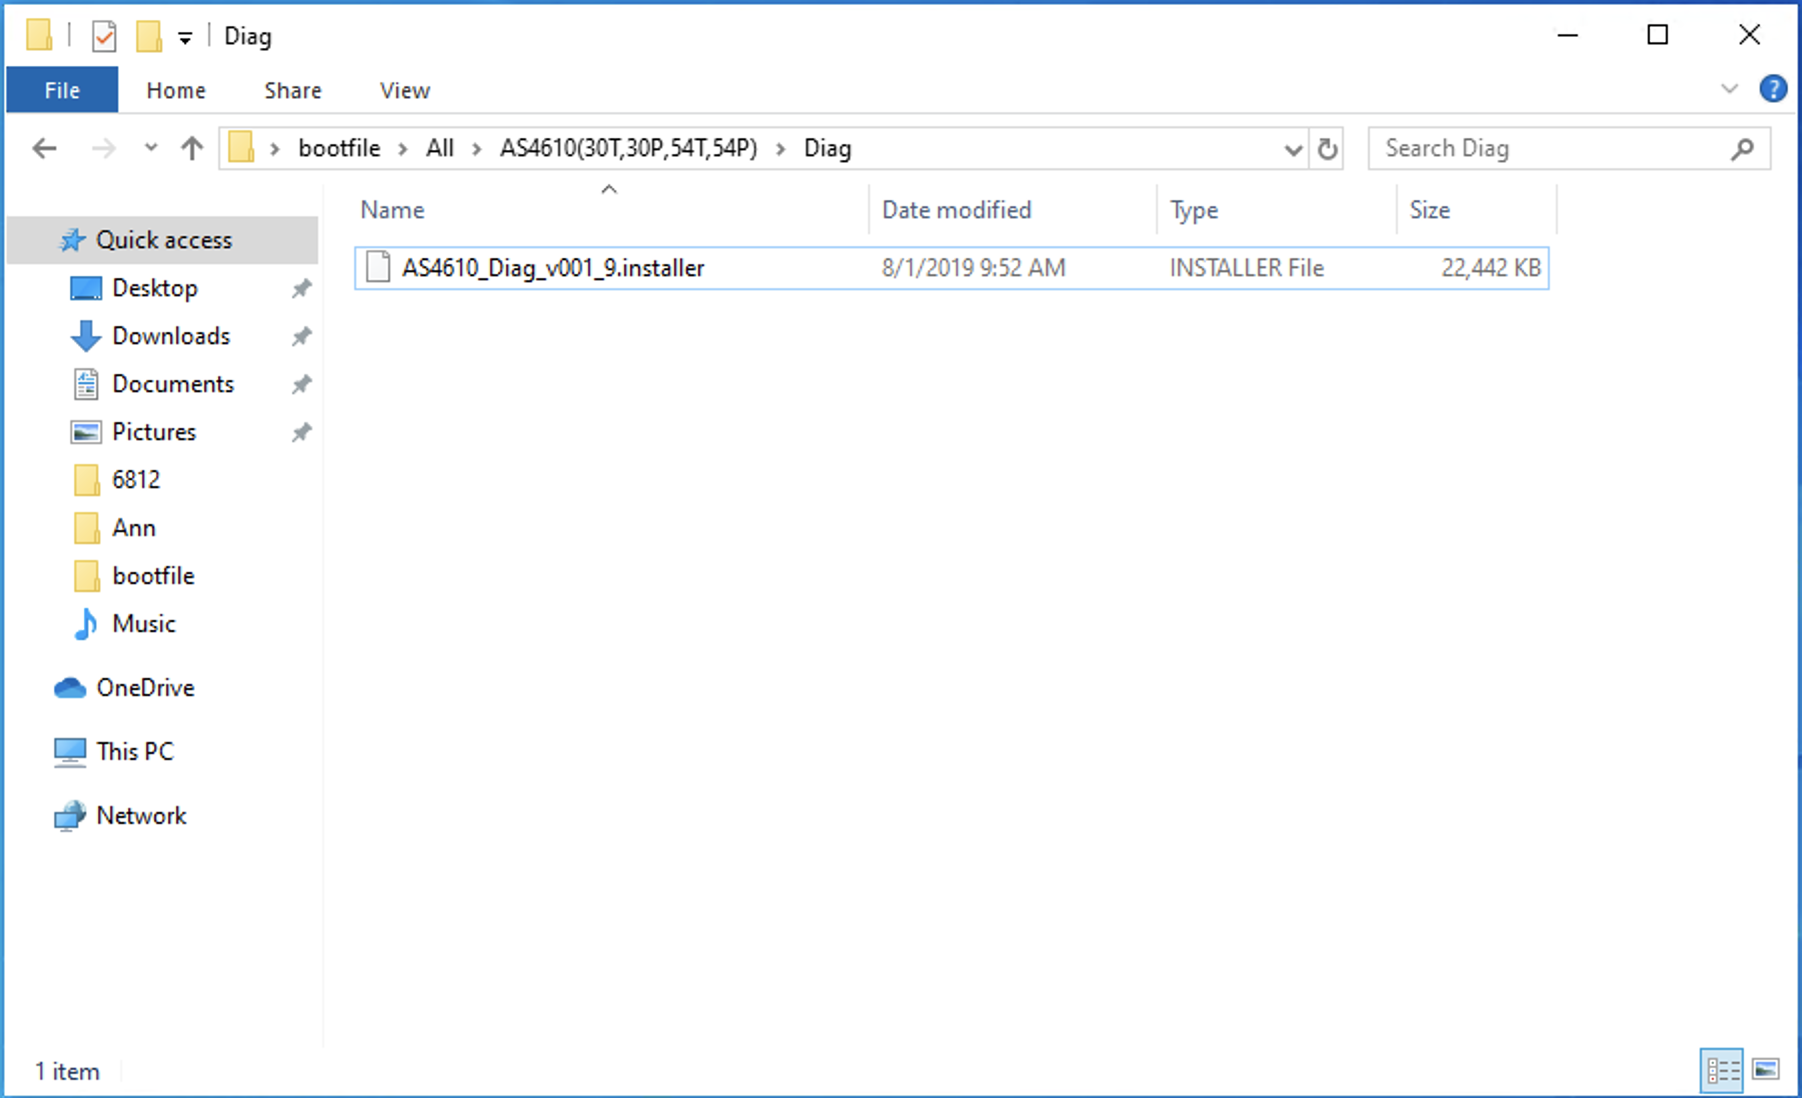
1. Put the onie_diag_installer to the USB drive.(e.g., AS4610_Diag_v001_9.installer)
2. Insert the USB drive into the data center front panel.

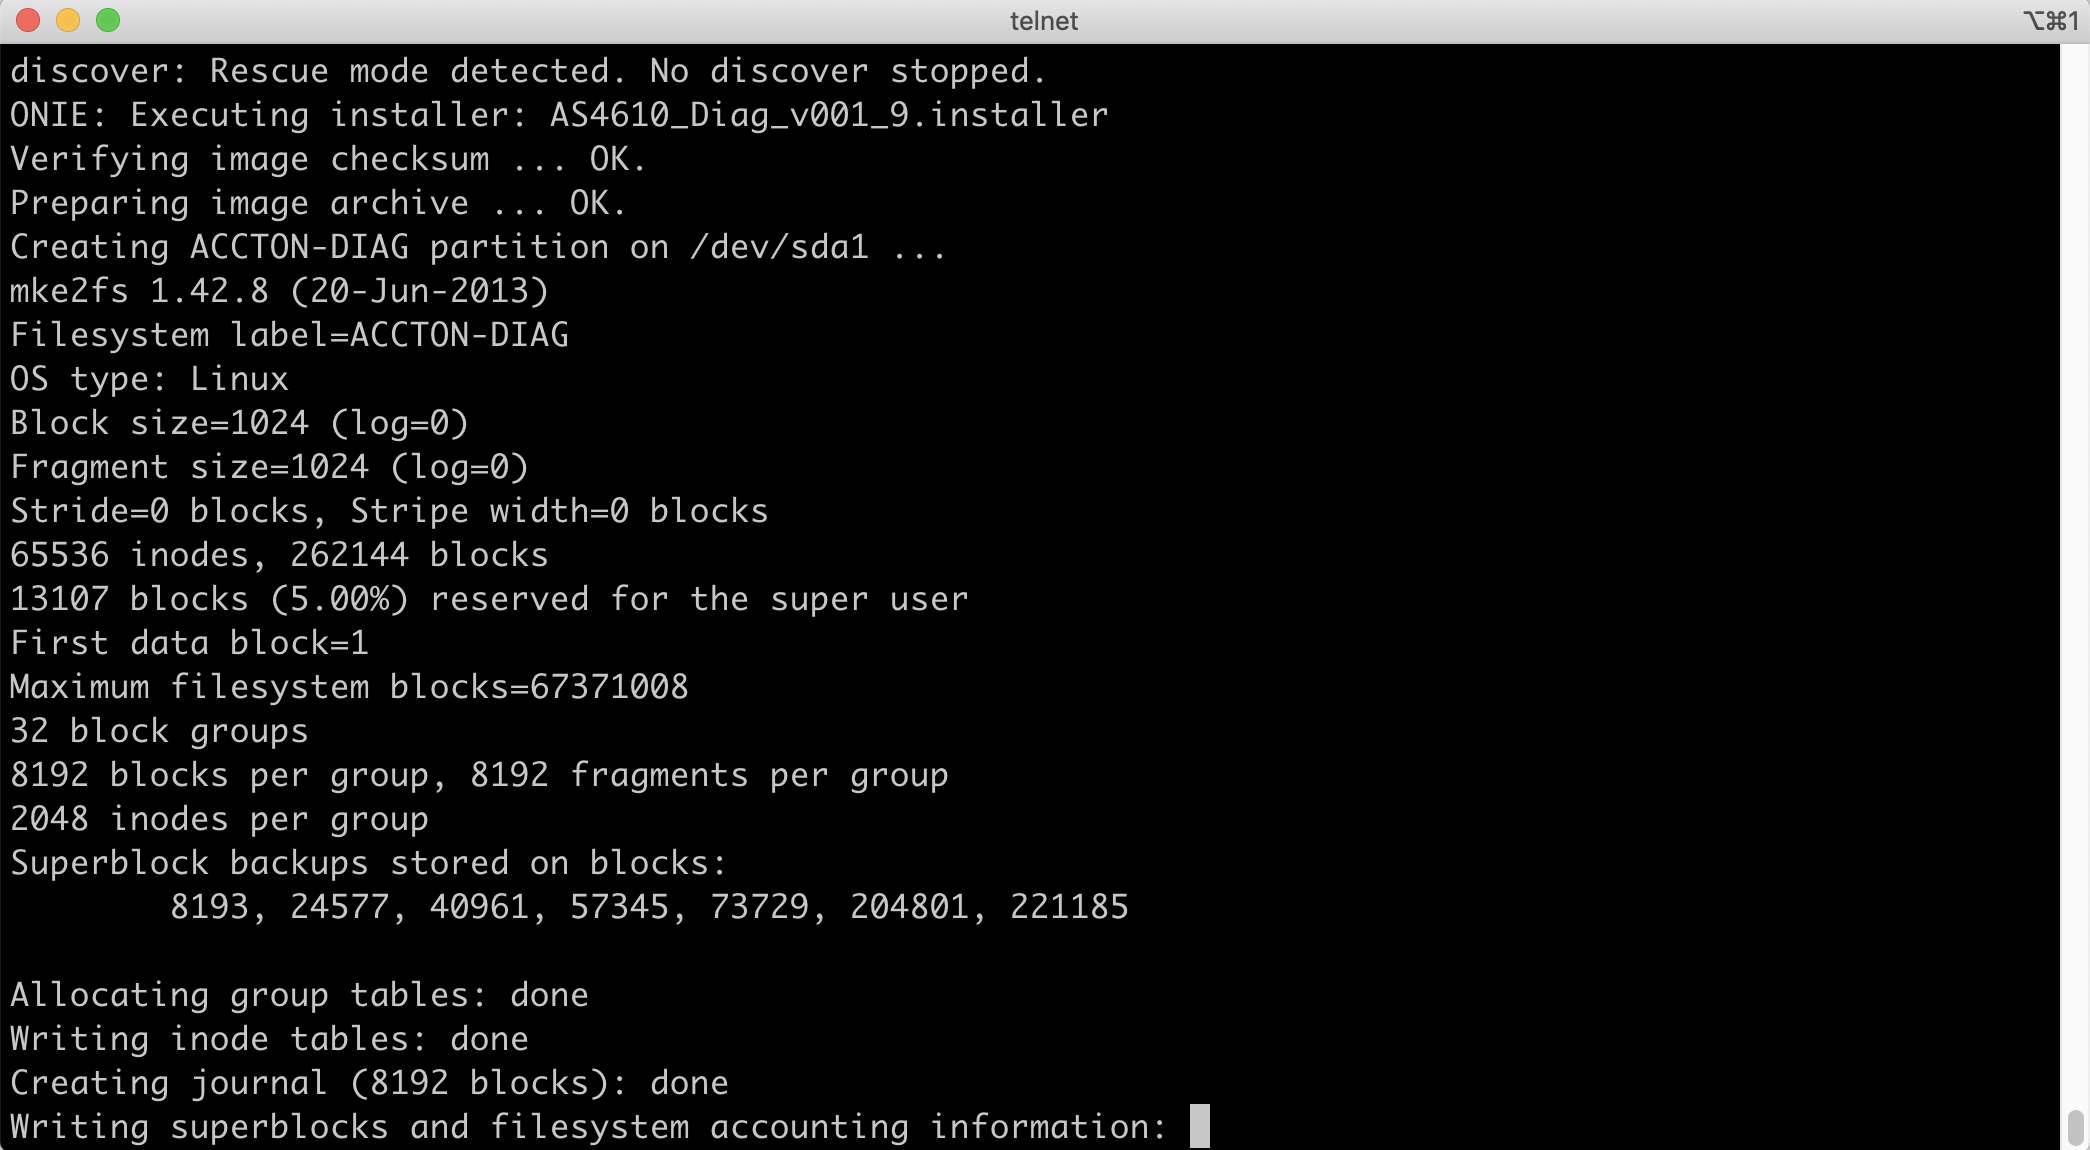
3. The terminal will show the following message.
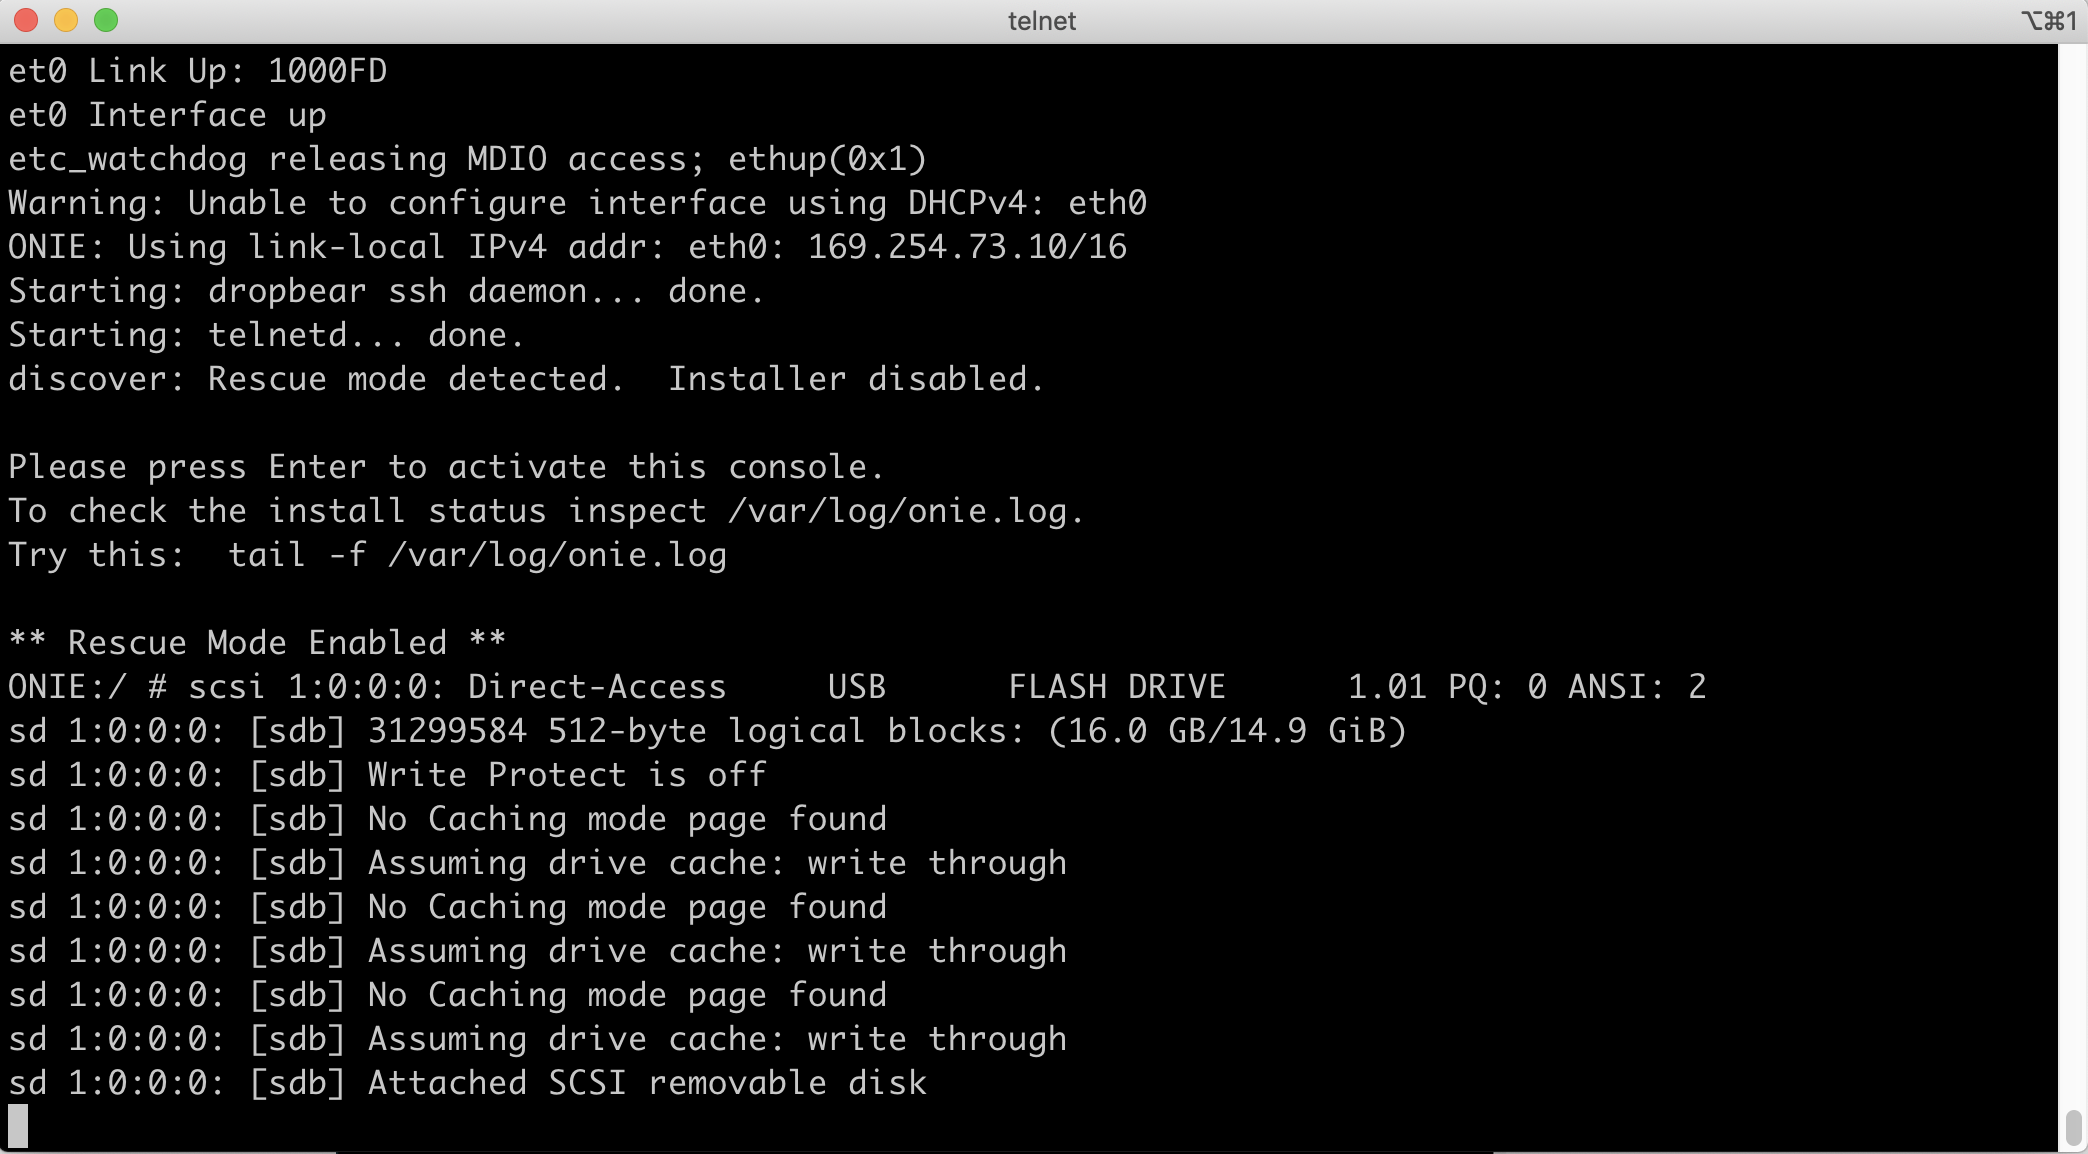
4. Input "gdisk /dev/sdb -l" command to show the storage status (e.g., /dev/sdb)
ONIE:/ # gdisk /dev/sdb -l
GPT fdisk (gdisk) version 0.8.8

Partition table scan:
MBR: MBR only
BSD: not present
APM: not present
GPT: not present


***************************************************************
Found invalid GPT and valid MBR; converting MBR to GPT format
in memory.
***************************************************************


Warning! Secondary partition table overlaps the last partition by
33 blocks!
You will need to delete this partition or resize it in another utility.
Disk /dev/sdb: 31299584 sectors, 14.9 GiB
Logical sector size: 512 bytes
Disk identifier (GUID): DDBB4463-8E78-41D1-BD4C-0BF3897007EF
Partition table holds up to 128 entries
First usable sector is 34, last usable sector is 31299550
Partitions will be aligned on 2048-sector boundaries
Total free space is 2014 sectors (1007.0 KiB)

Number Start (sector) End (sector) Size Code Name
1 2048 31299583 14.9 GiB 0700 Microsoft basic data

Note: /dev/sda is original hard drive.
5. Mount the USB drive and check the mount status.
ONIE:/mnt # mkdir /mnt/usb
ONIE:/mnt # mount -v /dev/sdb1 /mnt/usb
ONIE:/mnt # mount | grep sdb1
/dev/sdb1 on /mnt/usb type vfat (rw,relatime,fmask=0022,dmask=0022,codepage=cp437,iocharset=iso8859-1,shortname=mixed,errors=remount-ro)
6. Copy the onie_diag_installer to local storage. (e.g., /tmp)
 ONIE:/mnt/usb # ls
 AS4610_Diag_v001_9.installer
 ONIE:/mnt/usb # cp AS4610_Diag_v001_9.installer /tmp
7. Install the Diag by "onie-nos-installl [onie_diag_installer]" command.
ONIE:/ # cd /tmp
ONIE:/tmp # ls
AS4610_Diag_v001_9.installer
ONIE:/tmp # onie-nos-installl AS4610_Diag_v001_9.installer
8. Diag will be installed immediately. After installing, the system will automatically reboot.
- TFTP
1. Please connect to the TFTP server with Mgmt port. (e.g., AS4610-30T)
Note: Please use 1G port.

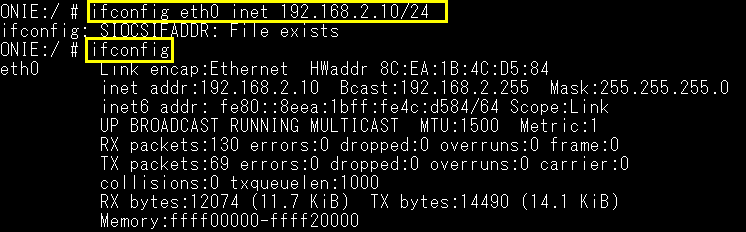
2. Set the IP address in ONIE and try to ping the TFTP server. (Server IP:188.188.99.1)
ONIE:/ # ifconfig eth0 188.188.184.123 netmask 255.255.0.0
ONIE:/ # ifconfig
eth0 Link encap:Ethernet HWaddr 3C:2C:99:41:46:60
inet addr:188.188.184.123 Bcast:188.188.255.255 Mask:255.255.0.0
inet6 addr: fe80::3e2c:99ff:fe41:4660/64 Scope:Link
UP BROADCAST RUNNING MULTICAST MTU:1500 Metric:1
RX packets:1705591 errors:0 dropped:3640 overruns:0 frame:0
TX packets:19296 errors:0 dropped:0 overruns:0 carrier:0
collisions:0 txqueuelen:1000
RX bytes:264260788 (252.0 MiB) TX bytes:2372380 (2.2 MiB)
Interrupt:234 Base address:0x2000
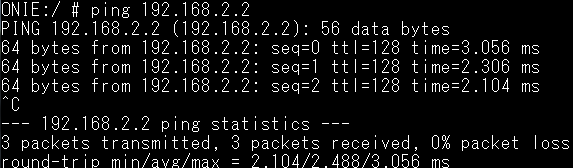
ONIE:/ # ping 188.188.1.1
PING 188.188.1.1 (188.188.1.1): 56 data bytes
64 bytes from 188.188.1.1: seq=0 ttl=64 time=0.656 ms
64 bytes from 188.188.1.1: seq=1 ttl=64 time=0.279 ms
64 bytes from 188.188.1.1: seq=2 ttl=64 time=0.323 ms
64 bytes from 188.188.1.1: seq=3 ttl=64 time=0.332 ms
^C
--- 188.188.1.1 ping statistics ---
4 packets transmitted, 4 packets received, 0% packet loss
round-trip min/avg/max = 0.279/0.370/0.656 ms
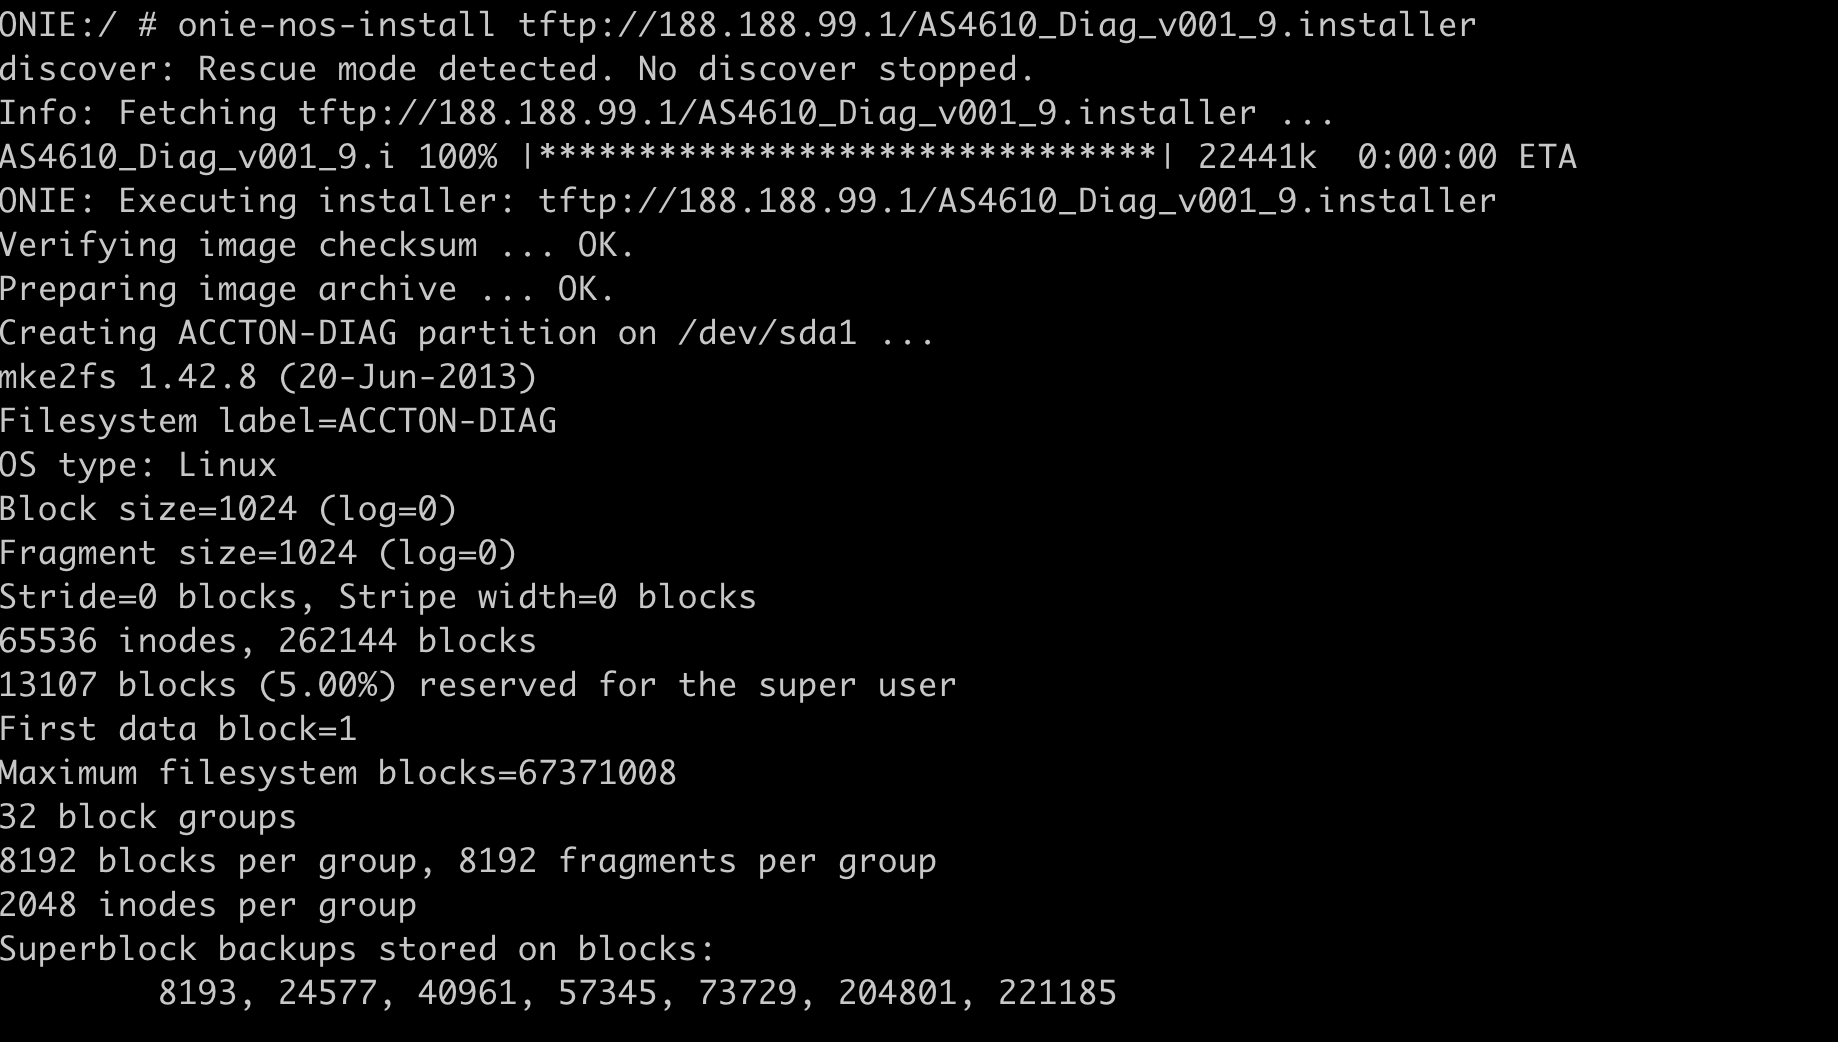
3. Input "onie-nos-install [TFTP location]" command and the installation will start.
ONIE:/ # onie-nos-install tftp://188.188.99.1/AS4610_Diag_v001_9.installer
- FTP
1. Please connect to the FTP server with Mgmt port. (e.g., AS4610-30T)
Note: Please use 1G port.
2. Set the IP address in ONIE and try to ping the FTP server. (Server IP: 188.188.184.1)
ONIE:/ # ifconfig eth0 188.188.184.123 netmask 255.255.0.0

ONIE:/ # ifconfig
eth0 Link encap:Ethernet HWaddr 3C:2C:99:41:46:60
inet addr:188.188.184.123 Bcast:188.188.255.255 Mask:255.255.0.0
inet6 addr: fe80::3e2c:99ff:fe41:4660/64 Scope:Link
UP BROADCAST RUNNING MULTICAST MTU:1500 Metric:1
RX packets:5587000 errors:0 dropped:8511 overruns:0 frame:0
TX packets:4441 errors:0 dropped:0 overruns:0 carrier:0
collisions:0 txqueuelen:1000
RX bytes:741003969 (706.6 MiB) TX bytes:436150 (425.9 KiB)
Interrupt:234 Base address:0x2000

ONIE:/ # ping 188.188.184.1
PING 188.188.184.1 (188.188.184.1): 56 data bytes
64 bytes from 188.188.184.1: seq=0 ttl=128 time=0.505 ms
64 bytes from 188.188.184.1: seq=1 ttl=128 time=0.284 ms
64 bytes from 188.188.184.1: seq=2 ttl=128 time=0.314 ms
^C
--- 188.188.184.1 ping statistics ---
3 packets transmitted, 3 packets received, 0% packet loss
round-trip min/avg/max = 0.284/0.367/0.505 ms
3. Input "onie-nos-install [FTP account:password@location]" command and the installation will start.
ONIE:/ # onie-nos-install ftp://ts:support@188.188.184.1/AS4610_Diag_v001_9.installer

- HTTP
1. Please connect to the HTTP server with Mgmt port.(e.g., AS4610-30T)
Note: Please use 1G port.
2. Set the IP address in ONIE and try to ping the HTTP server. (Server IP: 188.188.99.1)
ONIE:/ # ifconfig eth0 188.188.184.123 netmask 255.255.0.0
3. Input "onie-nos-install [HTTP URL]" command and the installation will start.
ONIE:/ # onie-nos-install http://188.188.99.1/AS4610_Diag_v001_9.installer
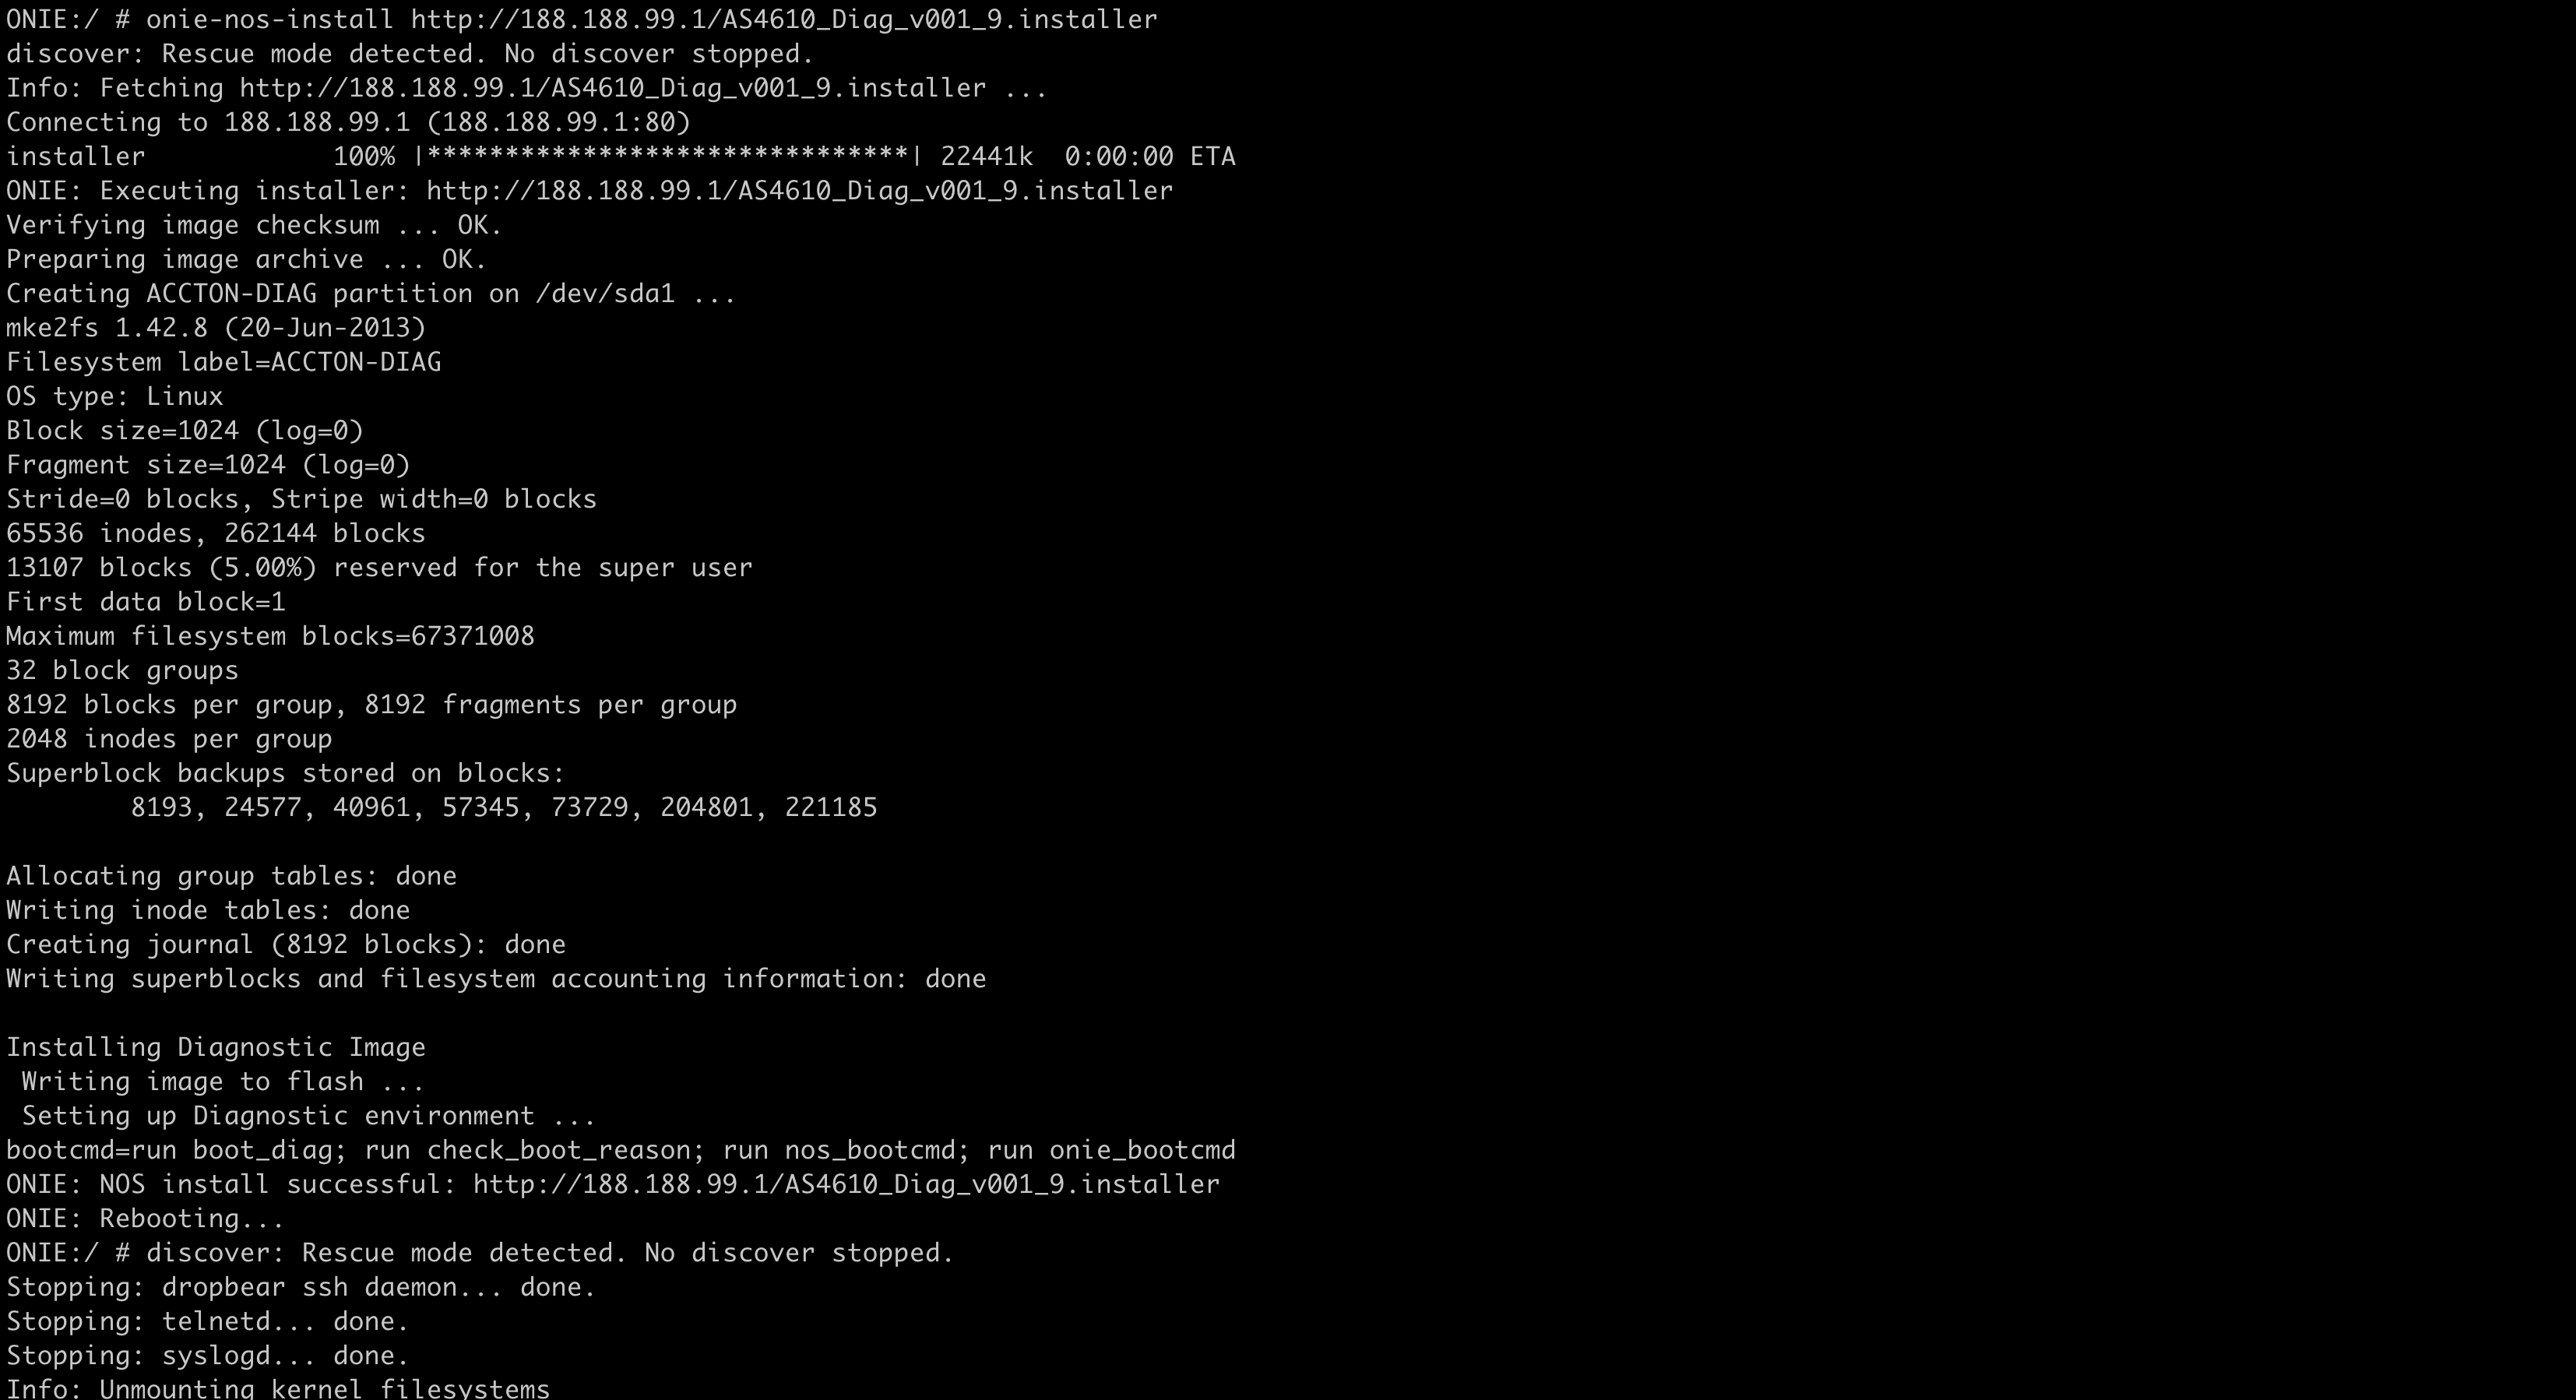
STEP4. After rebooting, press "any key" to enter the U-Boot mode again and execute "run diag_bootcmd", then you can use the Accton-Diag now.
accton_as4610-30-> run diag_bootcmd
Purpose:
This post shows the procedures to update BMC.
Two methods. 1. BMC updater 2. Web interface.
Model:
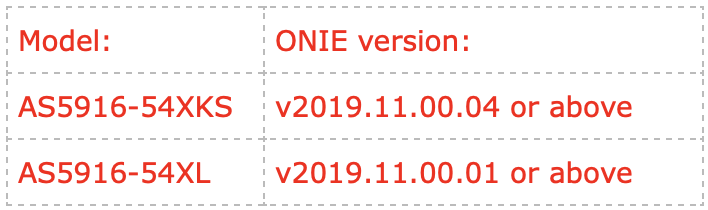
AS5916-54XKS, AS5916-54XL
AS7316-26XB
Preparation:
A. Personal computer
B. BMC updater or BMC bin file.
- Download the BMC updater or BMC bin file for your own device.
- Reference: How to download the current firmware?
Note: If you want to use the updater to update BMC, ONIE version should refer to the form.
C. Serial Console cable:
- A cable which attached in the original box.
D. Console terminal:
- Putty,Teraterm,SecureCRT,etc...
E. TFTP or HTTP server:
F. Web browser:
- Chrome, Opera, Safari, etc..
Procedure:
====================1. BMC updater====================
STEP1. Plugin the ethernet cable to the MGMT on the front panel of chassis. (e.g., AS5916-54XL)

STEP2. Plugin the console cable into console port on the front panel of chassis. (e.g., AS5916-54XL)

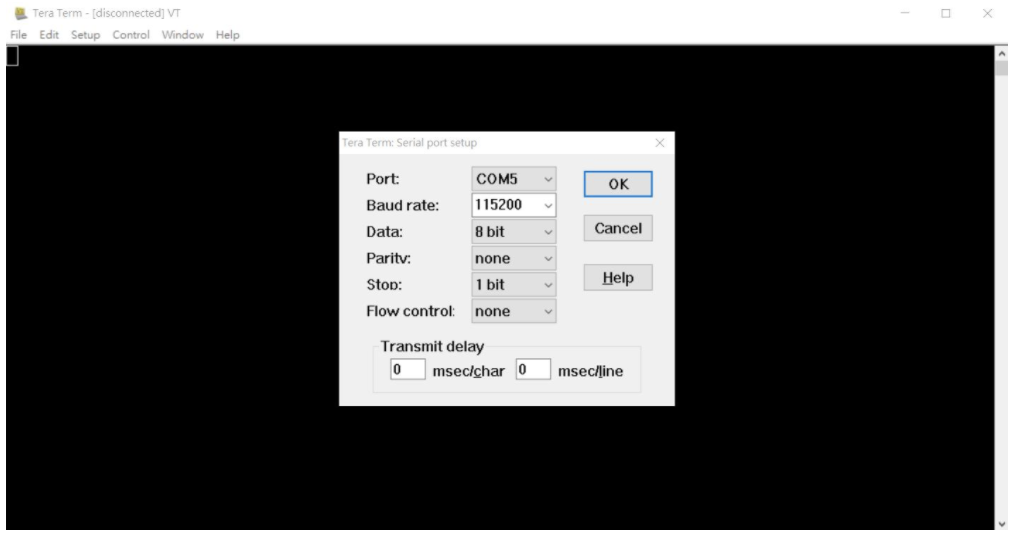
STEP3. Open the terminal. (e.g., Teraterm)
Note: Please set the baud rate as 115200
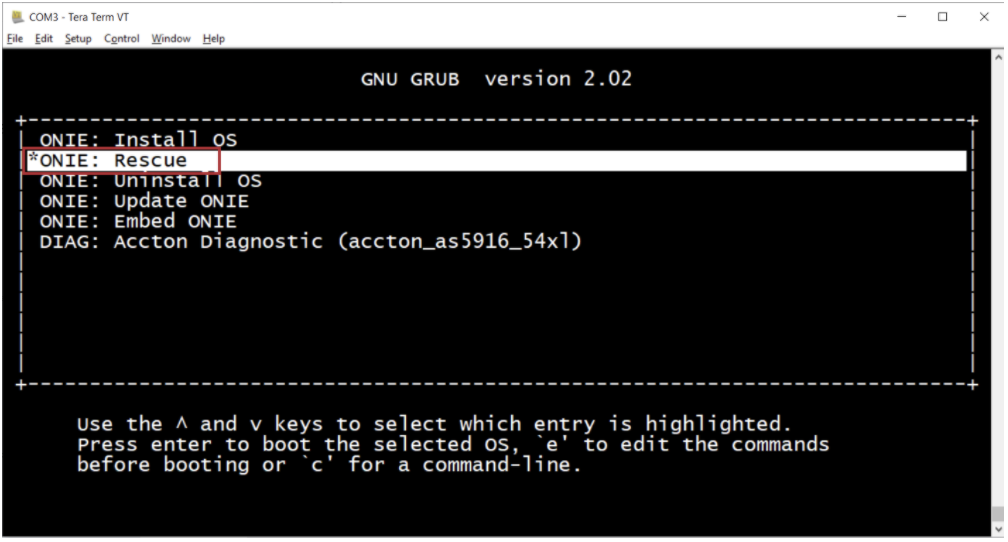
STEP4. Reboot the chassis and enter the "Onie: Rescue " mode.
STEP5. Assigned an IP address that can negotiate with TFTP or HTTP server.
ONIE:/ # ifconfig eth0 188.188.184.100 netmask 255.255.0.0
ONIE:/ # ifconfig eth0
eth0 Link encap:Ethernet HWaddr B8:6A:97:70:D4:F1
 inet addr:188.188.184.100 Bcast:188.188.255.255 Mask:255.255.0.0
 inet6 addr: fe80::ba6a:97ff:fe70:d4f1/64 Scope:Link
 UP BROADCAST RUNNING MULTICAST MTU:1500 Metric:1
 RX packets:5912 errors:0 dropped:0 overruns:0 frame:0
 TX packets:18 errors:0 dropped:0 overruns:0 carrier:0
 collisions:0 txqueuelen:1000
 RX bytes:440628 (430.3 KiB) TX bytes:2796 (2.7 KiB)

ONIE:/ # ping 188.188.99.1  //TFTP or HTTP server
PING 188.188.99.1 (188.188.99.1): 56 data bytes
64 bytes from 188.188.99.1: seq=0 ttl=64 time=0.404 ms
64 bytes from 188.188.99.1: seq=1 ttl=64 time=0.234 ms
^C
--- 188.188.99.1 ping statistics ---
2 packets transmitted, 2 packets received, 0% packet loss
round-trip min/avg/max = 0.234/0.319/0.404 ms
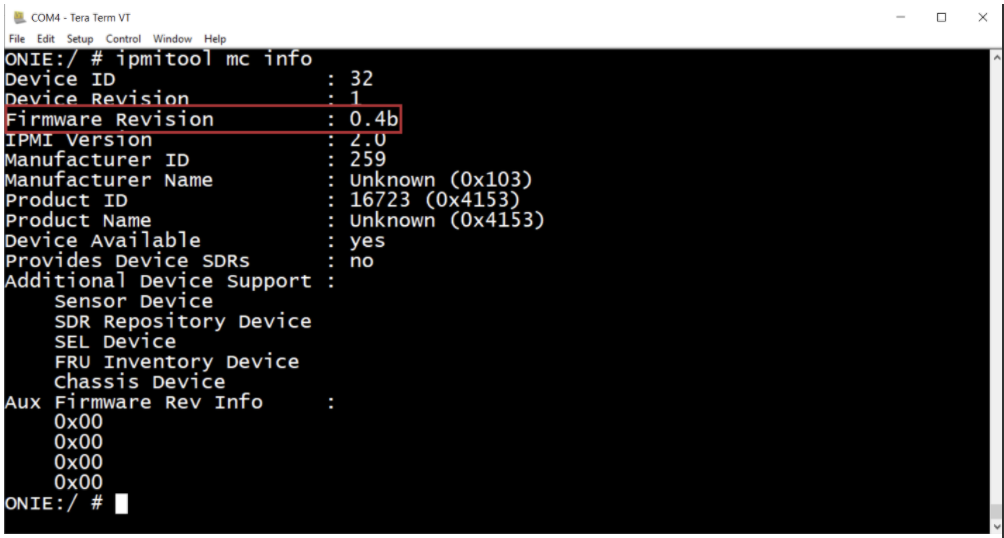
STEP6. Check the BMC version first. (0.52)
ONIE:/ # ipmitool mc info
Device ID : 32
Device Revision : 1
Firmware Revision : 0.52
IPMI Version : 2.0
Manufacturer ID : 259
Manufacturer Name : Unknown (0x103)
Product ID : 16723 (0x4153)
Product Name : Unknown (0x4153)
Device Available : yes
Provides Device SDRs : no
Additional Device Support :
 Sensor Device
 SDR Repository Device
 SEL Device
 FRU Inventory Device
 Chassis Device
Aux Firmware Rev Info :
 0x00
 0x00
 0x00
STEP7. Execute "onie-self-update + [FILE location]". (e.g., http)
ONIE:/ # onie-self-update http://188.188.99.1/as5916-54xl_bmc_v00.53.00h_firmimg_20200409.updater
discover: Rescue mode detected. No discover stopped.
Info: Attempting http://188.188.99.1/as5916-54xl_bmc_v00.53.00h_firmimg_20200409.updater ...
Connecting to 188.188.99.1 (188.188.99.1:80)
installer 100% |*******************************| 16569k 0:00:00 ETA
ONIE: Executing installer: http://188.188.99.1/as5916-54xl_bmc_v00.53.00h_firmimg_20200409.updater
Verifying image checksum ... OK.
Preparing image archive ... OK.
BMC Firmware : Version : 00.53.00h
BMC Updater : Architecture : x86_64
BMC Updater : Machine : accton_as5916_54xl
BMC Updater : Machine Rev : 0
.
. --------omit---------
.
Updating BMC firmware via HTTP ...

=== Accton Firmware Update version 1.3 ===

=== Update BMC 192.168.1.18 ===
=== FW <<as5916-54xl_bmc_v00.53.00h_firmimg_ast2400.bin>> ===
=== without preserve config ===
=== Get SessionID ===
=== Upload BMC FW ===
=== Set BMC's earse flag ===
=== Start upate BMC FW ===
=== In Progress ===
Waiting BMC reboot
 === Update BMC FW success !! =========
STEP8. After upgrade firmware success, the chassis will restart and boot to NOS automatically. Then, you can check the BMC version in your NOS. (e.g., ONL) or ONIE.
root@localhost:~# ipmitool mc info
Device ID : 32
Device Revision : 1
Firmware Revision : 0.53
IPMI Version : 2.0
Manufacturer ID : 259
Manufacturer Name : Unknown (0x103)
Product ID : 16723 (0x4153)
Product Name : Unknown (0x4153)
Device Available : yes
Provides Device SDRs : no
Additional Device Support :
 Sensor Device
 SDR Repository Device
 SEL Device
 FRU Inventory Device
 Chassis Device
Aux Firmware Rev Info :
 0x00
 0x00
 0x00
 0x00
====================2. Web interface====================
STEP1. Plugin the ethernet cable to the MGMT on the front panel of chassis. (e.g., AS5916-54XL)

STEP2. Plugin the console cable into console port on the front panel of chassis. (e.g., AS5916-54XL)

STEP3. Open the terminal. (e.g., Teraterm)
Note: Please set the baud rate as 115200
STEP4. Reboot the chassis and enter the "Onie: Rescue " mode.

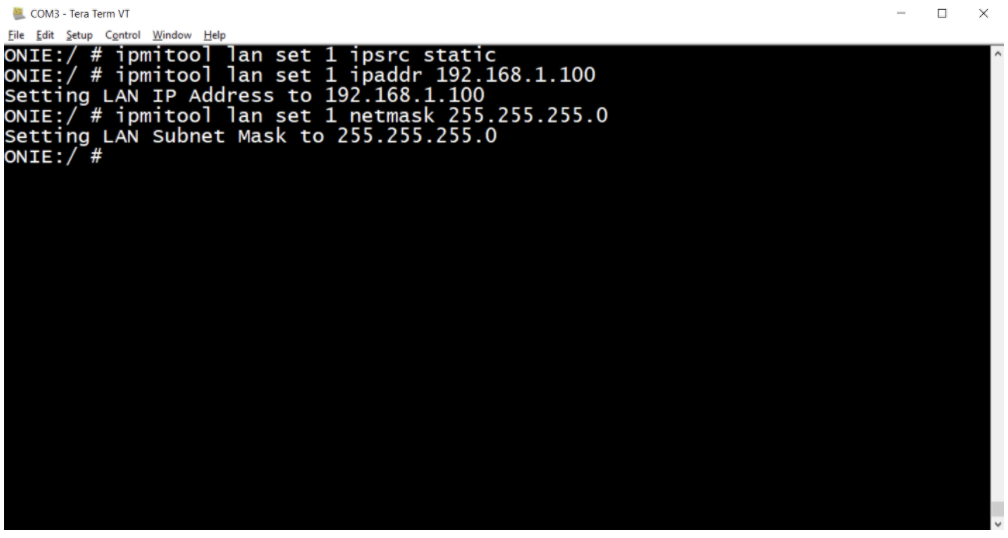
STEP5. Set the BMC IP mode, IP address, Netmask, and gateway.
ONIE:/ # ipmitool lan set 1 ipsrc static
ONIE:/ # ipmitool lan set 1 ipaddr 192.168.0.100
ONIE:/ # ipmitool lan set 1 netmask 255.255.255.0
ONIE:/ # ipmitool lan set 1 defgw ipaddr 192.168.0.254
STEP6. Check the current status of BMC IP.
ONIE:/ # ipmitool lan print

STEP7. Open a web browser to login to BMC web interface. (e.g., Chrome, URL: https://192.168.0.100/)
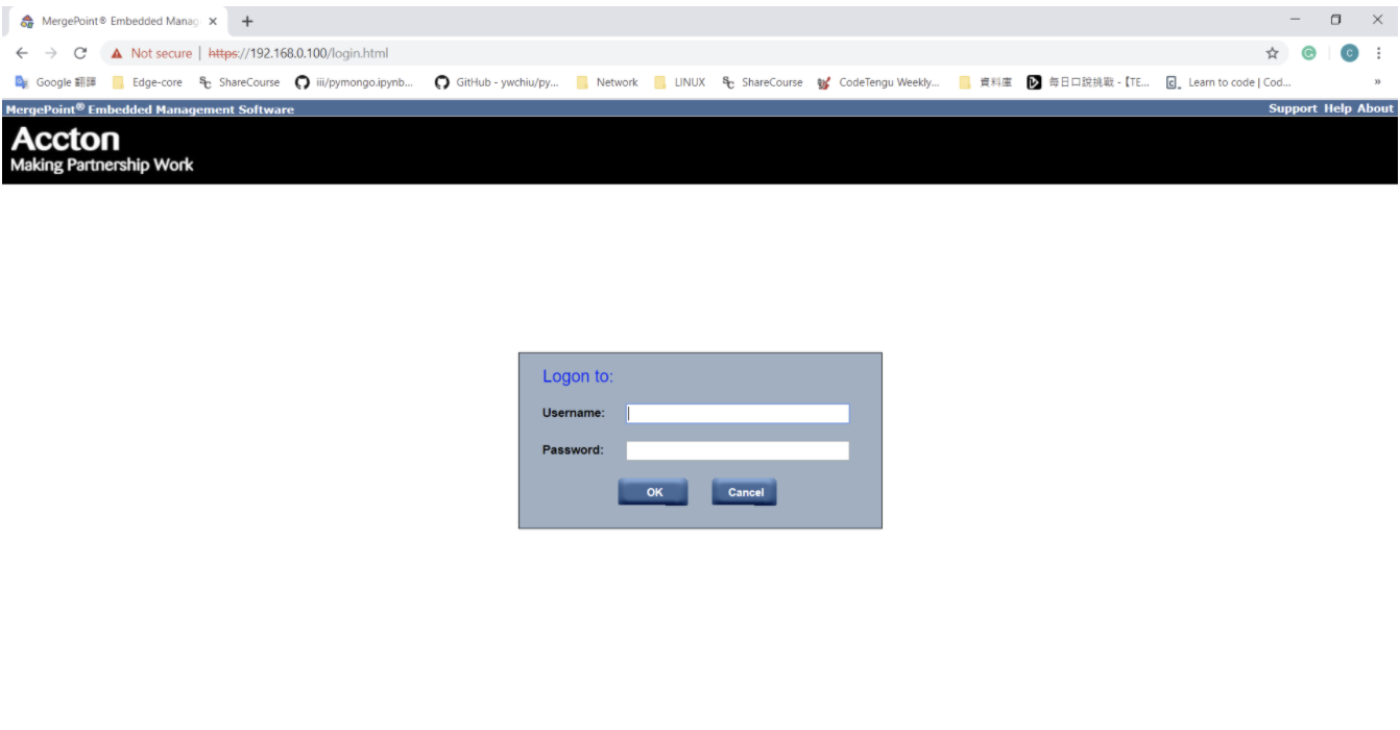
Note: Please allow going on the web page manually, because the web browser will determine that it is not secure.
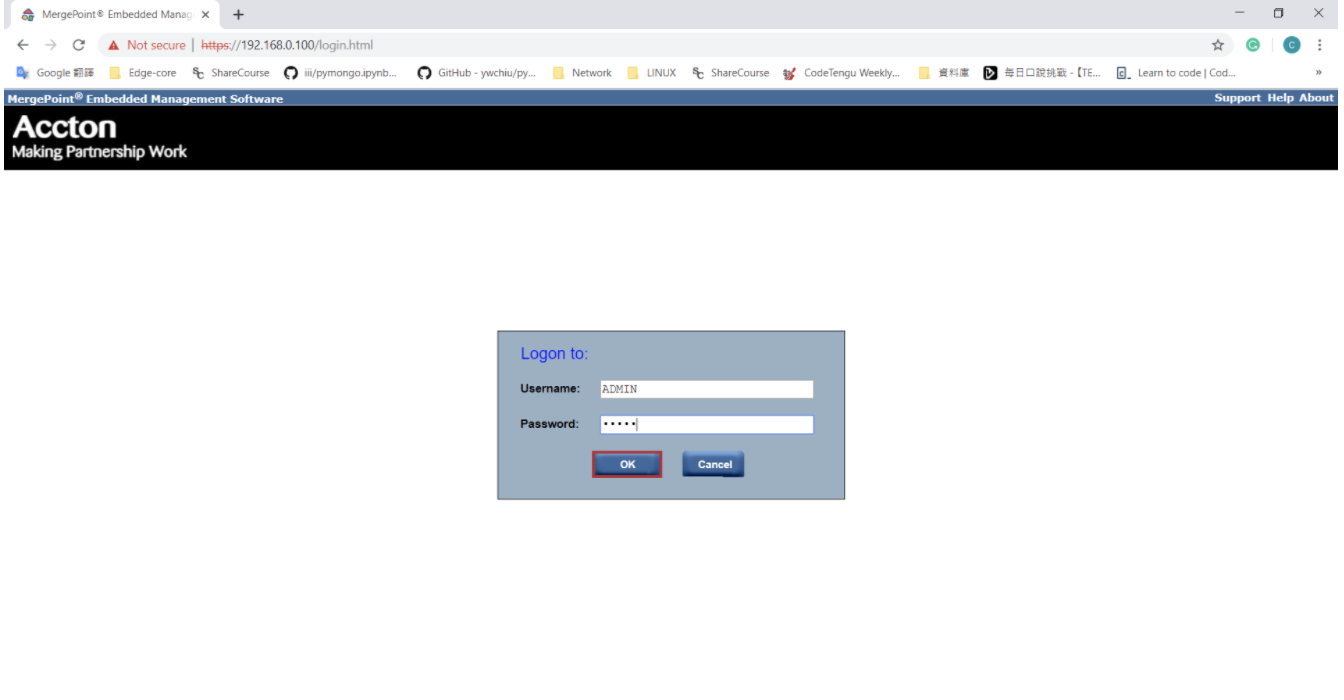
STEP8. Enter the default "Username" and "Password" then click "OK".
Username: ADMIN
Password: ADMIN
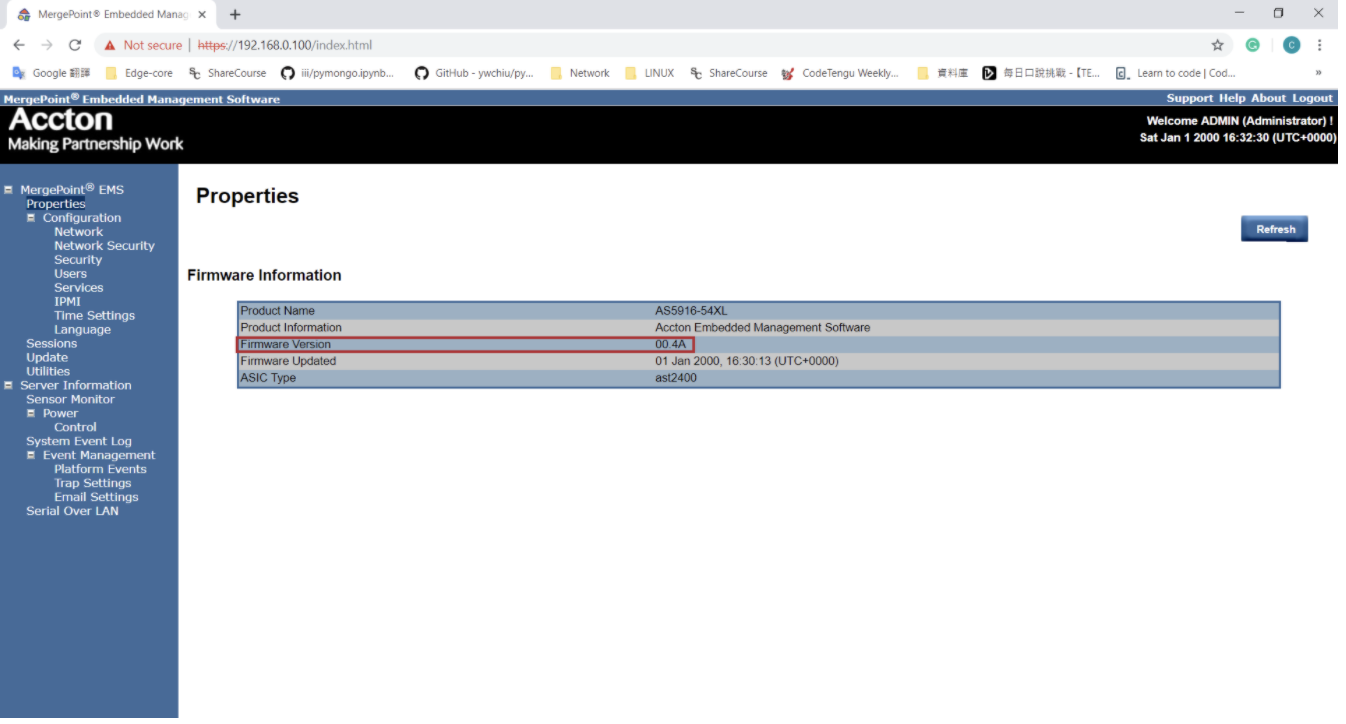
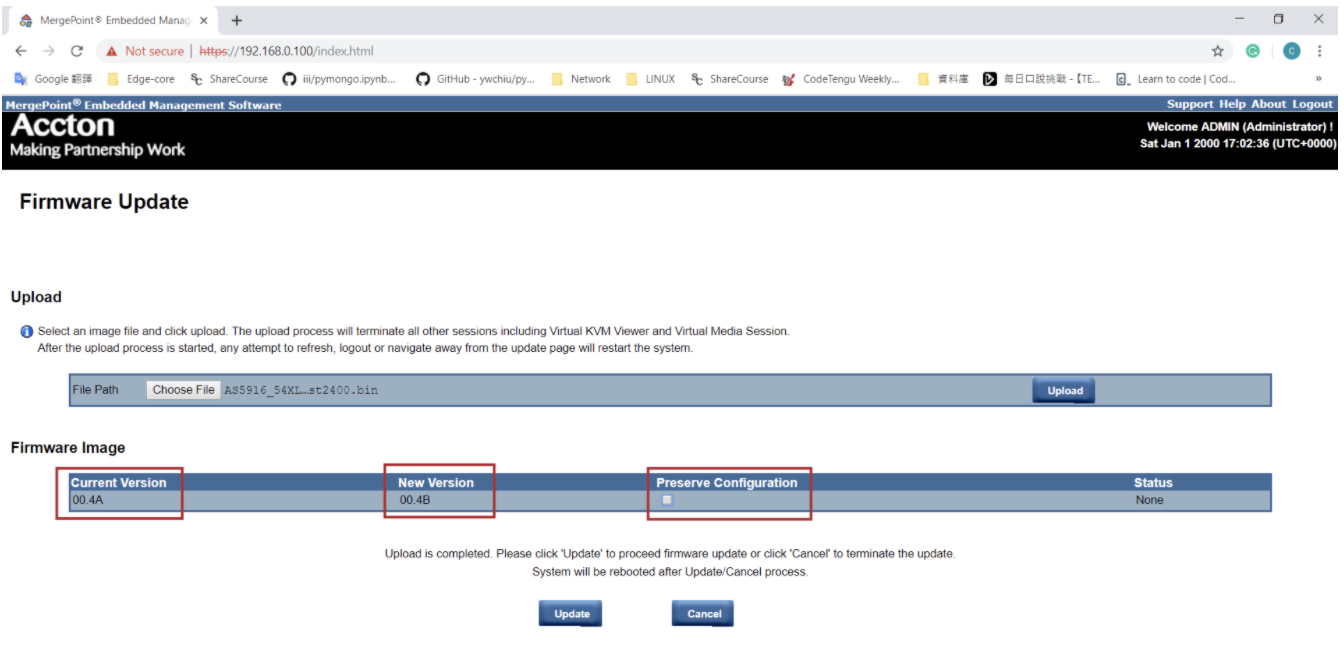
STEP9. The "Properties" page is displayed the current version of BMC, it showed hexadecimal. (e.g., Firmware version: 00.4A)
STEP10. Click the "update" option and click “Choose File” then choose the firmware image file. (e.g., AS5916_54XL_BMC_v00_4Bh_firmimg_ast2400.bin)
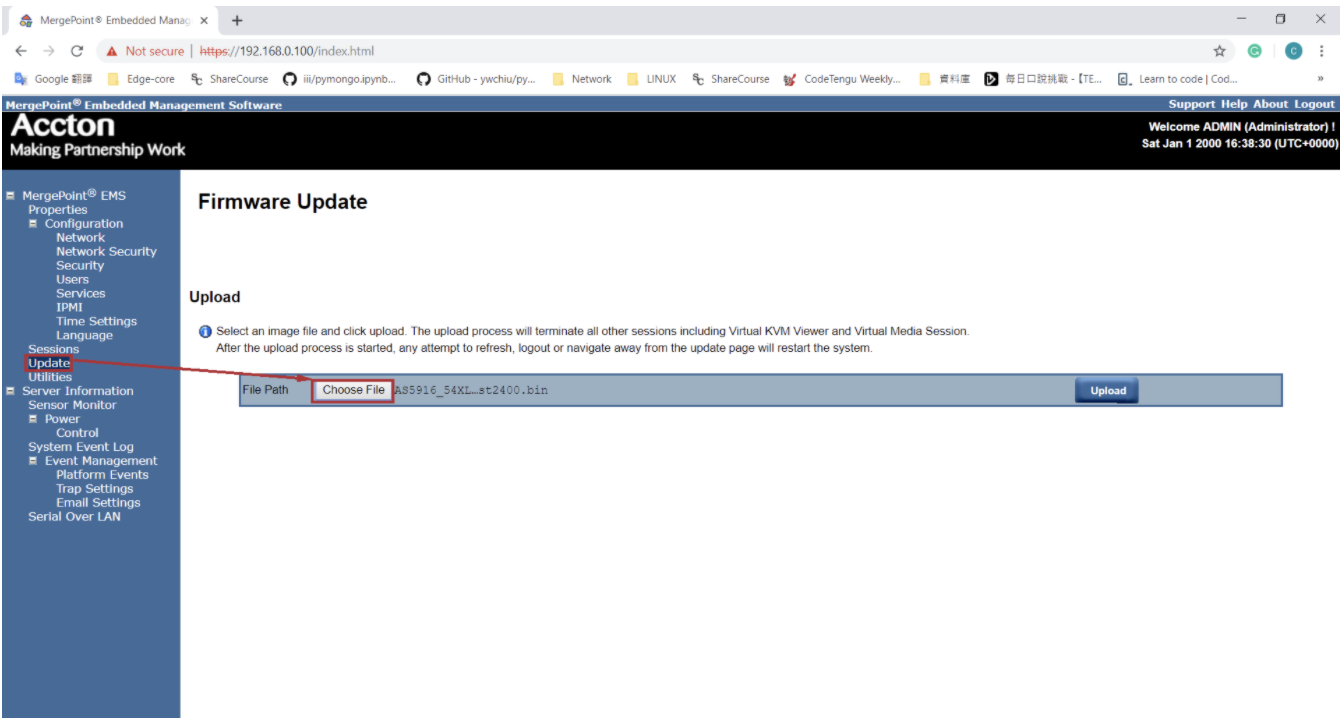
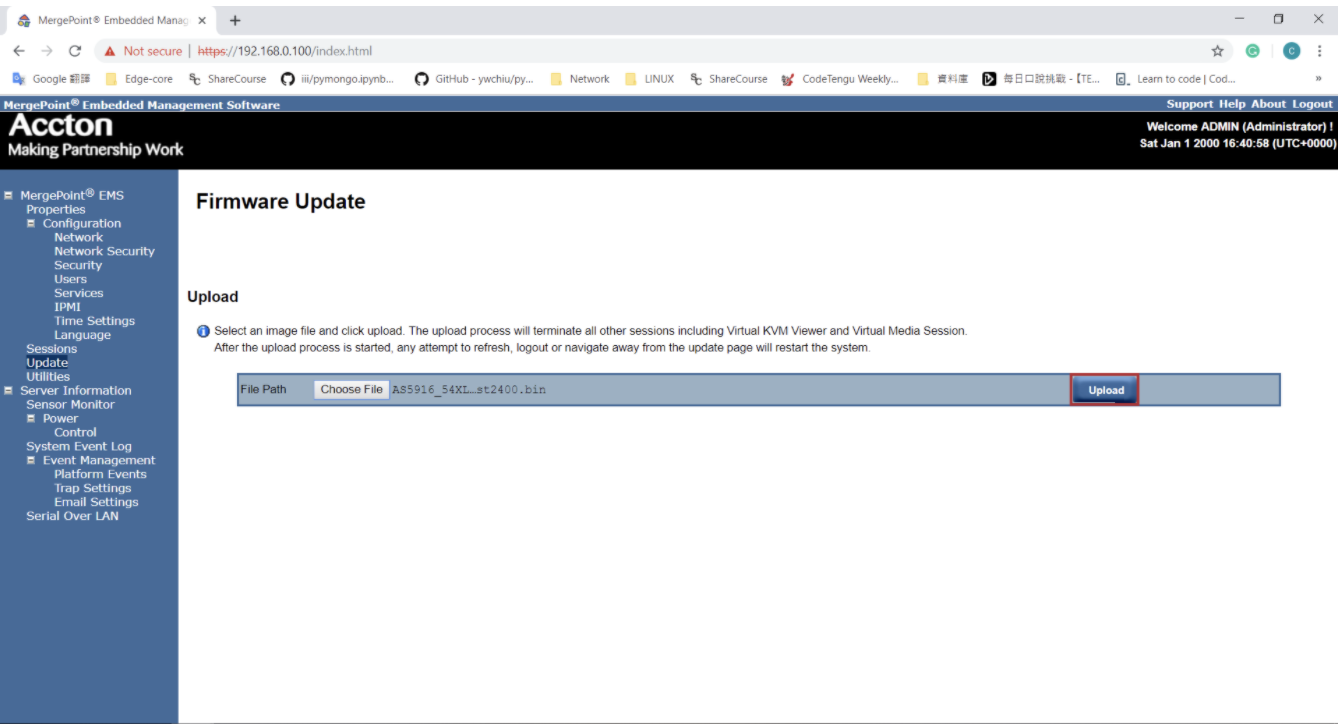
STEP11. After seeing the firmware image file chosen, click “Upload” option.
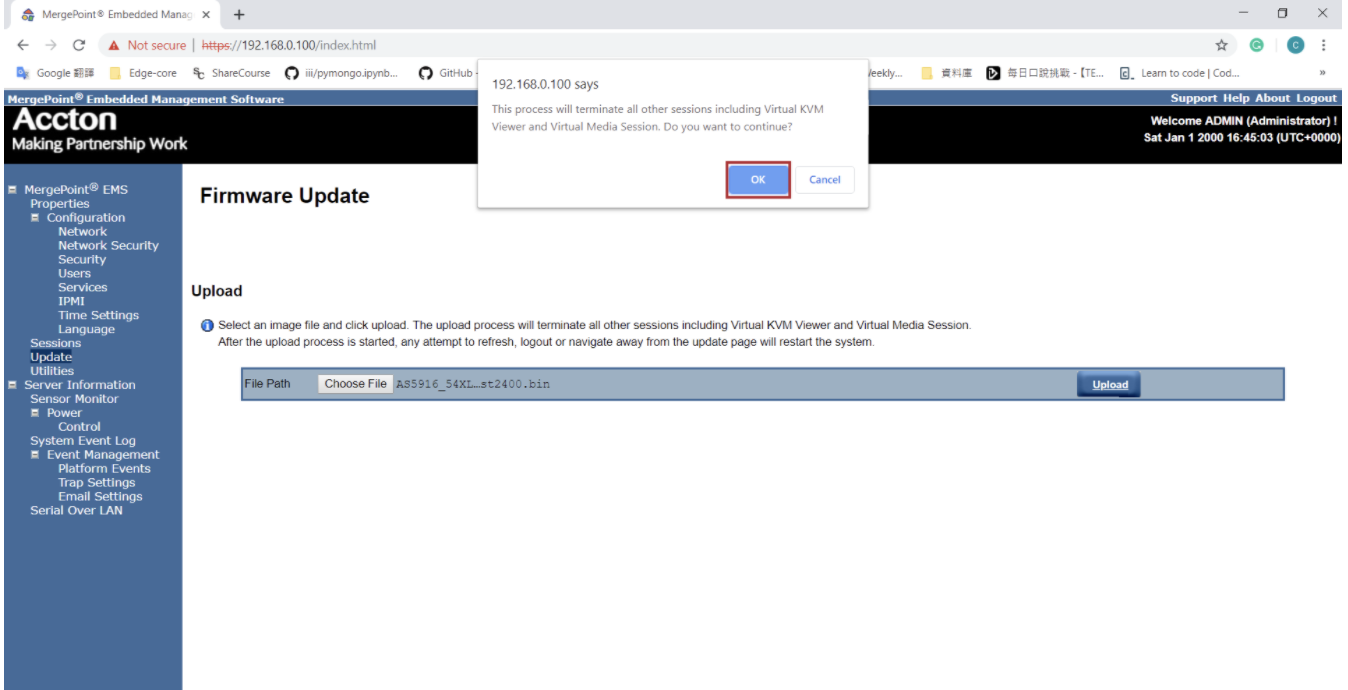
STEP12. When prompted, click “OK” to start the upload.
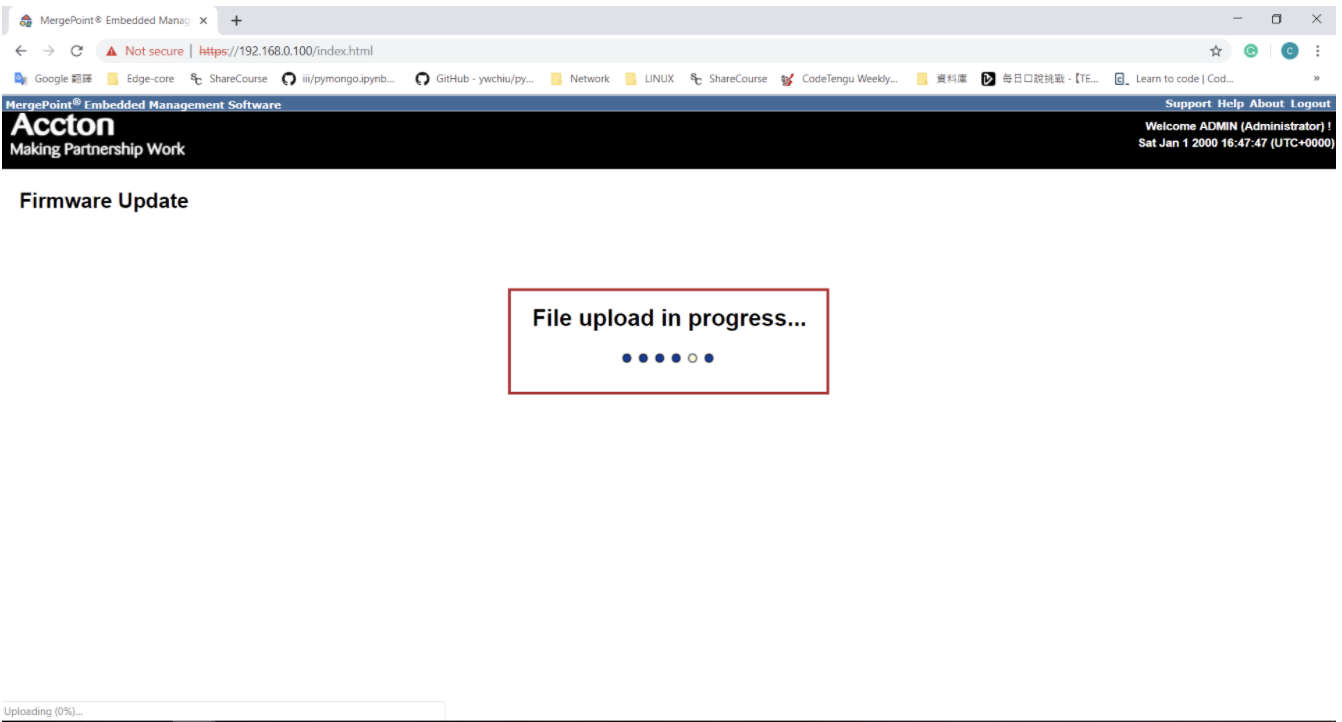
STEP13. Please wait for the several minutes when showing upload is in progress.
STEP14. The web interface will show the current version and the new version when the upload is completed.
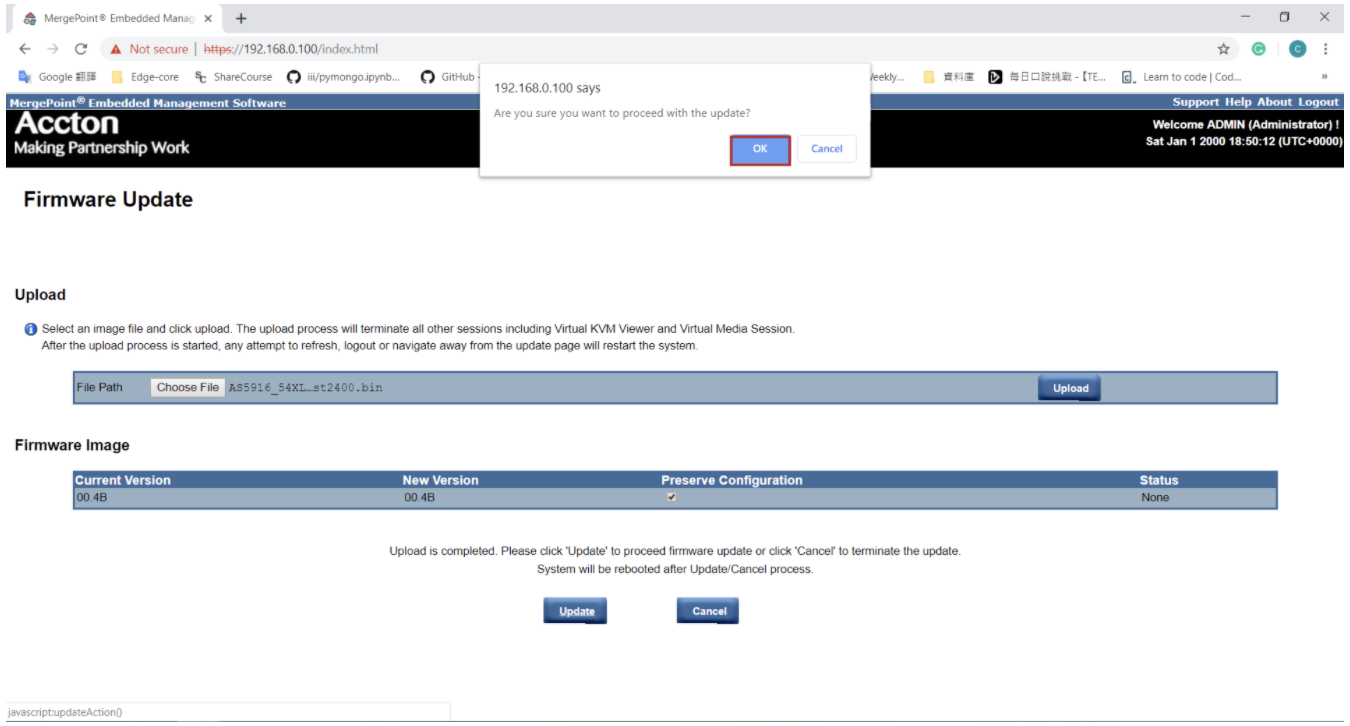
STEP15. Uncheck the “Preserve Configuration” option. Then, click "update" option below the button.
Note: “Preserve Configuration” is enabled by default, please disable the “preserve configuration” when updating the firmware.

STEP16. When prompted, click “OK” to start the update.
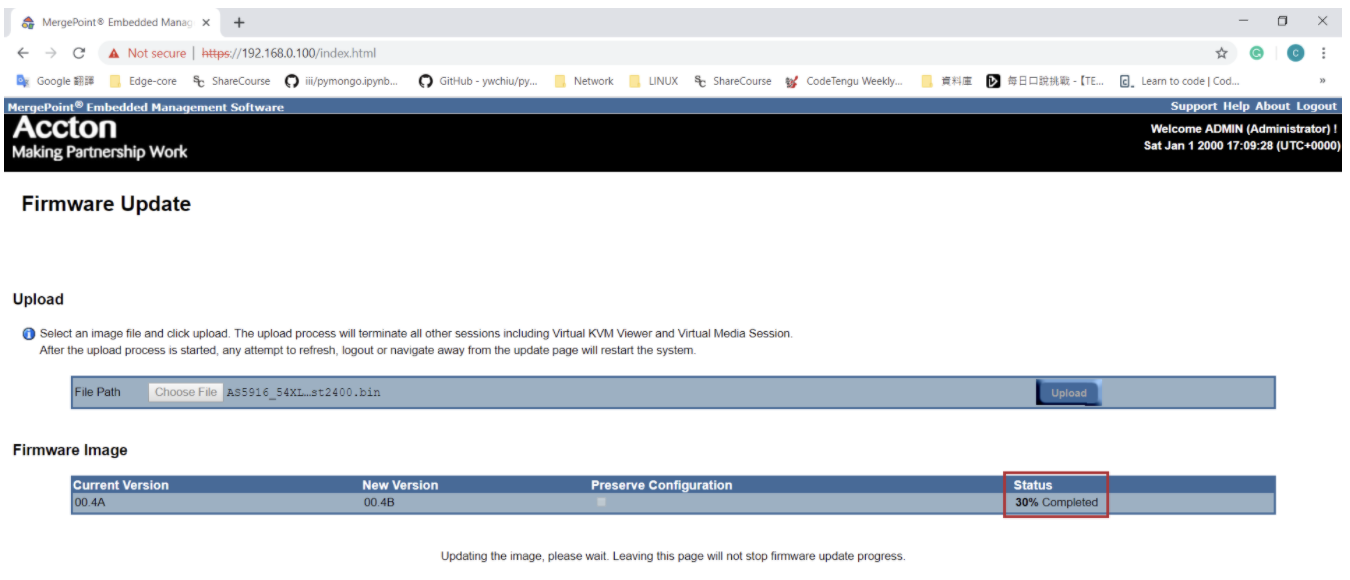
STEP17. Wait for the update process until 100% completed.
STEP18. Refresh the BMC web interface again and check the firmware version.
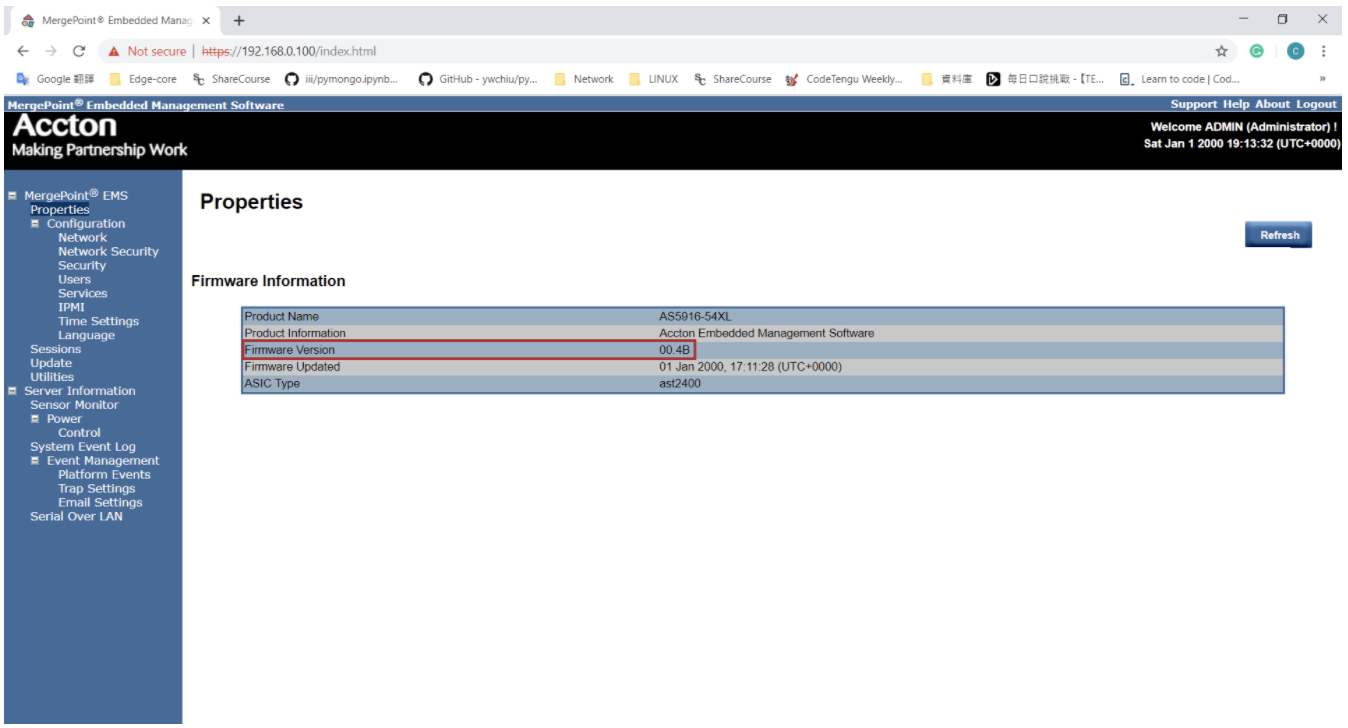
STEP19. You could also use the "ipmitool mc info" command under the ONIE to check the current firmware version.
ONIE:/ # ipmitool mc info
Purpose:
This post shows the procedures to recover ONIE on Edgecore x86 platform switch via USB Drive.
Model:
AS5712-54X
AS5812-54X,AS5812-54T
AS5912-54X
AS5916-54XL, AS5916-54XKS
AS6712-32X
AS6812-32X
AS7312-54XS
AS7316-26XB
AS7712-32X
AS7816-64X
Preparation:
A. Personal computer:
B. Storage Device:
- USB Drive * 1 (Please check that the USB drive with a minimum size of 256M and need to back up any files you want to keep.)
C. Serial Console cable:
- A cable which attached in the original box.
D. Burning tools:
- Windows: Win32 Disk Imager
- MacOS: "dd", Coreutils
- Linux: "dd", Coreutils
E. ISO Image:
- Download the ONIE ISO image for your own device.
- Reference: How to download the current firmware?
F. A console terminal
- Putty,Teraterm,SecureCRT,etc...
Procedure:
STEP1. Burn the ONIE ISO file to the USB drive. (Please choose the operating software you need)
Windows:
1. Insert the USB drive to your PC or laptop.
2. Double click the application icon.

3. Select the device which you insert in. (e.g., E:\)
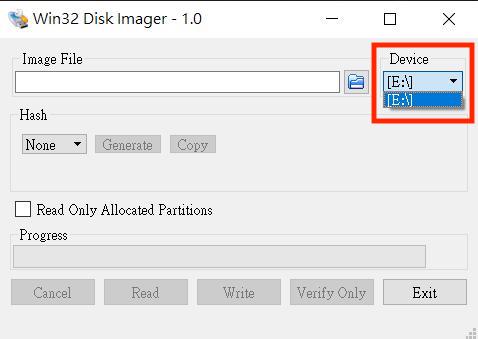
4. Click the file icon.
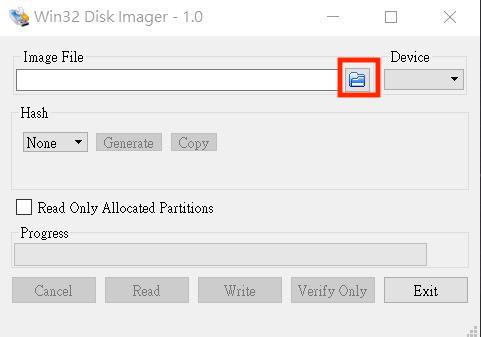
5. Select the filename extension to "*".
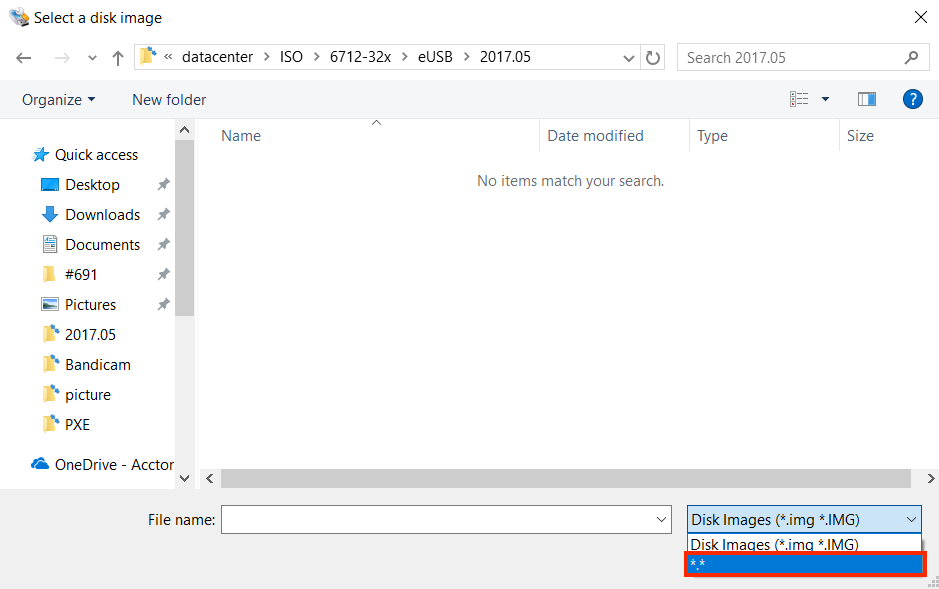
6. You will see the ISO image file and then open it.
7. Select "write" icon to burn the ISO to the USB drive.
8. There will be a message popping up, just click yes then start burning.
9. You will see the successful message while the process is done.
MacOS:
1. Insert the USB drive to iMac or Macbook.
2. Input "diskutil list" command on terminal to check the local disks and volumes. (e.g., /dev/disk2)
jeff-chengde-MacBook-Pro:jeff_cheng$ diskutil list
 /dev/disk0 (internal):
 #: TYPE NAME SIZE IDENTIFIER
 0: GUID_partition_scheme 1.0 TB disk0
 1: EFI EFI 314.6 MB disk0s1
 2: Apple_APFS Container disk1 1.0 TB disk0s2

 /dev/disk1 (synthesized):
 #: TYPE NAME SIZE IDENTIFIER
 0: APFS Container Scheme - +1.0 TB disk1
 Physical Store disk0s2
 1: APFS Volume Macintosh HD 144.5 GB disk1s1
 2: APFS Volume Preboot 45.2 MB disk1s2
 3: APFS Volume Recovery 522.7 MB disk1s3
 4: APFS Volume VM 5.4 GB disk1s4

 /dev/disk2 (external, physical):
 #: TYPE NAME SIZE IDENTIFIER
 0: FDisk_partition_scheme *7.9 GB disk2
3. Umount the disk with "diskutil umount [disk location]" (e.g., /dev/disk2)
jeff-chengde-MacBook-Pro:jeff_cheng$ diskutil umount /dev/disk2
Volume FDisk_partition_scheme on disk2 unmounted
4. Start burning the ISO with "sudo dd if=[.ISO file location] of=[disk location]" command.
jeff-chengde-MacBook-Pro:jeff_cheng$ sudo dd if=~/Desktop/ISO/6712-32x/mSATA/onie-recovery-x86_64-accton_as6712_32x-r0.iso of=/dev/disk2
41216+0 records in
41216+0 records out
21102592 bytes transferred in 23.526439 secs (896973 bytes/sec)
Linux:
1. Insert the USB drive to the personal computer.
2. Input "fdisk -l" command on terminal to check the local disks and volumes. (e.g., /dev/sdc)
root@jeff-D520MT-K:~# fdisk -l


Disk /dev/sdc: 7.4 GiB, 7918845952 bytes, 15466496 sectors
Units: sectors of 1 * 512 = 512 bytes
Sector size (logical/physical): 512 bytes / 512 bytes
I/O size (minimum/optimal): 512 bytes / 512 bytes
Disklabel type: gpt
Disk identifier: DB507D64-8A6E-4250-8AD7-45EECE4B4971

Device Start End Sectors Size Type
/dev/sdc1 40 409639 409600 200M EFI System
/dev/sdc2 409640 15464447 15054808 7.2G Microsoft basic data
3.Umount the disk with "umount [disk location]" (e.g., /dev/sdc)
root@jeff-D520MT-K:~# umount /dev/sdc2
4. Start burning the ISO with "sudo dd if=[.ISO file location] of=[disk location]" command.
root@jeff-D520MT-K:~# dd if=/home/jeff/ISO/6712-32x/mSATA/onie-recovery-x86_64-accton_as6712_32x-r0.iso of=/dev/sdc
41216+0 records in
41216+0 records out
21102592 bytes (21 MB, 20 MiB) copied, 3.22522 s, 6.5 MB/s
STEP2. Insert the USB drive to the data center switch. (e.g., AS6712-32X)

STEP3. Plug in the console cable into the console port. (e.g., AS6712-32x)

STEP4. Open the terminal. (e.g., Teraterm)
Note: Please set the baud rate as 115200
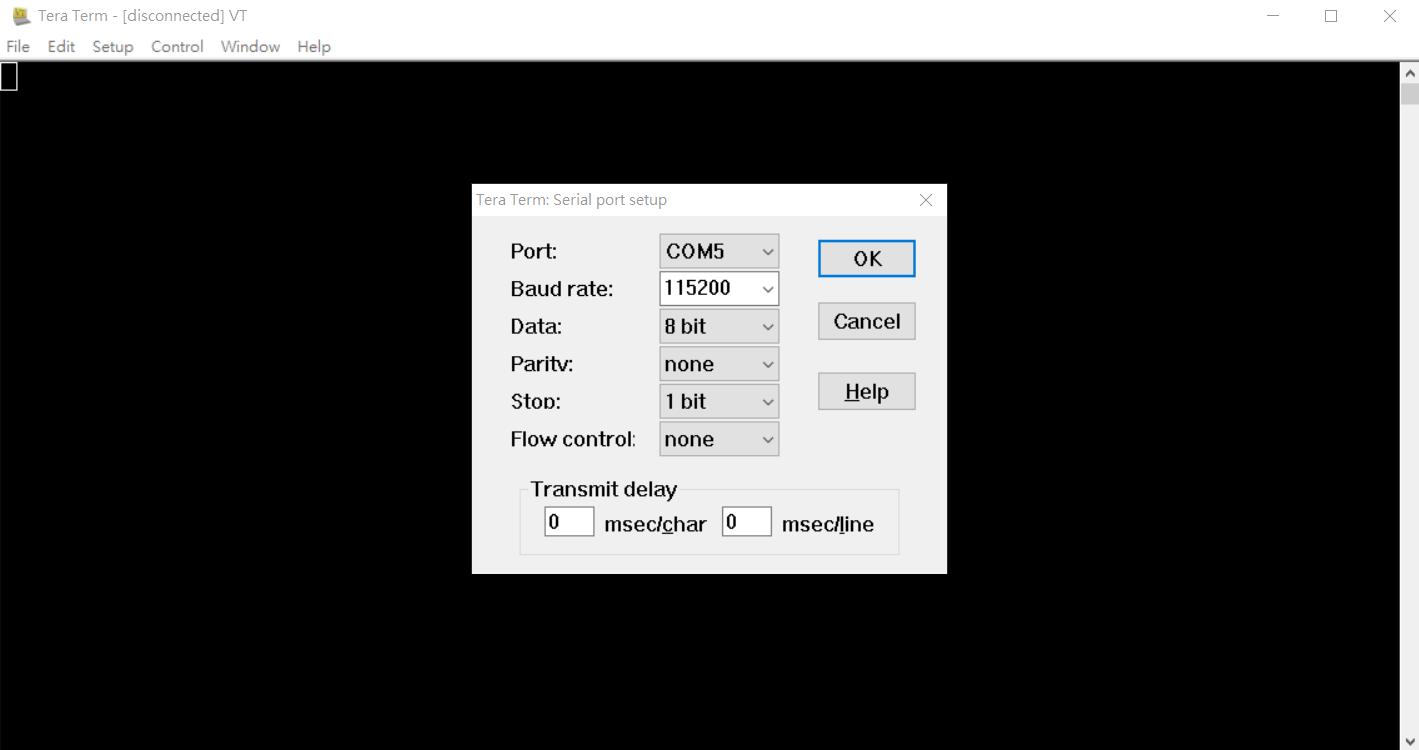
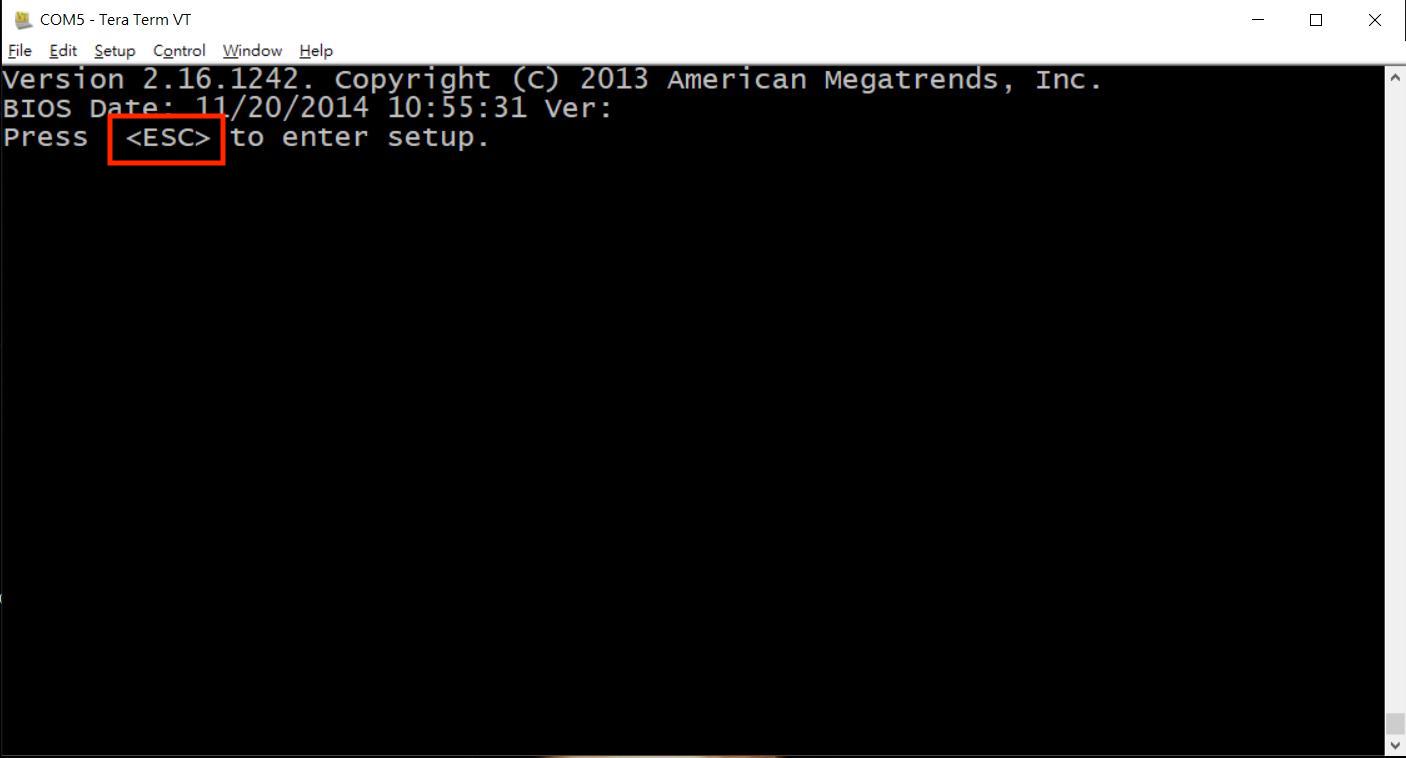
STEP5. Power on the data center switch, wait for a few seconds and press "ESC" to enter the BIOS setup.
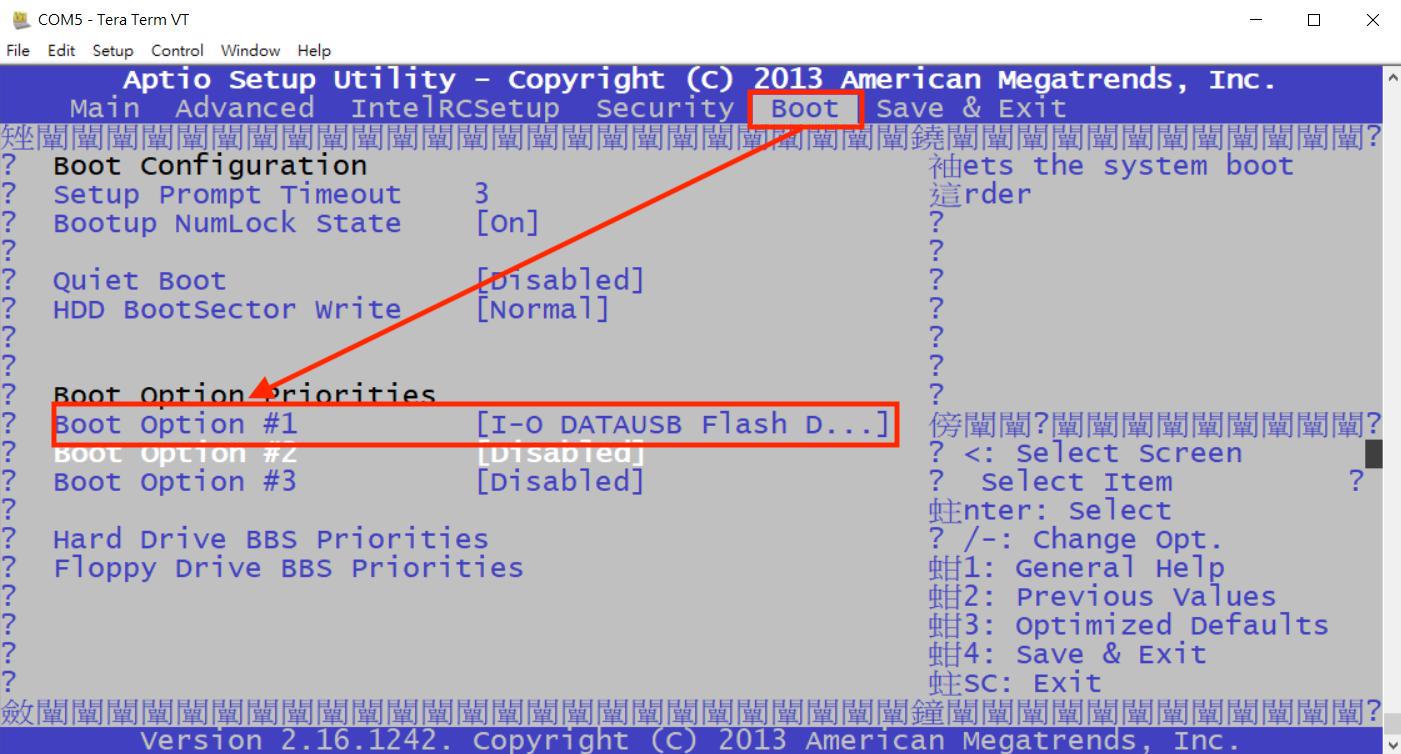
STEP6. Go to the Boot section and select the USB drive as boot option #1. (e.g., I-O DATAUSB FLASH DRIVE)
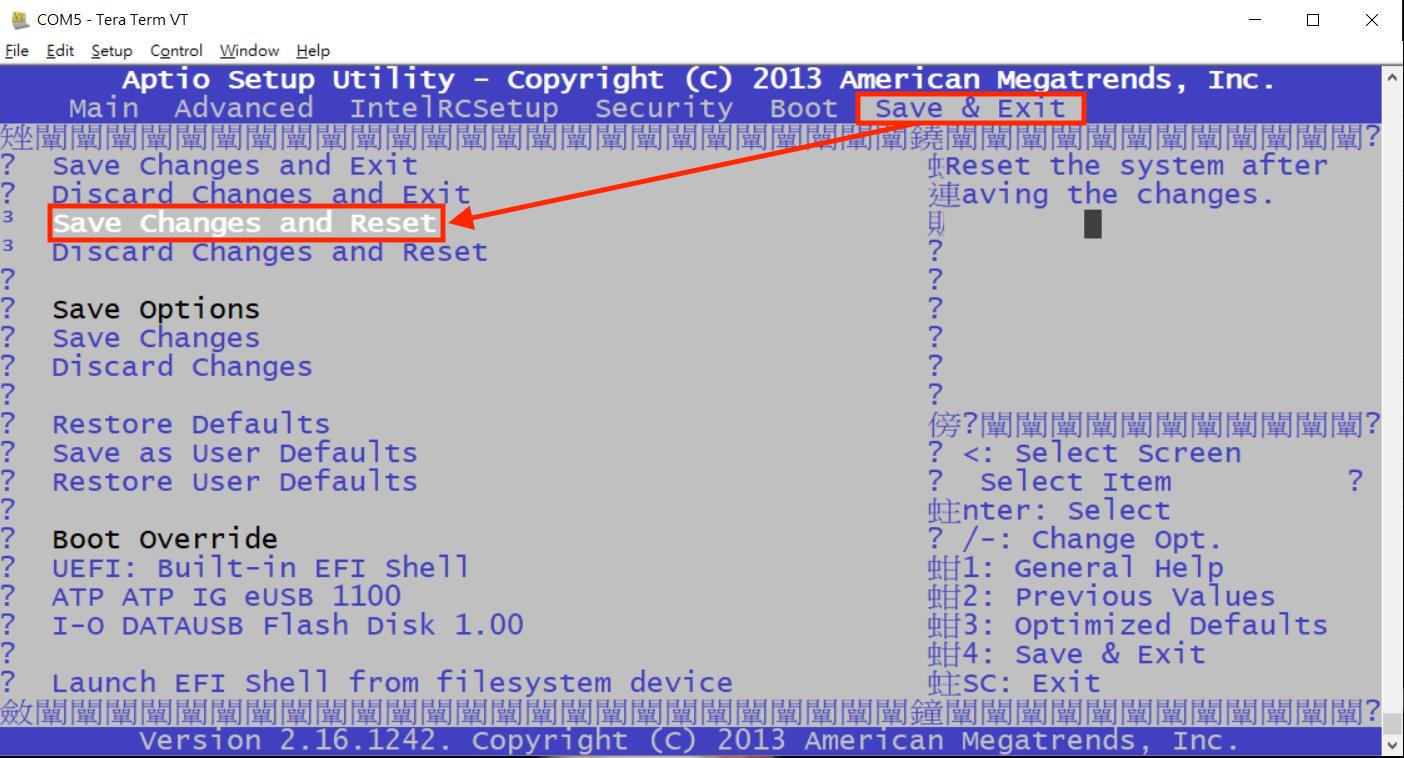
STEP7. Go to Save&Exit section, select "Save changes and Reset"
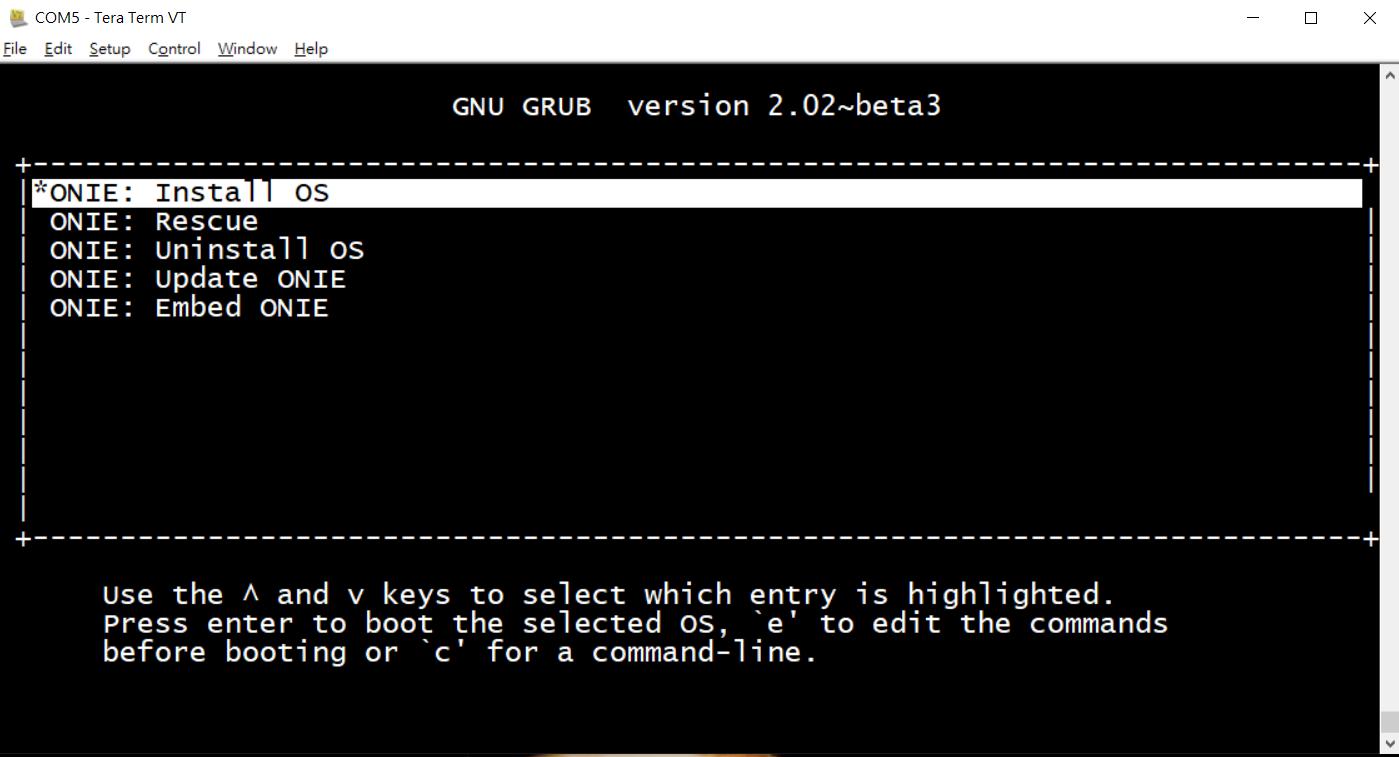
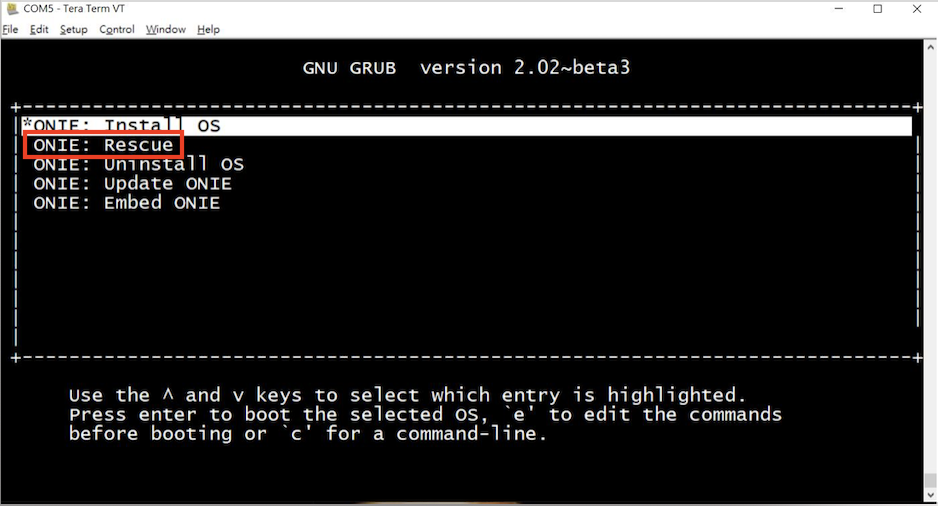
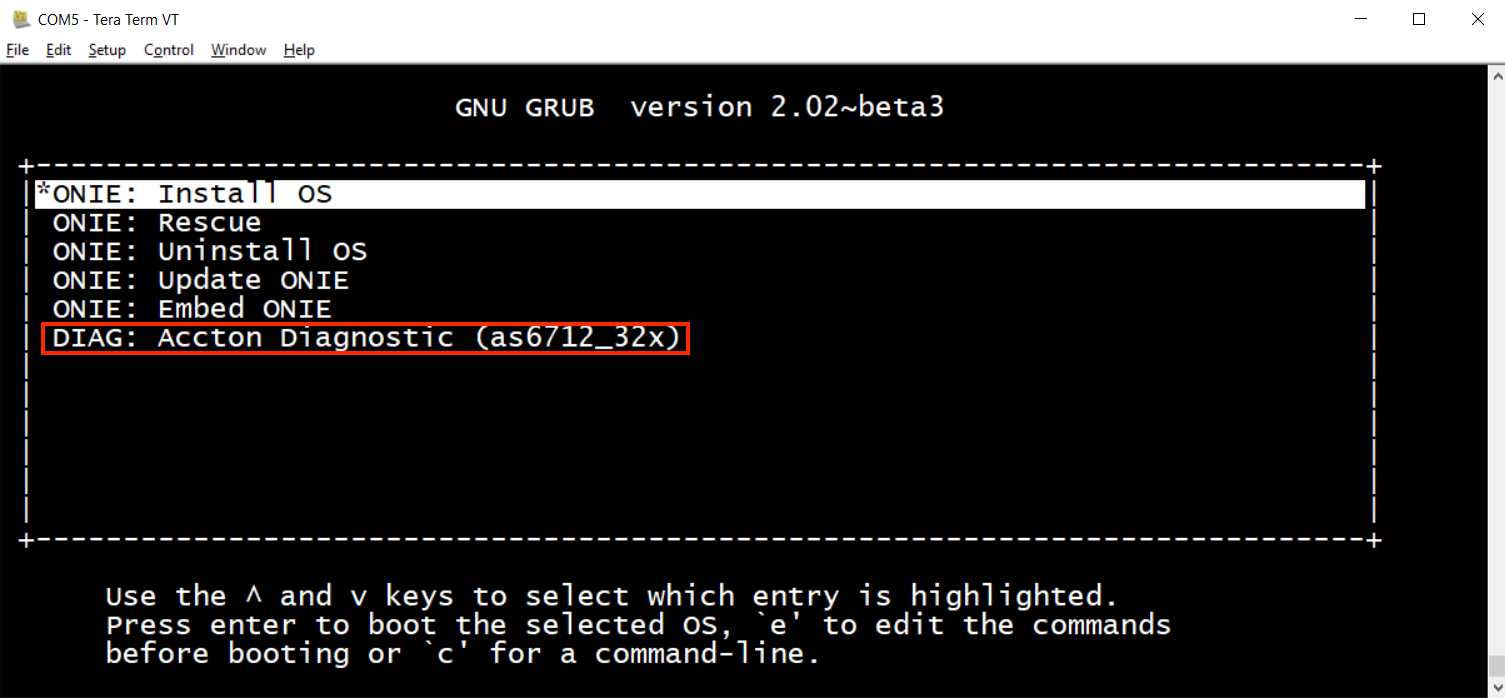
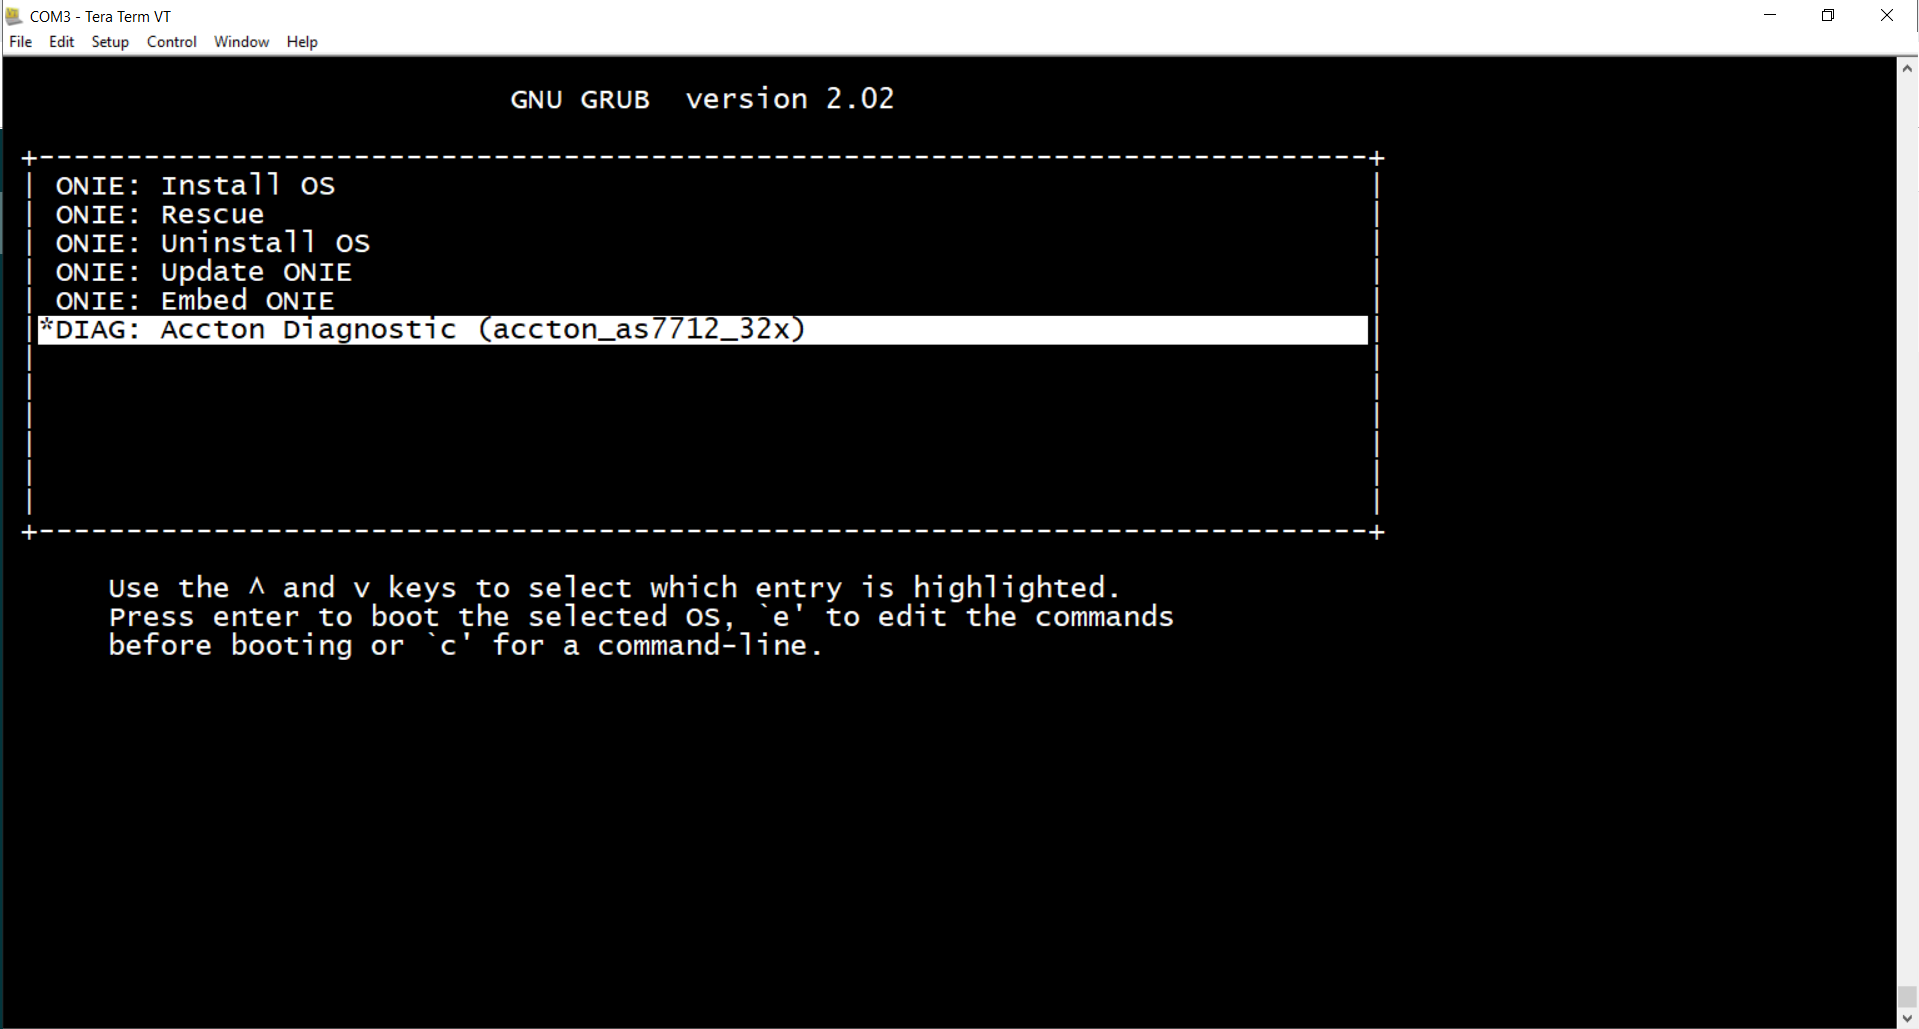
STEP8. Wait for the reset time and the ONIE Installer screen will pop up, select "ONIE: Embed ONIE", the system will start to reinstall the ONIE.

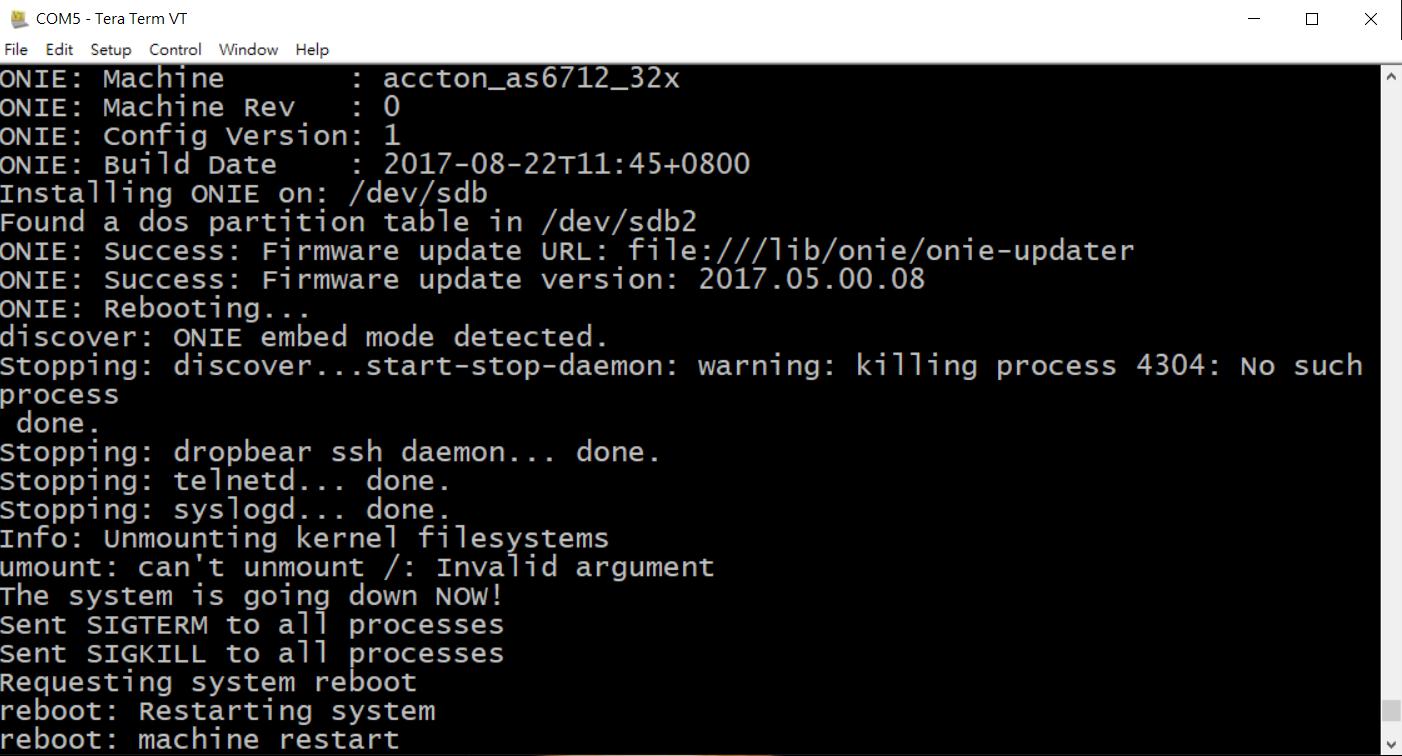
STEP9. When showing the "Installing ONIE on:/dev/sdx", the installer is almost complete. (e.g., /dev/sdb)
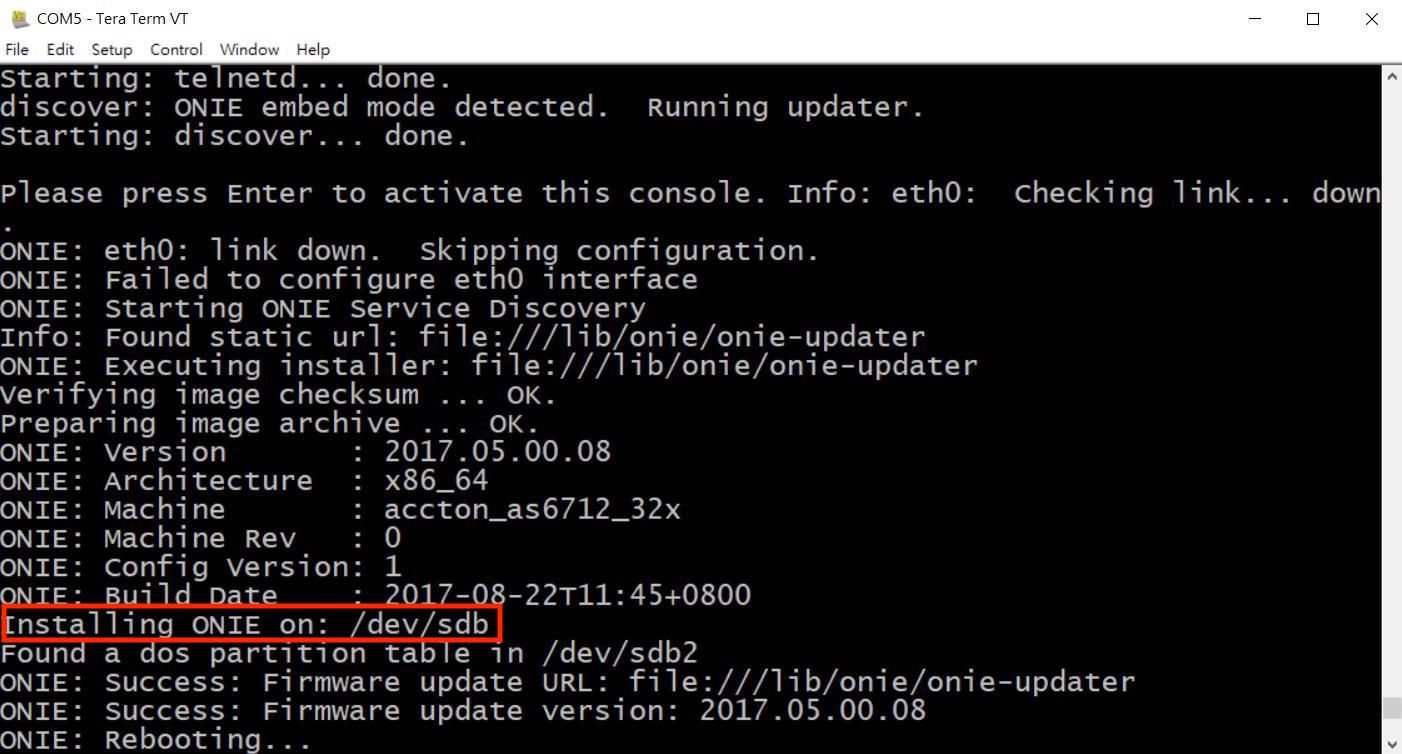
STEP10. The system will reboot after completion.
STEP11. Please follow STEP5 to go into BIOS again.
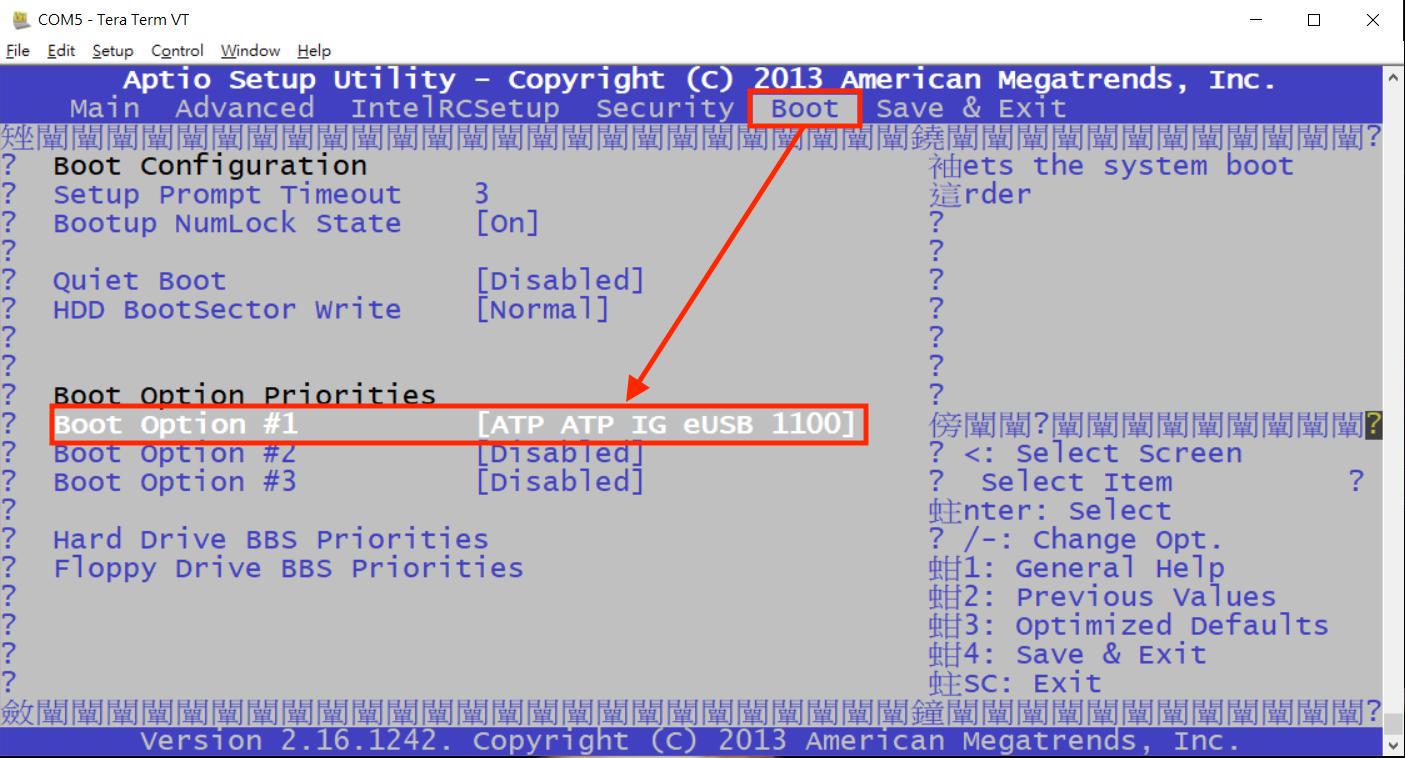
STEP12. Go to the Boot section and select the FLASH drive as boot option #1. (e.g., ATP ATP IG eUSB 1100), now you can remove the USB drive.
Note. Edgecore switch has two kinds of storage drives, eUSB or mSATA. Therefore, your switch's FLASH model name might be different from the following picture.
STEP13. Go to "Save & Exit" section, select "Save changes and Reset"
STEP14. ONIE is recovered.
Purpose:
This FAQ shows the procedures to check the SSD type.
Procedure:
There are two ways to check your SSD type, A and B.
A. If you can go into "ONIE: Rescue mode", please choose this plan.
STEP1: Boot up the datacenter and login "ONIE Rescue" mode.
STEP2: Execute the command "parted /dev/sda print" to check the SSD information. (E.g.,eUSB)
ONIE:/ # parted /dev/sda print
Model: USB DISK 2.0 (scsi)
Disk /dev/sda: 7919MB
Sector size (logical/physical): 512B/512B
Partition Table: gpt
Disk Flags:

Number Start End Size File system Name Flags
1 1049kB 3146kB 2097kB GRUB-BOOT hidden, bios_grub
2 3146kB 137MB 134MB ext4 ONIE-BOOT hidden
3 137MB 272MB 134MB ext4 ACCTON-DIAG hidden
4 272MB 406MB 134MB ext4 ONL-BOOT
5 406MB 540MB 134MB ext4 ONL-CONFIG
6 540MB 1614MB 1074MB ext4 ONL-IMAGES
7 1614MB 7918MB 6304MB ext4 ONL-DATA
*Note:
Model name = USB DISK 2.0, AF8GSSGH-AC2, AF8GSSGH-AC1 or FA008GEUT-AC meant eUSB type.
Model name = FS032GMSI-AC or TS32EPTMM1600, meant mSATA type.
B. If you can not go into "ONIE: Rescue mode", please choose this plan.
STEP1: Boot up the datacenter and login into BIOS. (Input "ESC")
STEP2: Go to "Save & Exit" option and check the "Boot Override" (E.g., P1:FS032GM242I-AC = mSATA type)
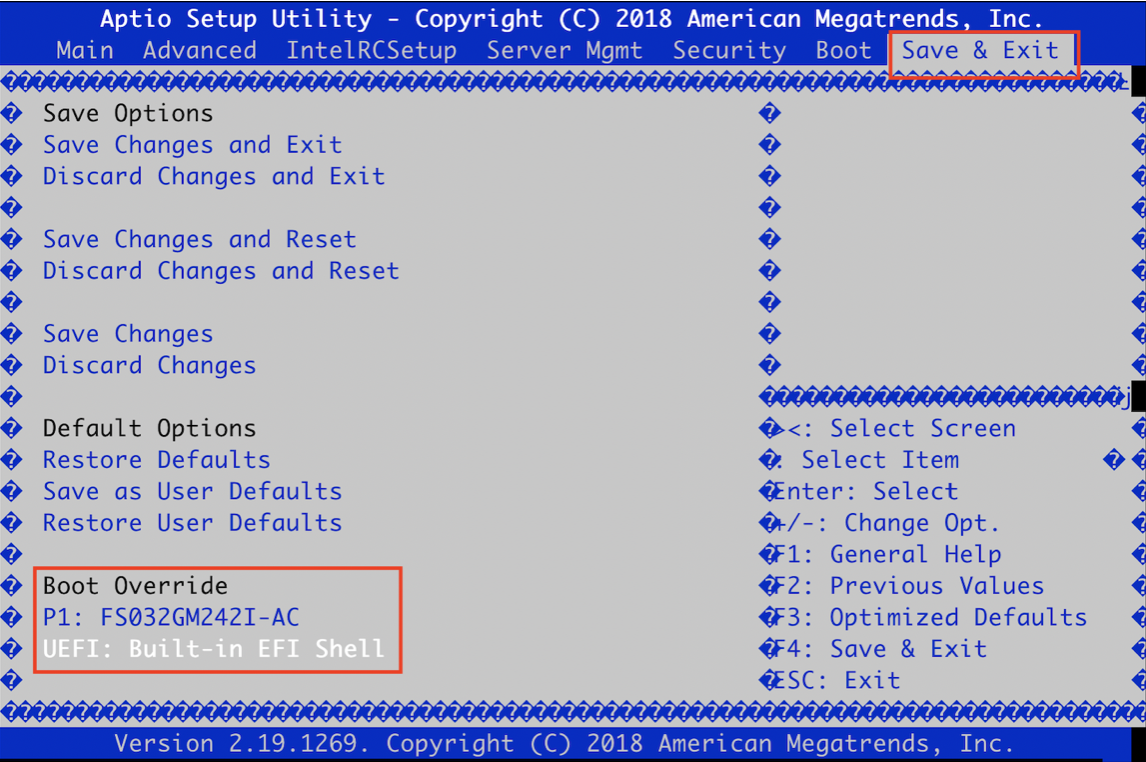
*Note:
Model name = USB DISK 2.0, AF8GSSGH-AC2, AF8GSSGH-AC1 or FA008GEUT-AC meant eUSB type.
Model name = FS032GMSI-AC or TS32EPTMM1600, meant mSATA type.
Purpose:
This application note describes the procedures that how to upgrade BIOS from EFI shell on the Edgecore x86 platform.
Model:
AS5712-54X
AS5812-54X, AS5812-54T
AS5912-54X
AS5916-54XKS, AS5916-54XL
AS6712-32X
AS6812-32X
AS7312-54XS
AS7316-26XB
AS7326-56X
AS7712-32X
AS7726-32X
AS7816-64X
AS9716-32D
Preparation:
A. Personal computer
B. BIOS_Updater
- Download the BIOS image for your own device.
- Reference: How to download the current firmware?
C. BIOS_Update_Tool
- AfuEfix64.efi
*User should get this tool from AMI directly, and Edgecore will not able to provide it.
D. Serial Console cable:
- A cable which attached in the original box.
E. Console terminal
- Putty,Teraterm,SecureCRT,etc...
F. USB drive
- USB drive with a minimum size of 256M
Procedure:
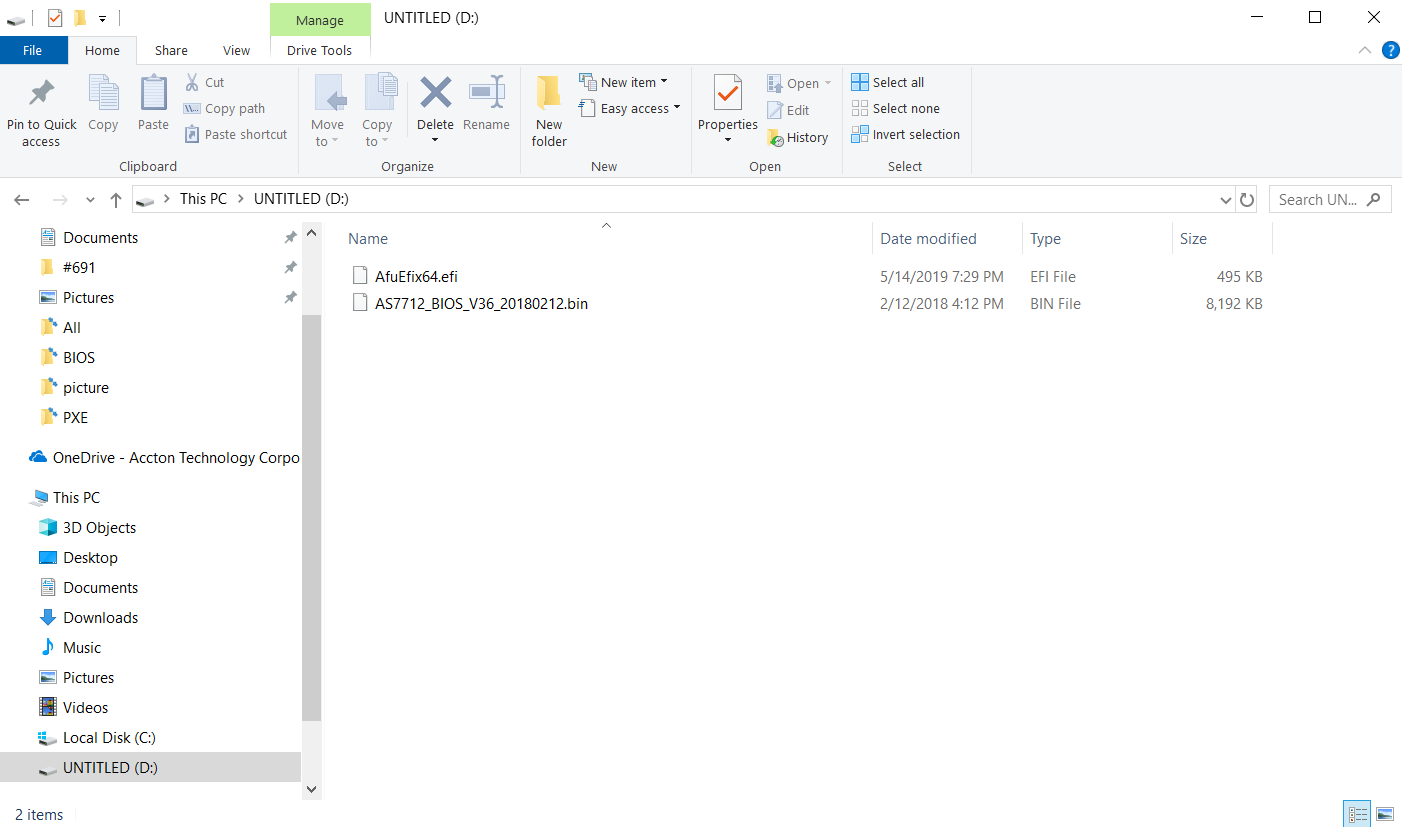
STEP1. Put the BIOS_Updater and BIOS_Update_Tool to the USB drive. (e.g.,AS7712_BIOS_V36_20180212.bin, AfuEfix64.efi)
STEP2. Insert the USB drive into the data center front panel. (e.g., AS7712-32X)
![]()
STEP3. Power on the switch, wait for a few seconds and press "ESC" to enter the BIOS setup.
STEP4. Go to the "Save & Exit" section and select the UEFI: "Built-in EFI shell".
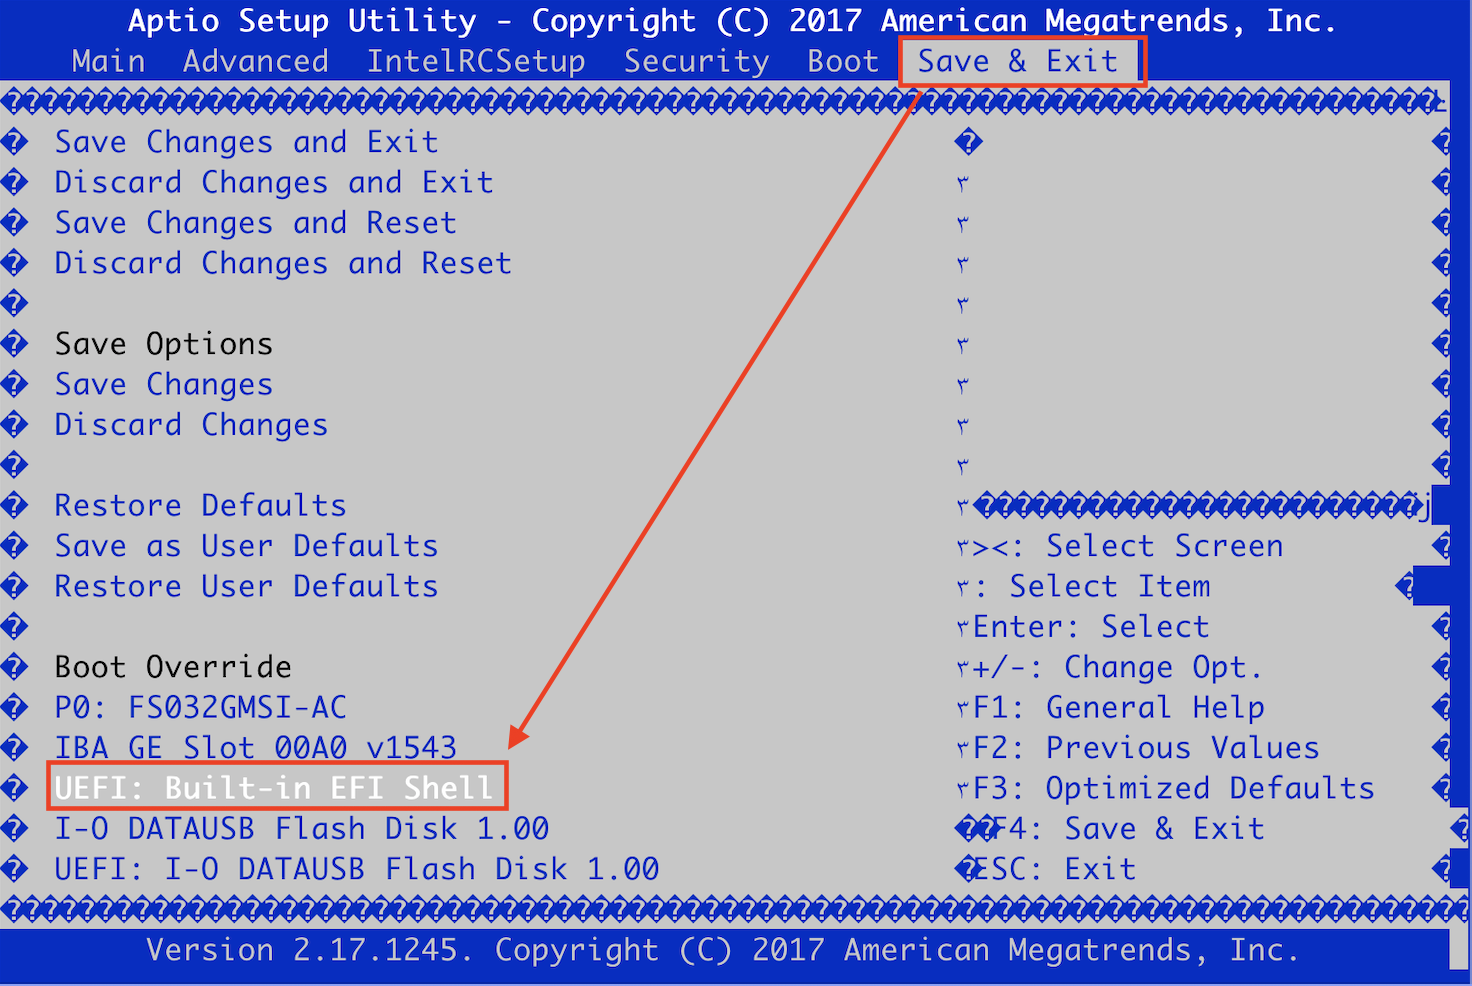
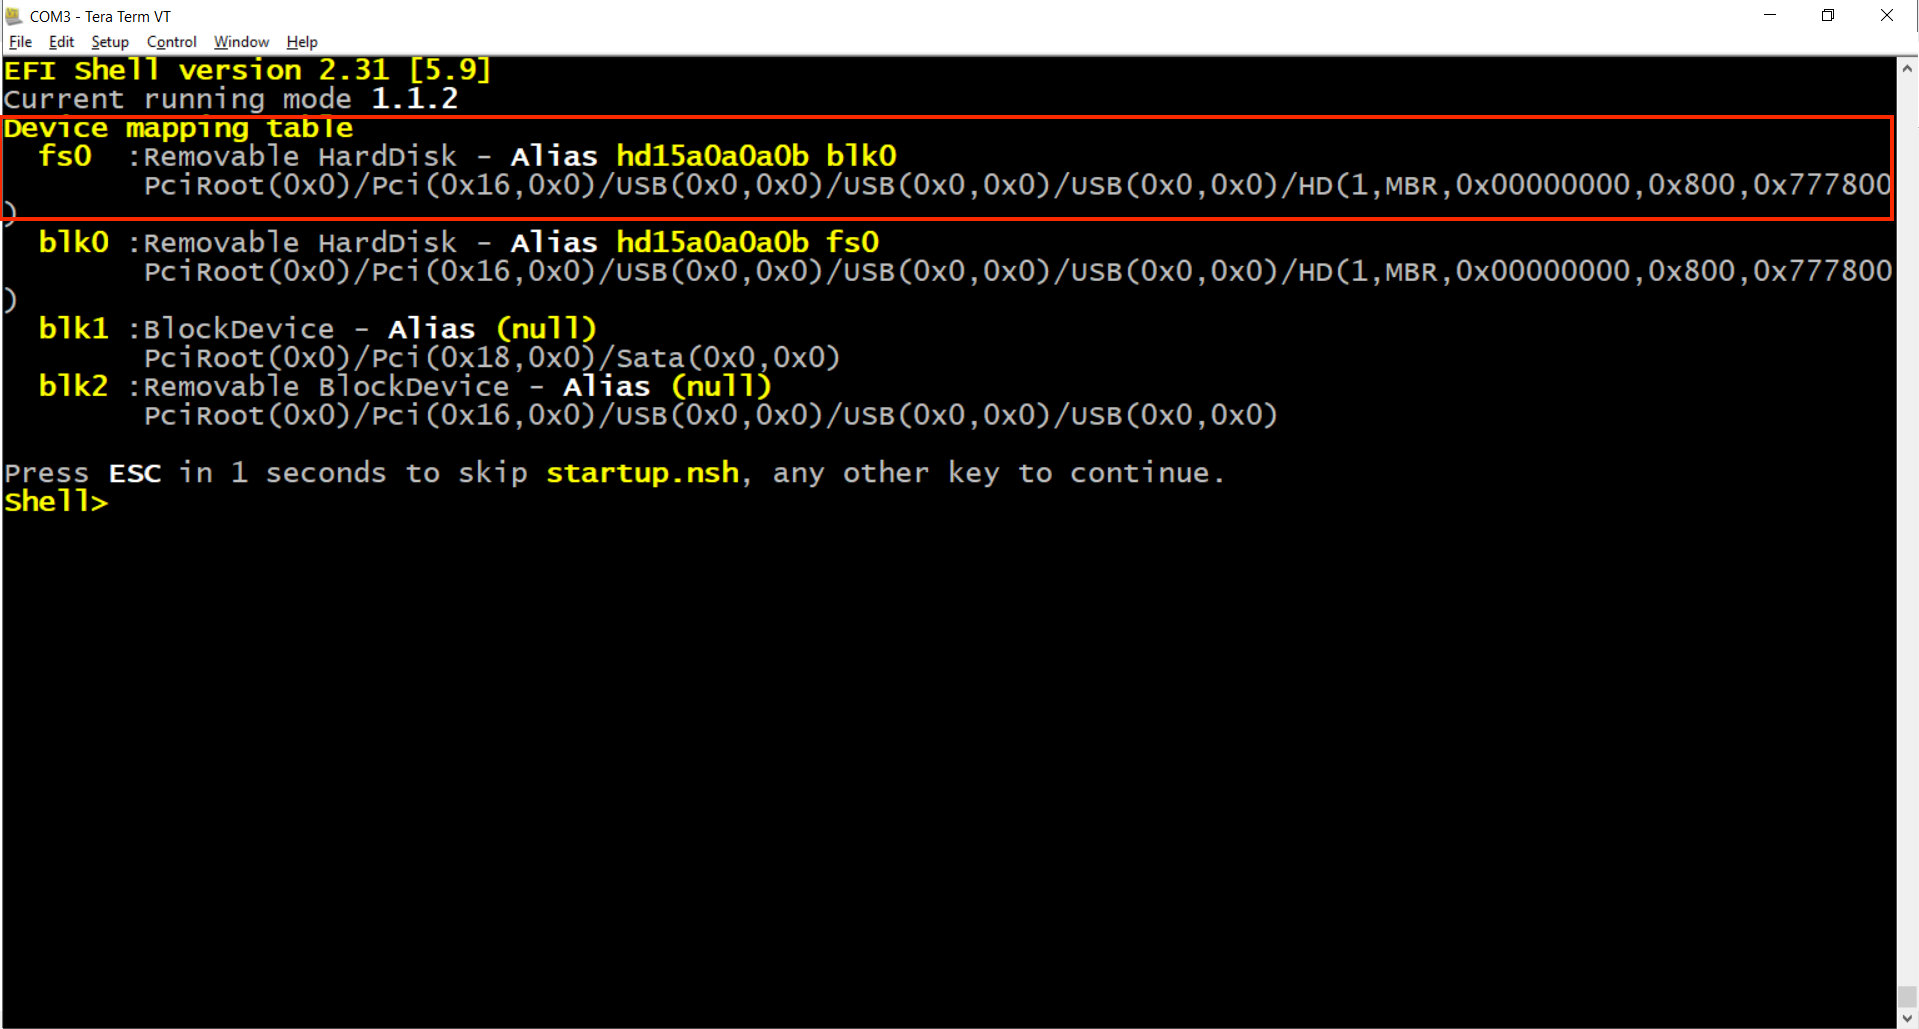
STEP5. Here is the EFI shell screen, fs0 is the USB drive that you insert. (e.g., fs0)
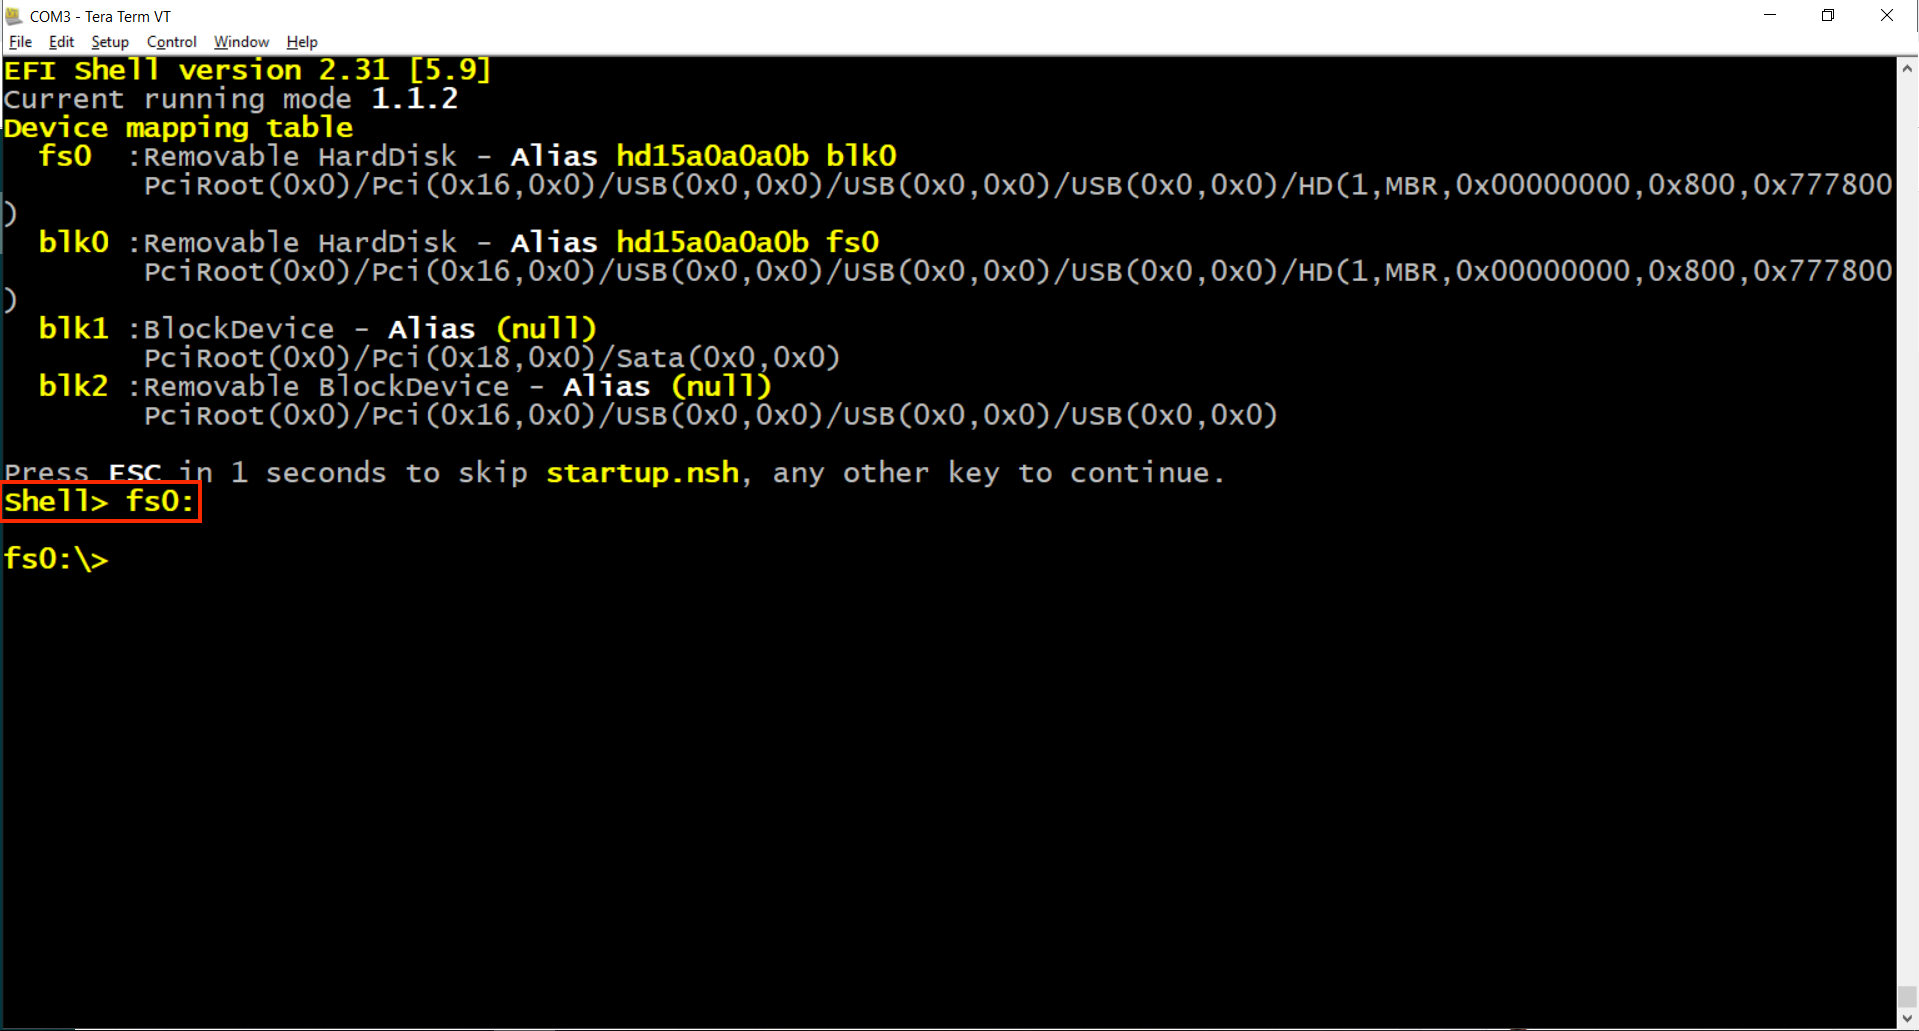
STEP6. Input "fs0:" command to go to the USB drive.
Shell> fs0:
STEP7. Input "dir" command to check the file list.
fs0:\> dir

STEP8. Input [EFI_tools BIOS_Updater /P /B /K /ME] command to start the upgrade.
fs0:\> AfuEfix64.efi AS7712_BIOS_V36_20180212.bin /P /B /K /ME
STEP9. After upgrade, power cycle the switch to apply the new BIOS.

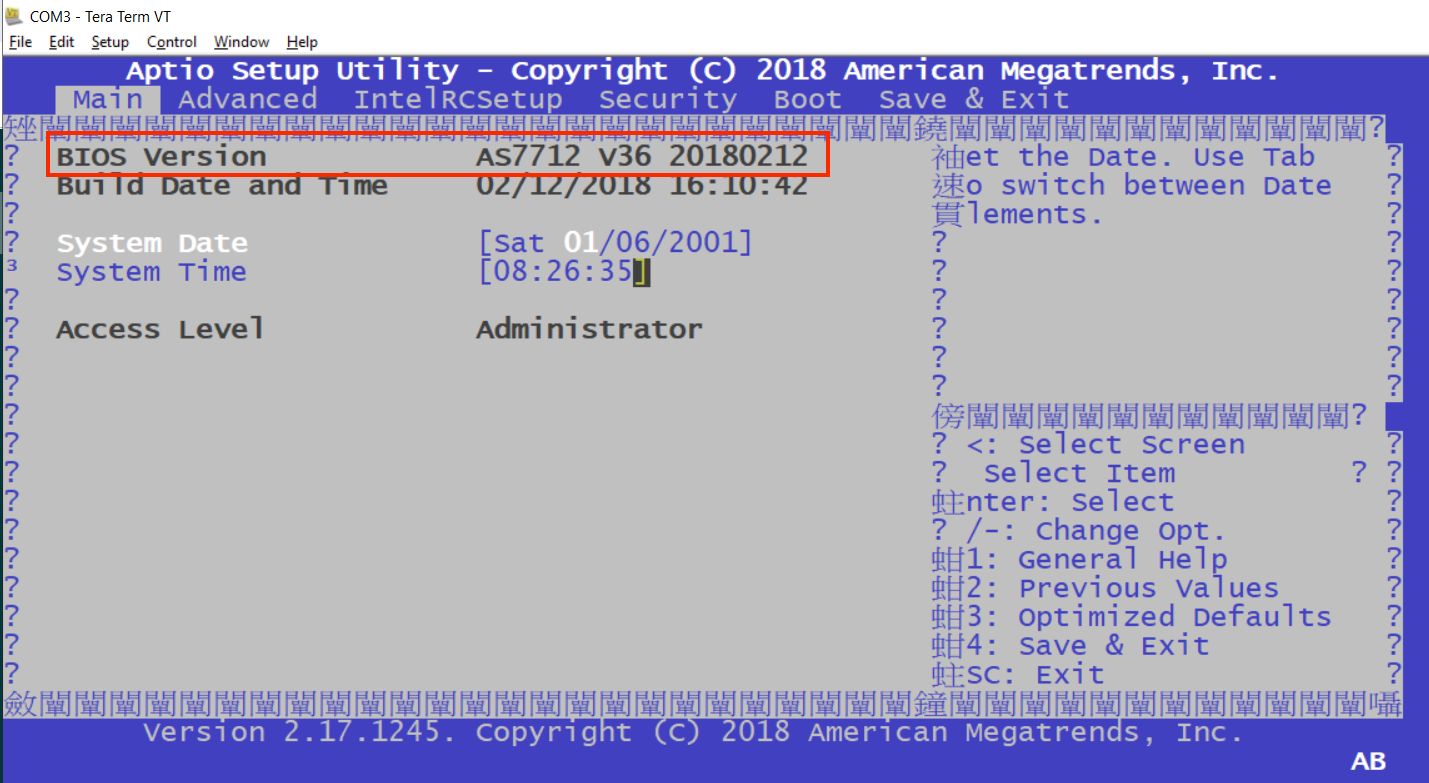
STEP10. Please follow STEP3 to go into BIOS again and check the version.
Purpose:
This post shows the procedures to upgrade CPLD via ONIE on Edgecore switch.
Model:
AS5712-54X
AS5812-54X, AS5812-54T
AS5912-54X, AS5916-54XL, AS5916-54XKS
AS6712-32X
AS6812-32X
AS7712-32X
AS7326-56X
AS7726-32X
Preparation:
A. Personal computer
B. CPLD_Updater
- Download the CPLD-updater image for your own device.
- Reference: How to download the current firmware?
C. Serial Console cable:
- A cable which attached in the original box.
D. Console terminal
- Putty,Teraterm,SecureCRT,etc...
E. Empty USB drive or transport protocol tools
- USB drive
- TFTP server
- FTP server
- Http file server
- OpenSSH
Procedure:
STEP1. Reboot the data center and enter the "Accton Diag" mode. (e.g., AS6712_32x)
STEP2. Check the current CPLD version.
Note: If your model belongs to "AS5712 / AS5812 / AS6712 / AS6812", please refer to section A. others, please refer to section B.
- Section A.
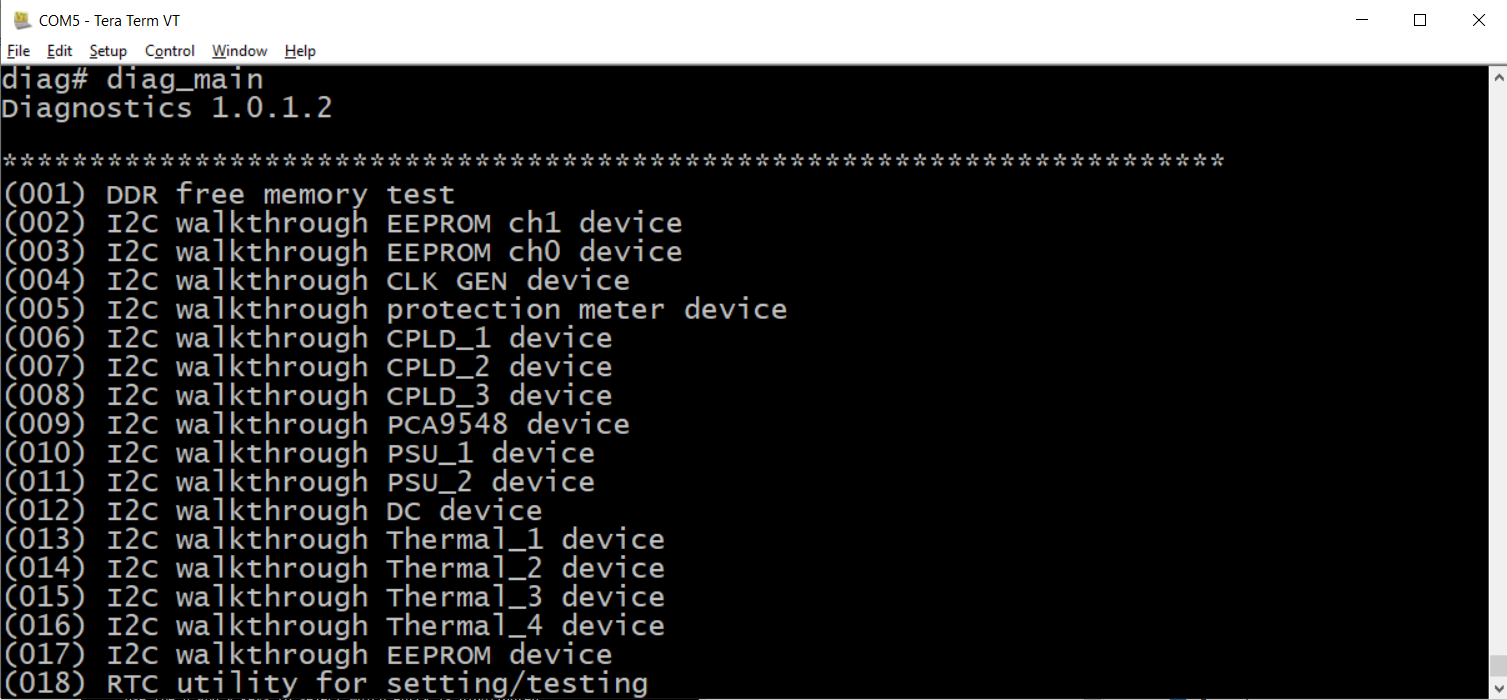
1.Input "diag_main" command.
diag# diag_main
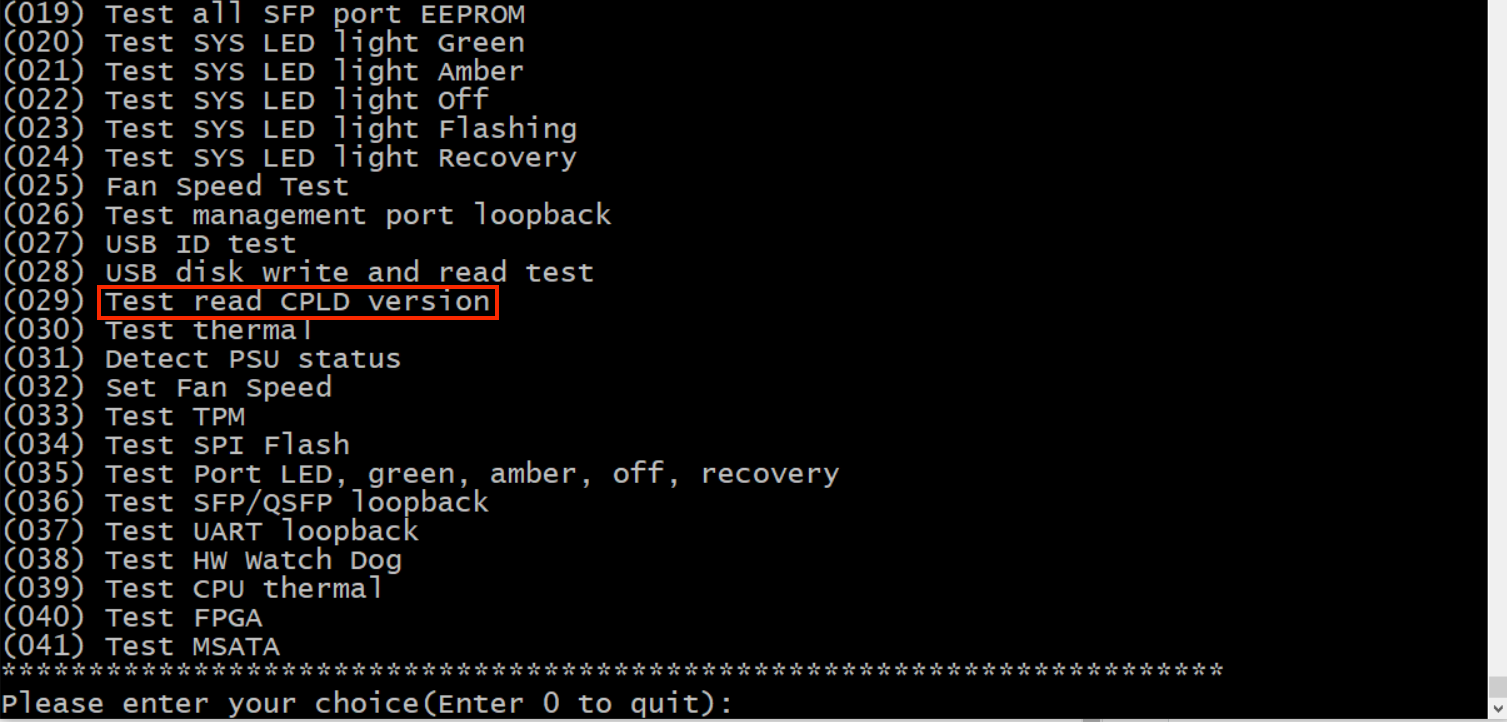
2. Please find "Test read CPLD version" then input corresponding option number and you will
see the CPLD version.
       Please enter your choice(Enter 0 to quit): 29
       CPLD-1 version : 4
       CPLD-2 version : 2
       CPLD-3 version : 2
       Item (29) test result : SUCCESS
- Section B.
1. Input "cpldutil -ver" command.
       root@(none):/# cpldutil -ver
       CPLD#1 Version: 10 (0x0A)
       CPLD#2 Version: 9 (0x09)
       CPLD#3 Version: 9 (0x09)
       FAN CPLD Version: 08 (0x08)
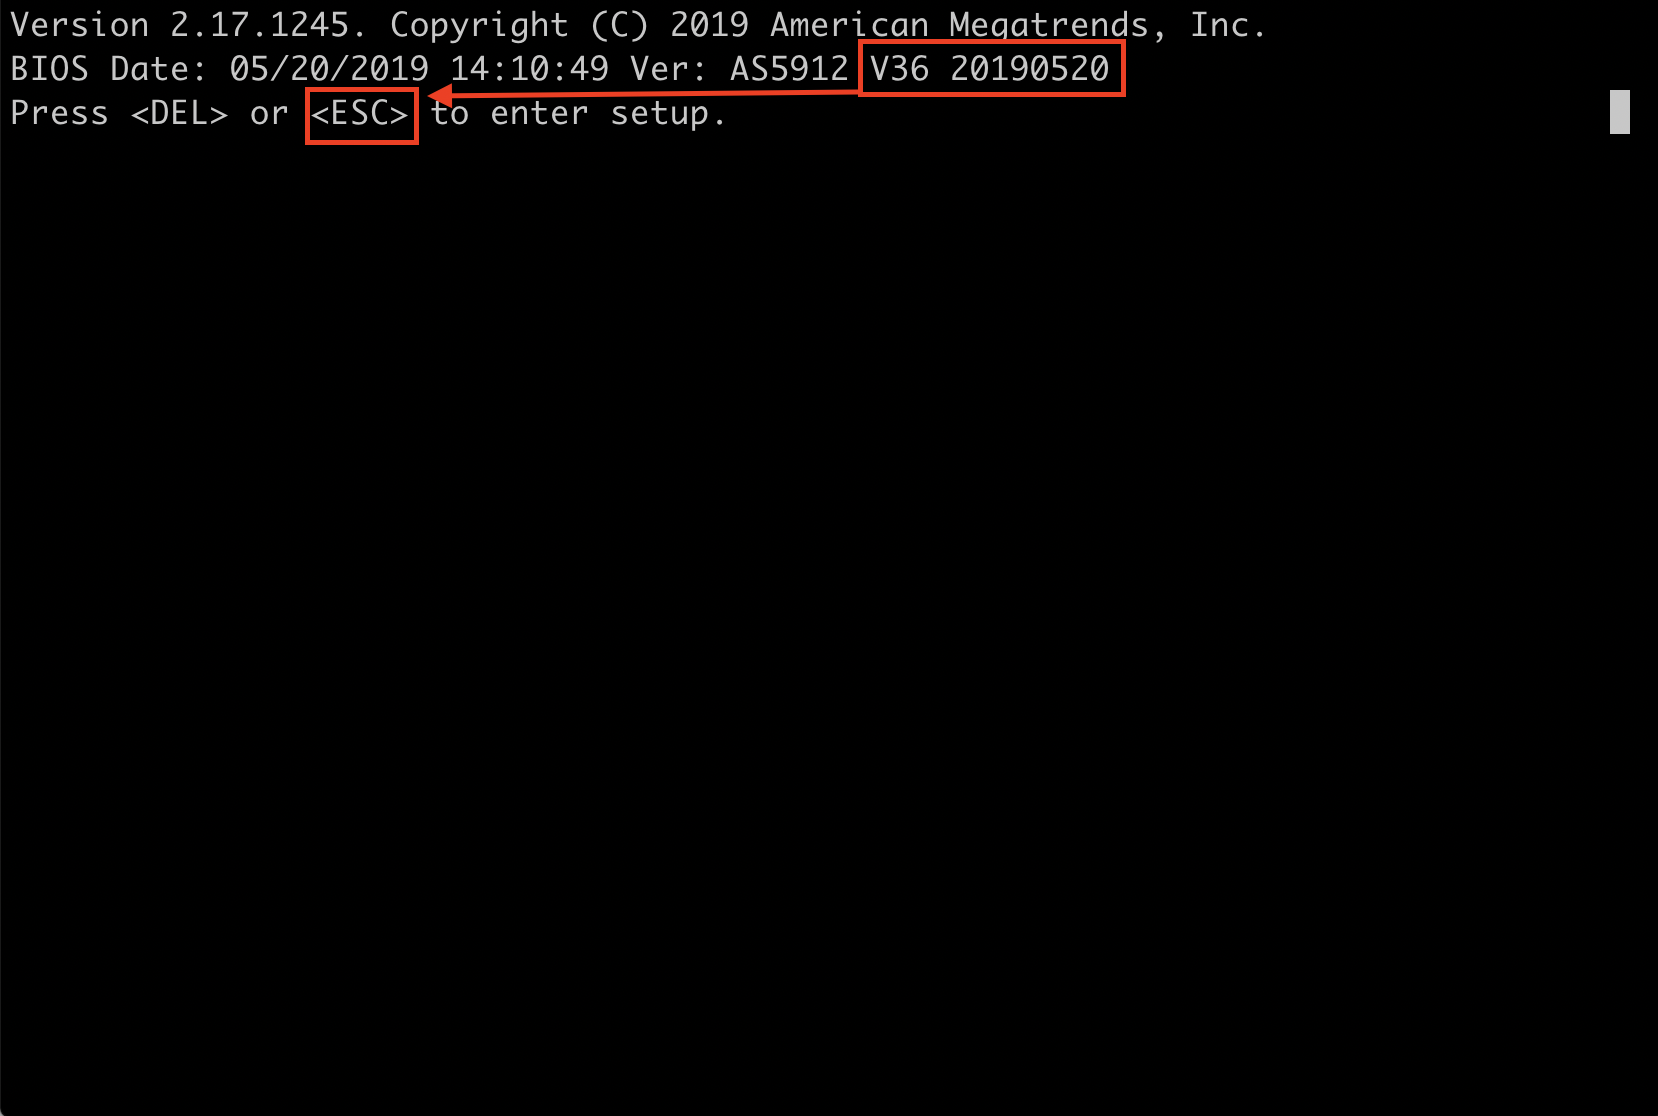
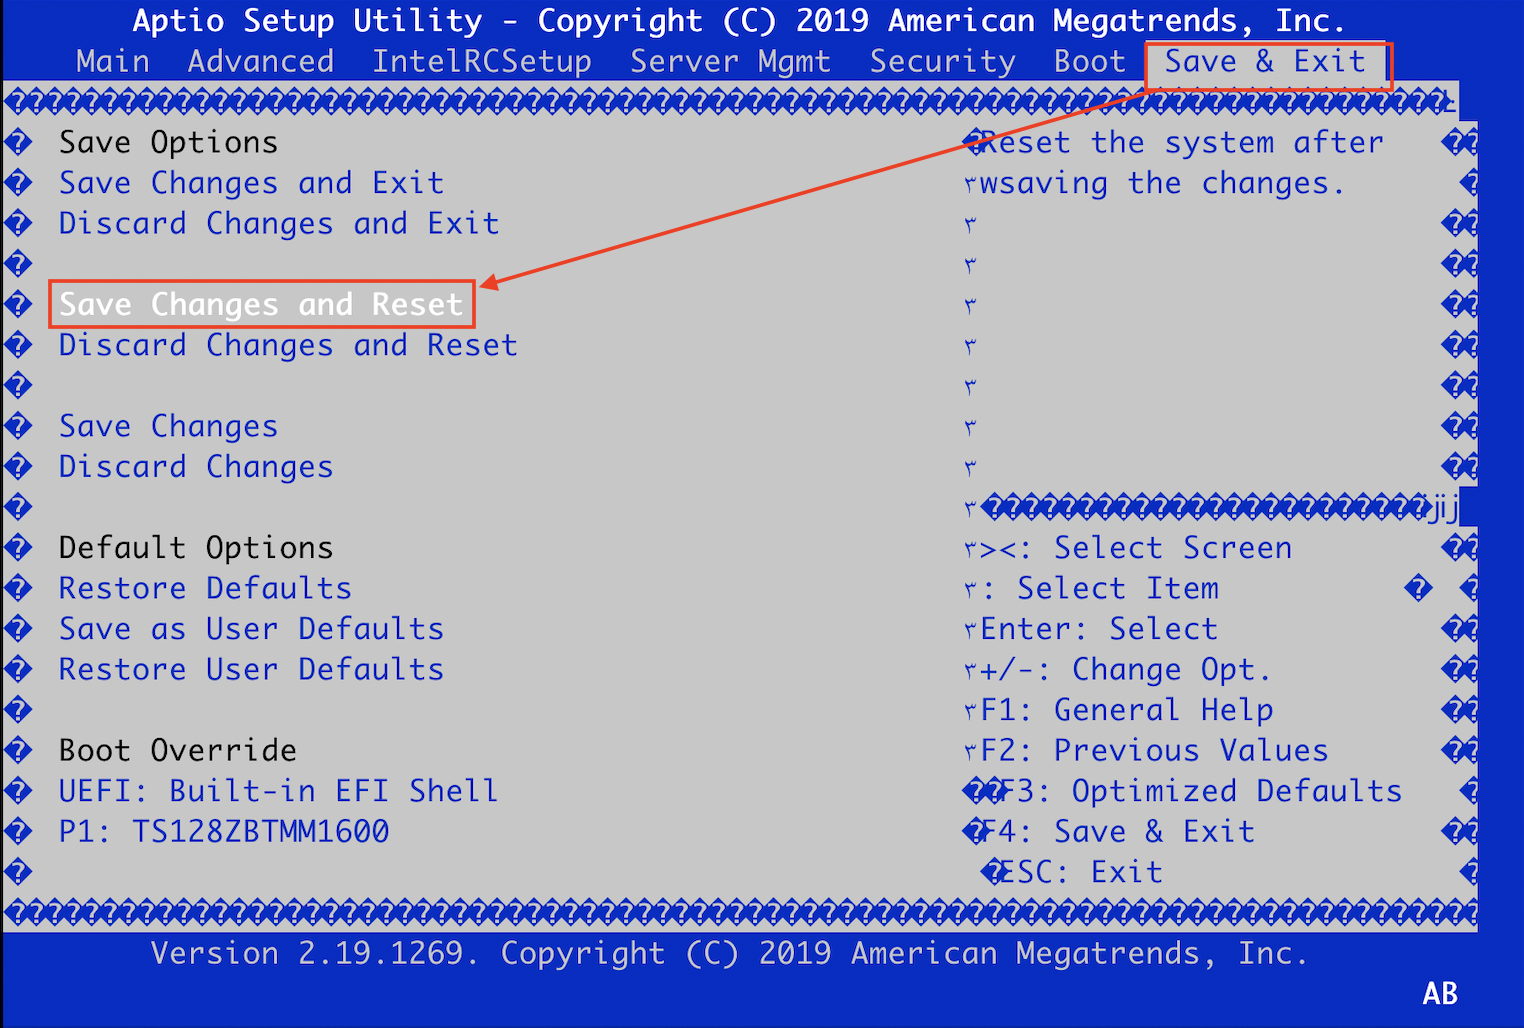
STEP3. Reboot the switch and then press "ESC" to enter the BIOS setting.
Note: If your model belongs to AS5916/AS7326/AS7716/AS7726 and the current BIOS version is v36 or later, STEP3 should be processed before the upgrade, else please ignore this step.
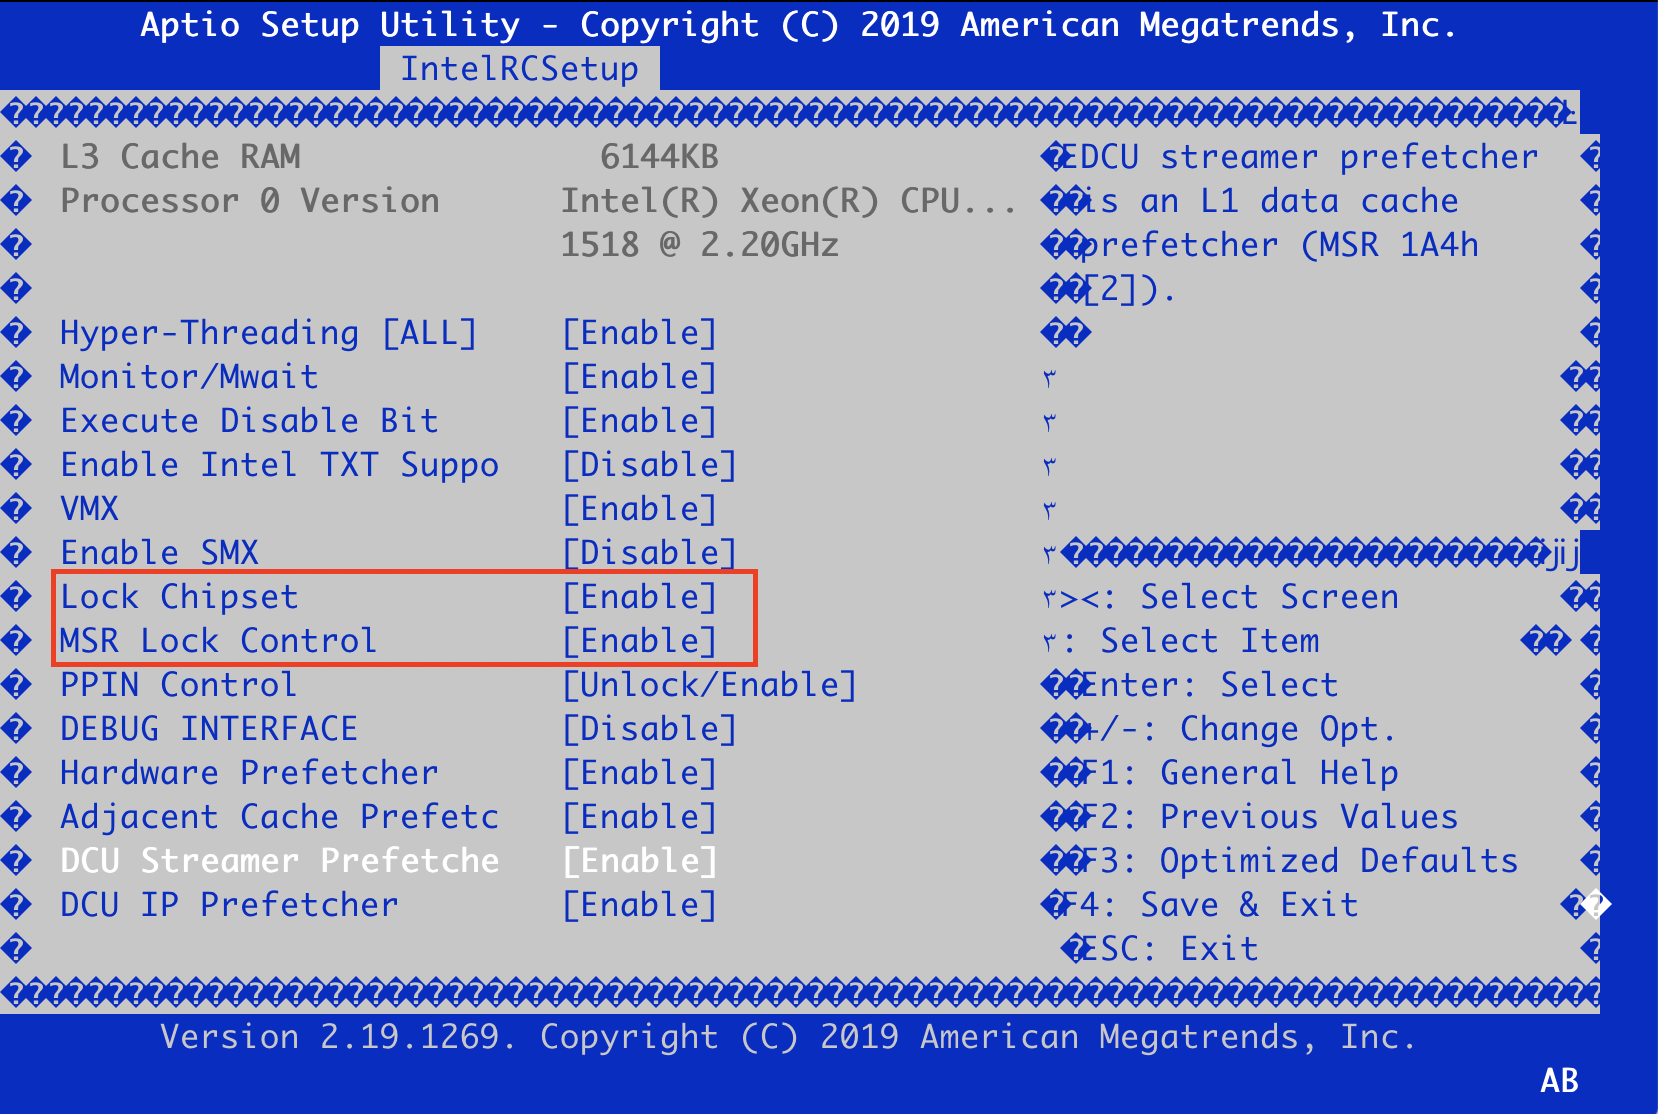
*set Lock Chipset to: Disable
*set MSR Lock Control to: Disable
1. Check the version and then press "ESC".
2. Please follow the red marked.
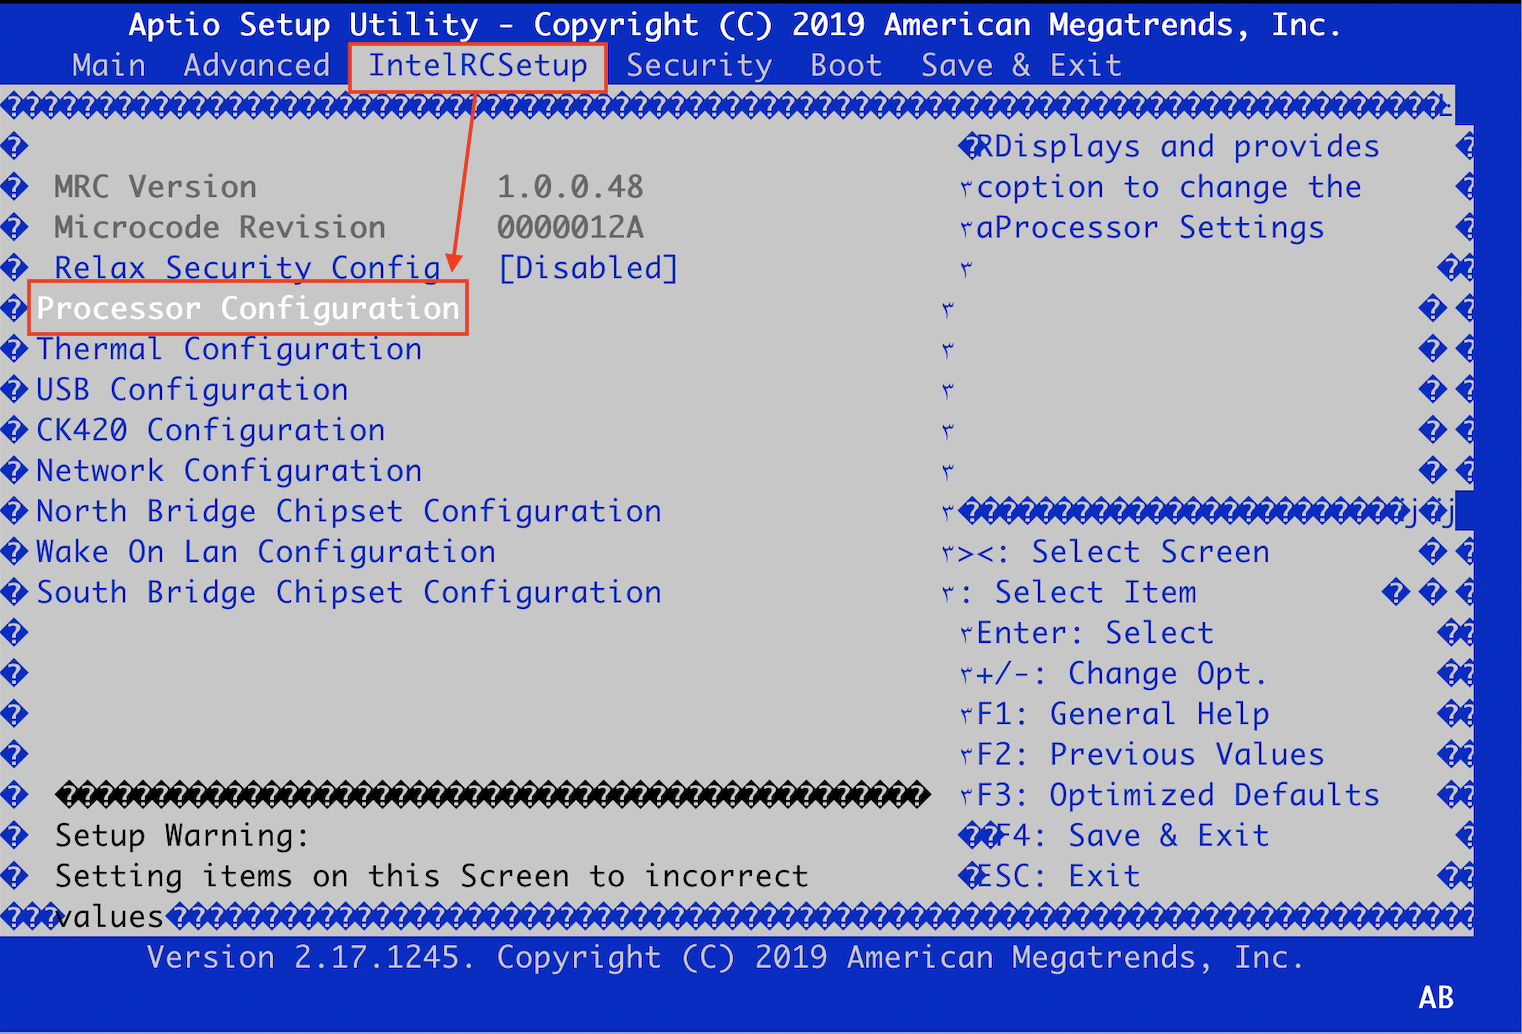
3. Please disable the following red marked
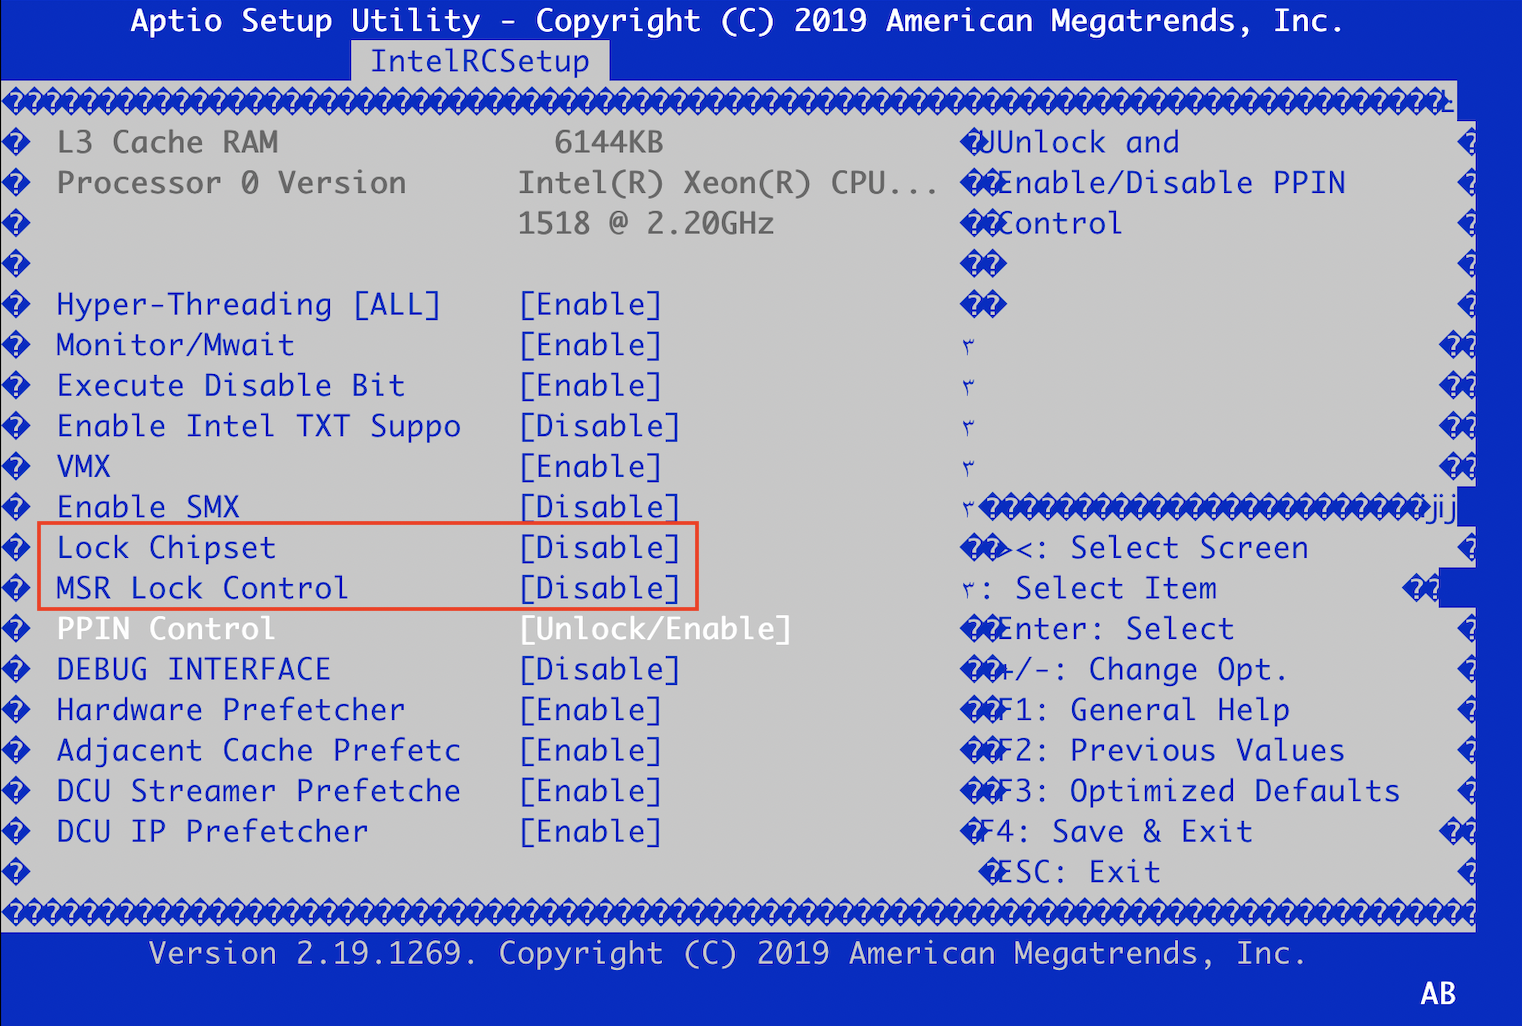
4. Save changes and reset.
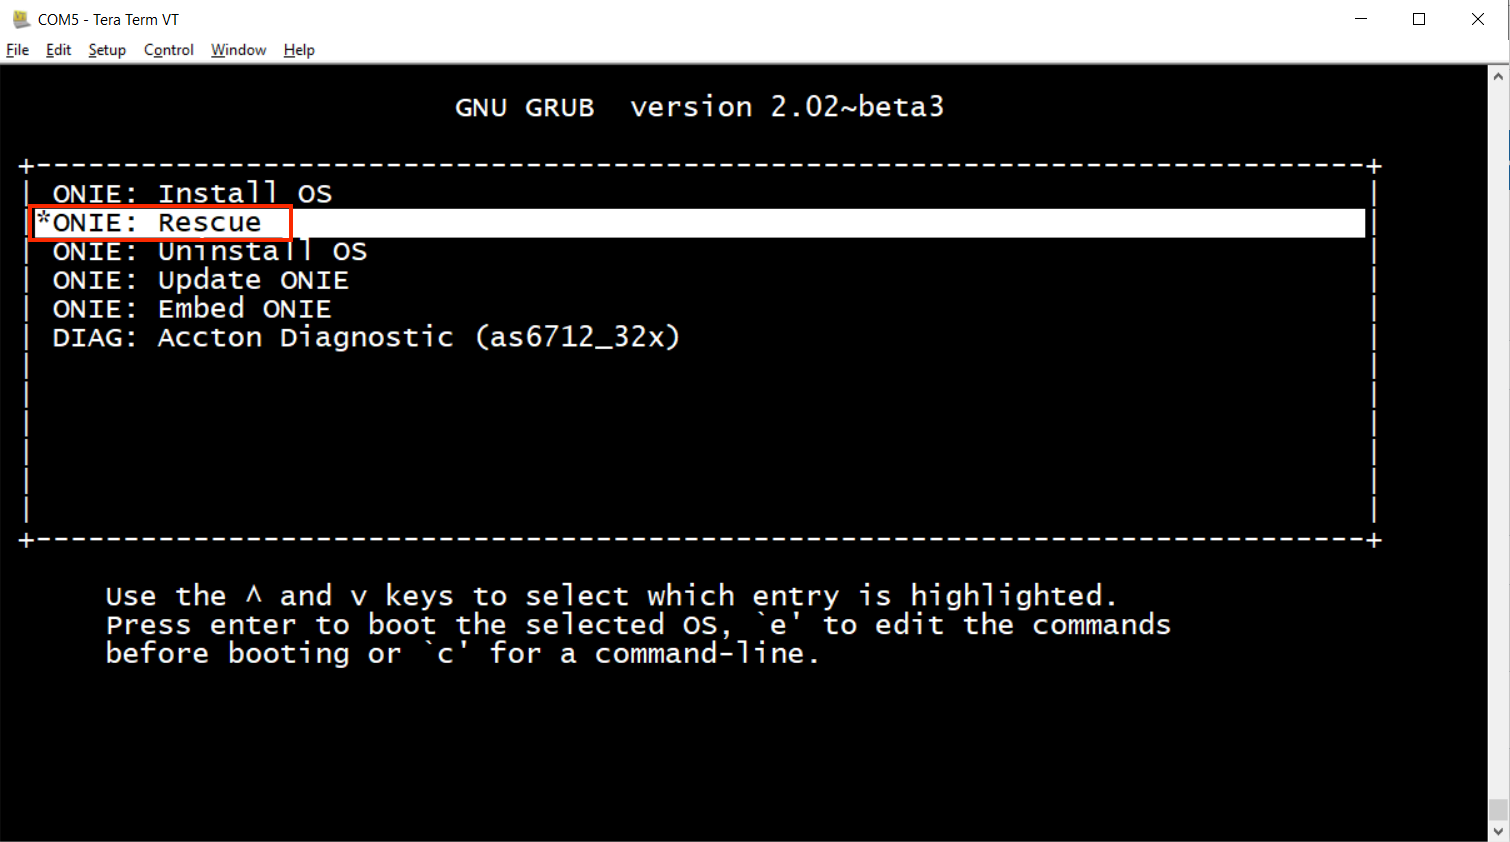
STEP4. Reboot the switch and enter the "ONIE: Rescue" mode.
STEP5. Start the upgrade process. Here introduce 5 ways (USB/TFTP/FTP/HTTP/SCP) to upgrade the CPLD.
- USB drive
1. Put the CPLD_Updater to the USB drive. (e.g., AS6712)
2. Insert the USB drive into the data center front panel.

3. The terminal will show the following message.
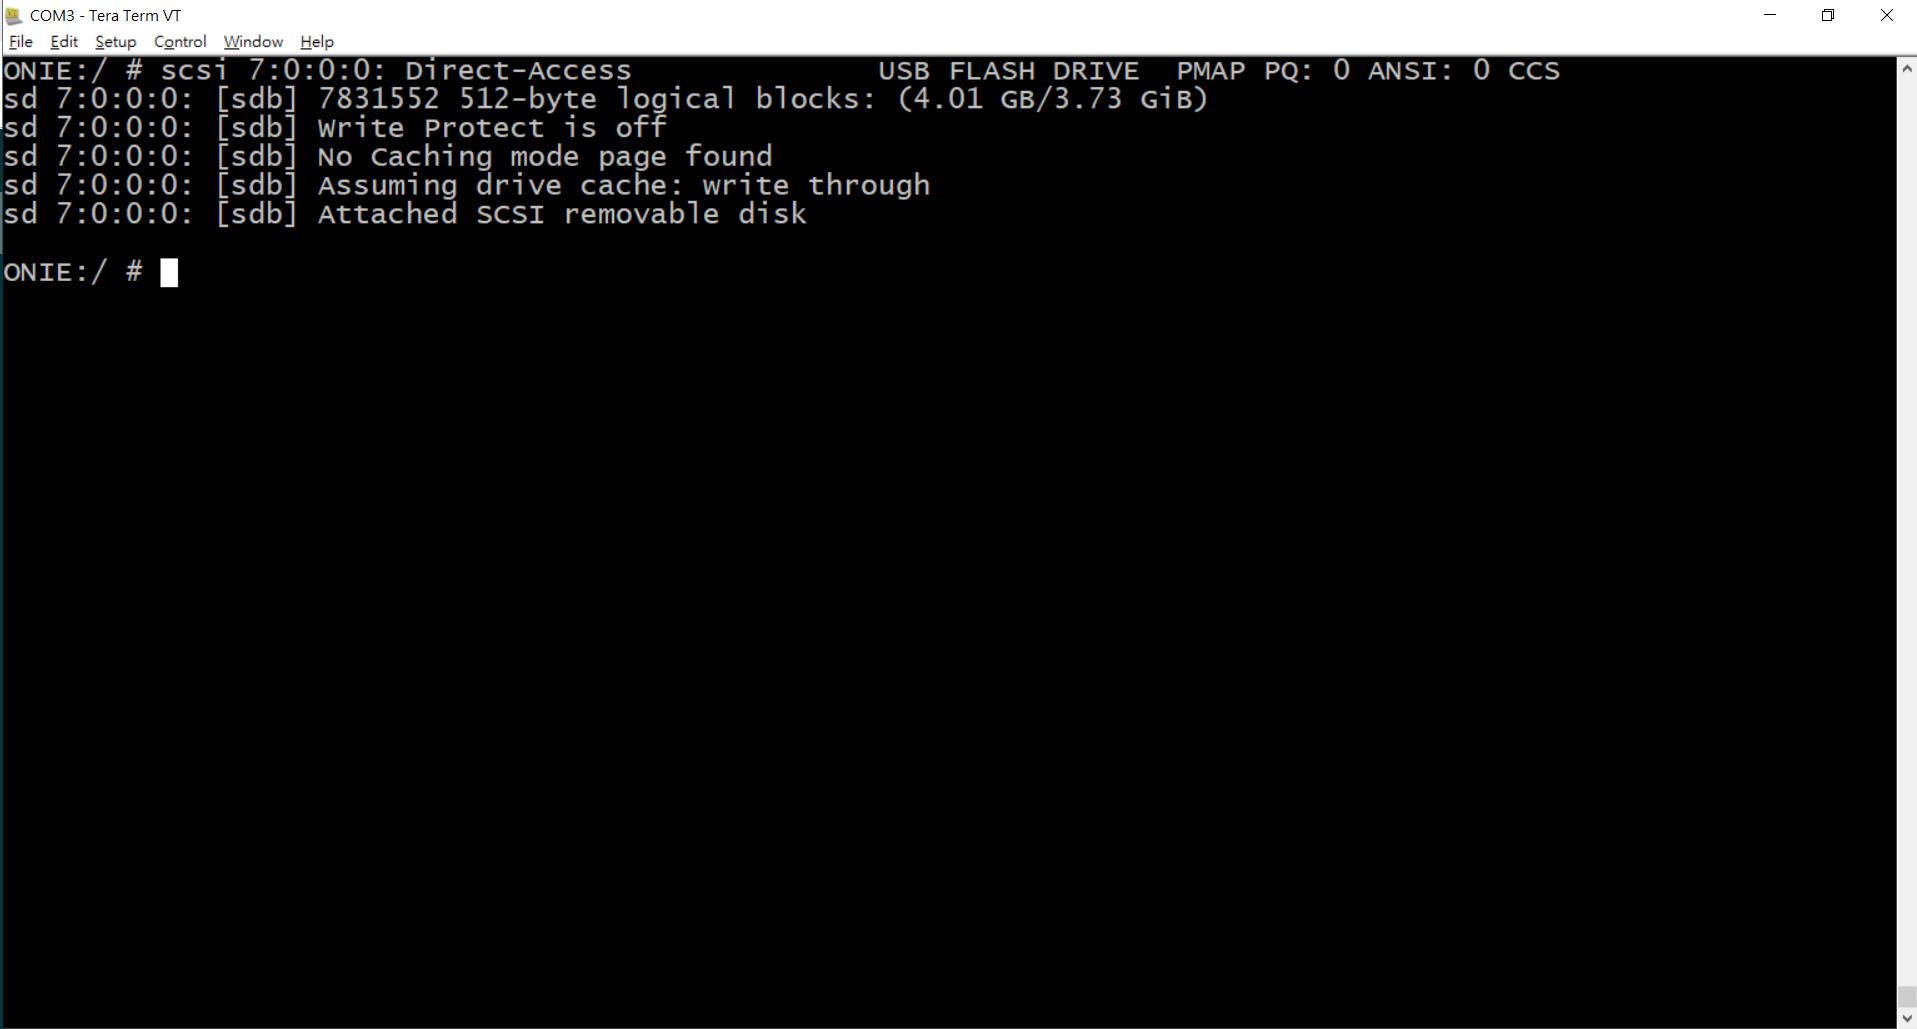
4.Input "fdisk -l" command to show the storage status (e.g., /dev/sdb)
       ONIE:/ # fdisk -l

       Disk /dev/sda: 8048 MB, 8048869376 bytes
       255 heads, 63 sectors/track, 978 cylinders
       Units = cylinders of 16065 * 512 = 8225280 bytes

       Device Boot Start End Blocks Id System
       /dev/sda1 * 1 979 7860223+ ee EFI GPT
       Partition 1 has different physical/logical beginnings (non-Linux?):
       phys=(0, 0, 1) logical=(0, 0, 2)
       Partition 1 has different physical/logical endings:
       phys=(1023, 254, 63) logical=(978, 140, 58)

       Disk /dev/sdb: 4009 MB, 4009754624 bytes
       255 heads, 63 sectors/track, 487 cylinders
       Units = cylinders of 16065 * 512 = 8225280 bytes

       Device Boot Start End Blocks Id System
       /dev/sdb1 * 1 488 3911744 b Win95 FAT32
       Partition 1 has different physical/logical beginnings (non-Linux?):
       phys=(1023, 254, 63) logical=(0, 128, 1)
       Partition 1 has different physical/logical endings:
       phys=(1023, 254, 63) logical=(487, 125, 22)
Note: /dev/sda is original hard drive, eUSB, 8G
5. Mount the USB drive and check the mount status.
       ONIE:/mnt # mkdir /mnt/usb
       ONIE:/mnt # mount -v /dev/sdb /mnt/usb
       ONIE:/mnt # mount | grep sdb
       /dev/sdb on /mnt/usb type vfat (rw,relatime,fmask=0022,dmask=0022,codepa
       ge=437,iocharset=iso8859-1,shortname=mixed,errors=re
6. Copy the CPLD_Updater to local storage. (e.g., /tmp)
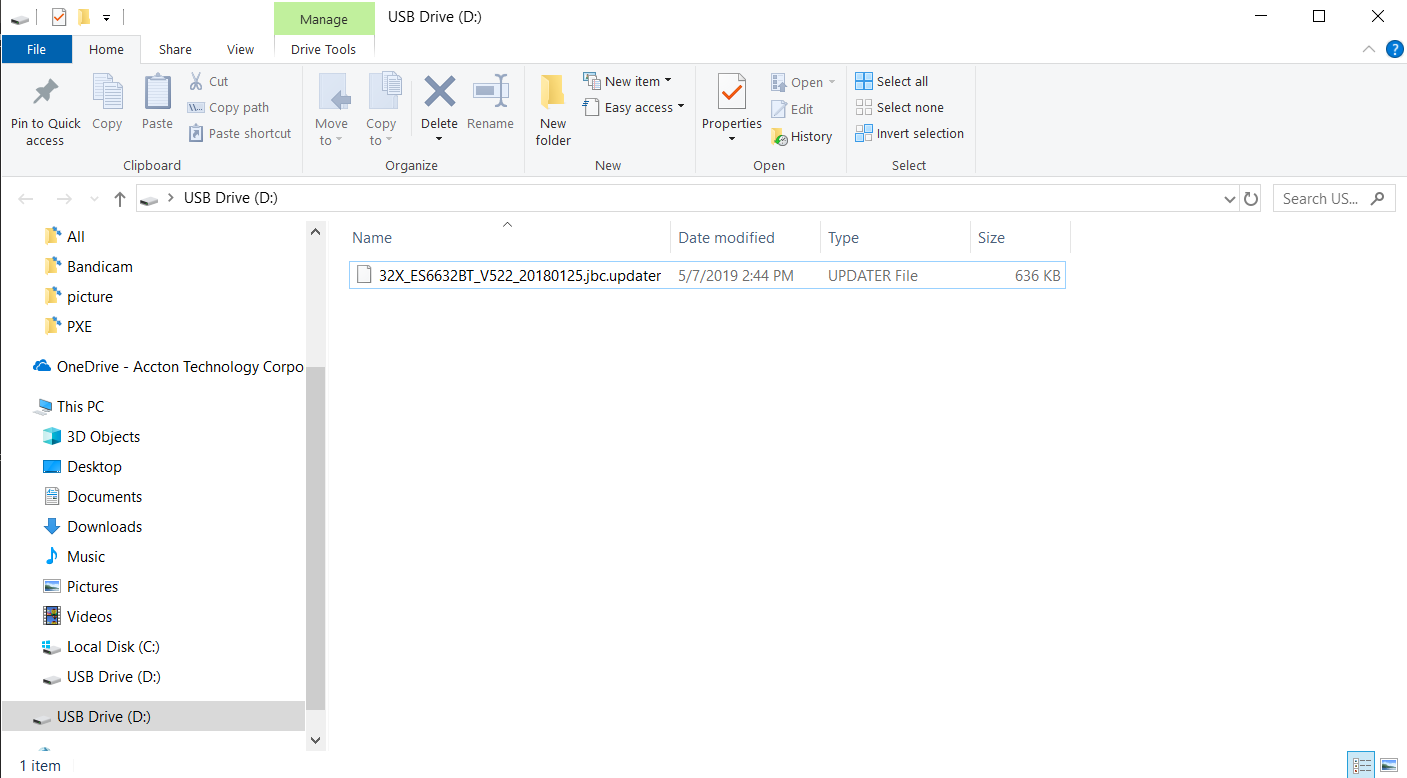
       ONIE:/mnt/usb # ls
       32X_ES6632BT_V522_20180125.jbc.updater
       System Volume Information
       ONIE:/mnt/usb # cp 32X_ES6632BT_V522_20180125.jbc.updater /tmp
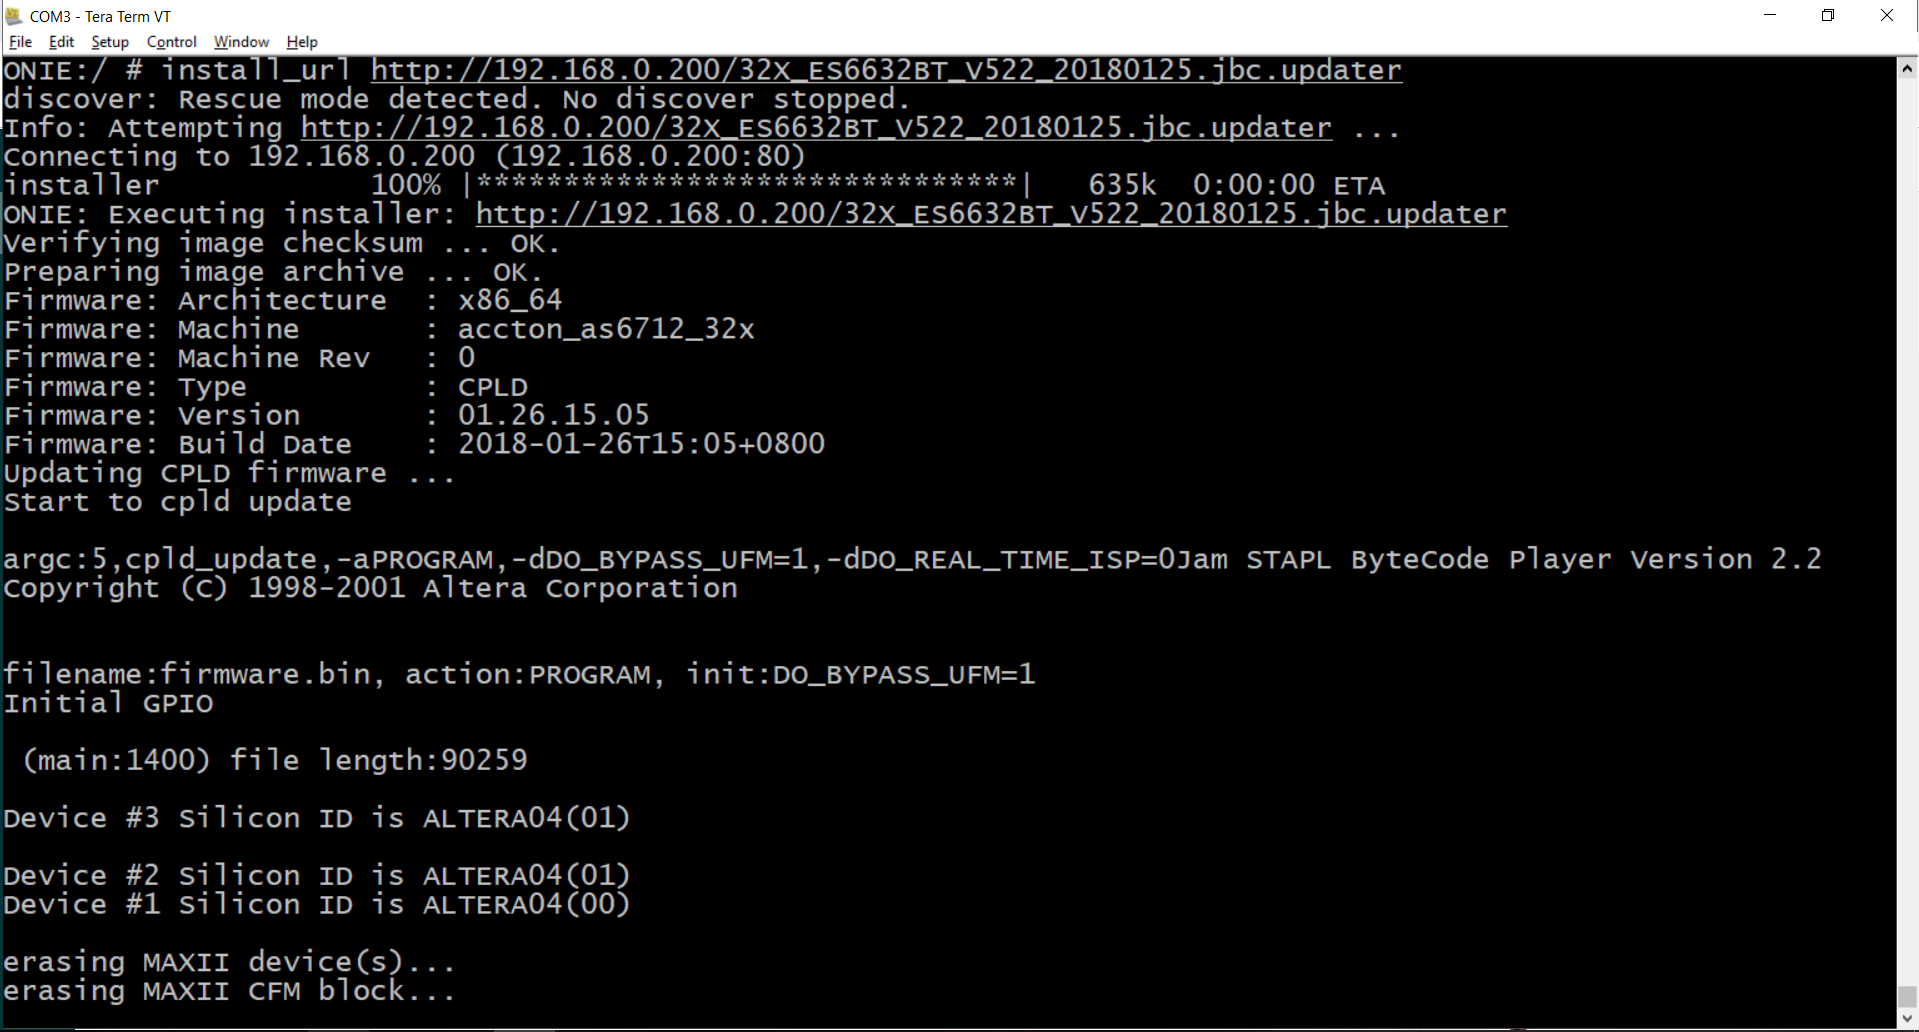
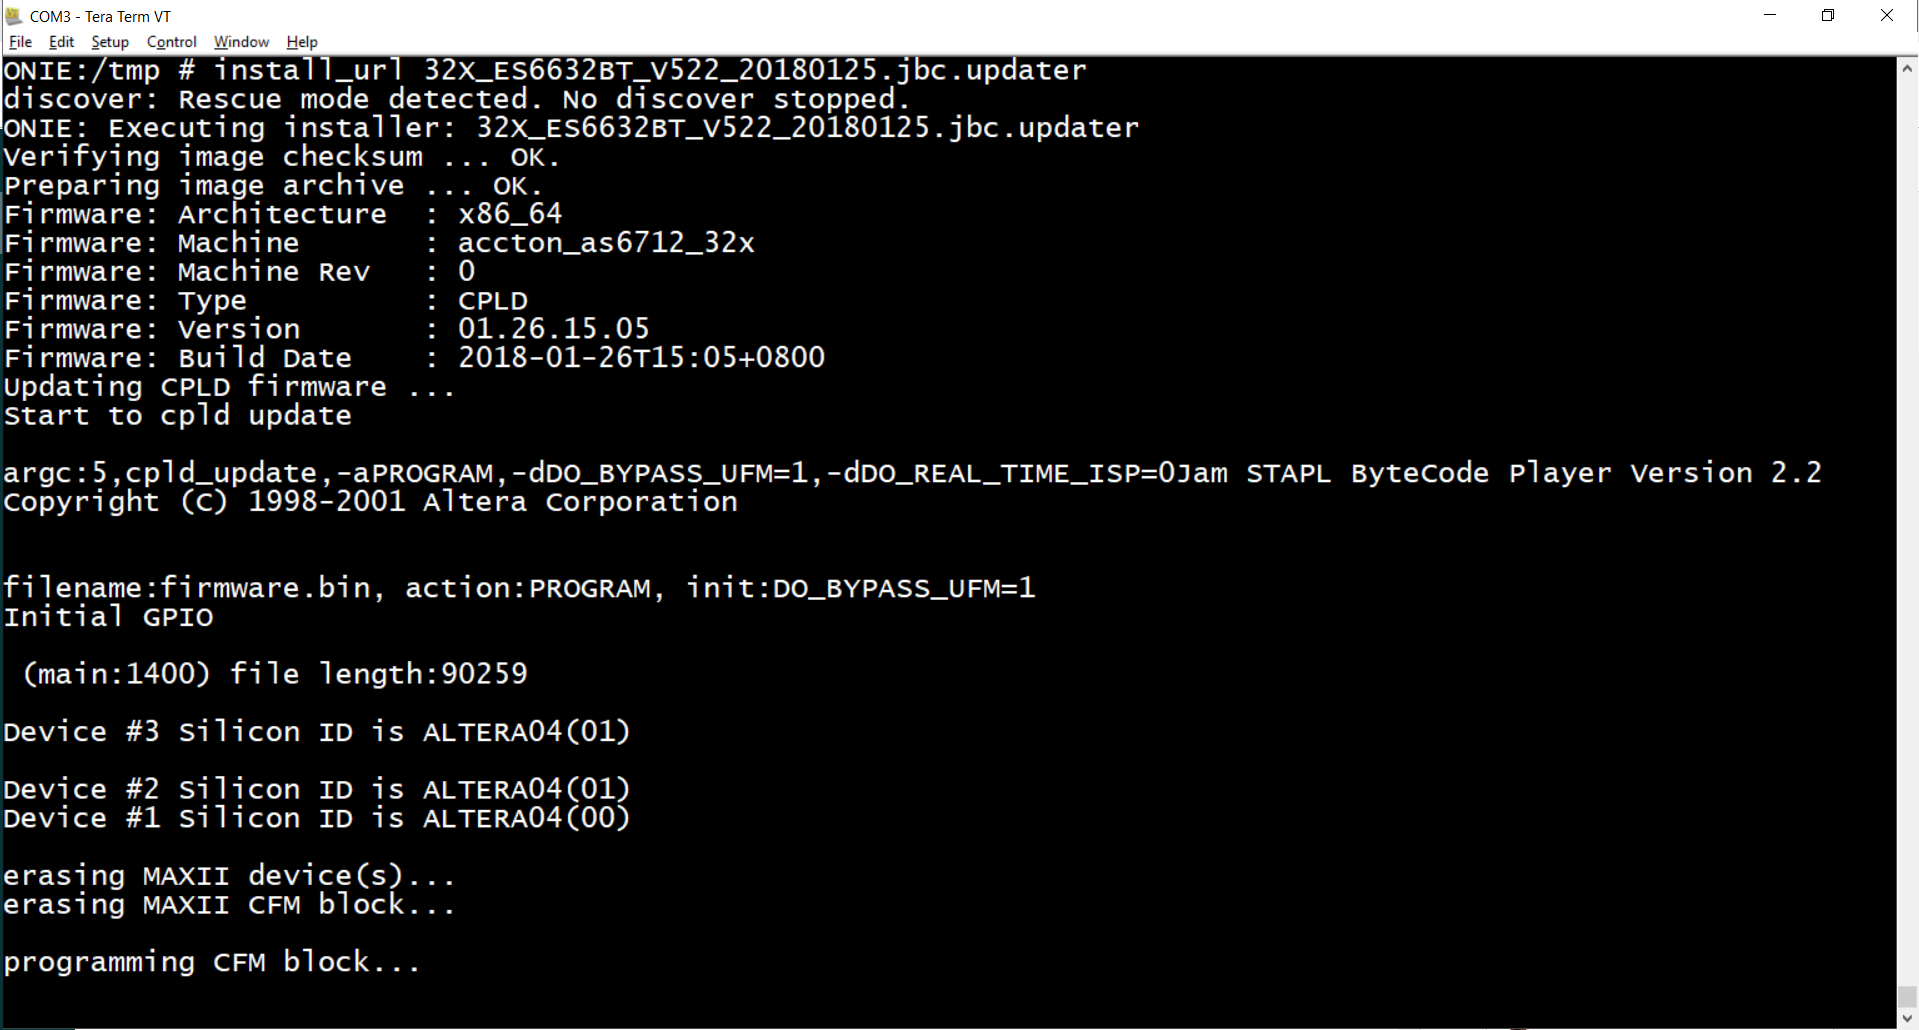
7. Upgrade the CPLD by "install_url [CPLD_Updater]" command.
       ONIE:/ # cd /tmp
       ONIE:/tmp # ls
       32X_ES6632BT_V522_20180125.jbc.updater
       ONIE:/tmp # install_url 32X_ES6632BT_V522_20180125.jbc.updater
8. CPLD will be upgraded immediately. After upgrade, the system will automatically reboot.
- TFTP
1. Please connect to the TFTP server with Mgmt port. (e.g., AS6712-32X)
Note: Please use 1G port.
![]()
2. Set the IP address in ONIE and use the ping command to make sure that the TFTP server can communicate with switch. (Server IP: 192.168.0.200)
       ONIE:/ # ifconfig eth0 192.168.0.1 netmask 255.255.255.0

       ONIE:/ # ifconfig
       eth0 Link encap:Ethernet HWaddr CC:37:AB:C4:B1:0C
       inet addr:192.168.0.1 Bcast:192.168.0.255 Mask:255.255.255.0
       inet6 addr: fe80::ce37:abff:fec4:b10c/64 Scope:Link
       UP BROADCAST RUNNING MULTICAST MTU:1500 Metric:1
       RX packets:77 errors:0 dropped:0 overruns:0 frame:0
       TX packets:31 errors:0 dropped:0 overruns:0 carrier:0
       collisions:0 txqueuelen:1000
       RX bytes:7619 (7.4 KiB) TX bytes:7134 (6.9 KiB)
       Memory:dff00000-dff1ffff

       ONIE:/ # ping 192.168.0.200
       PING 192.168.0.200 (192.168.0.200): 56 data bytes
       64 bytes from 192.168.0.200: seq=0 ttl=128 time=9.675 ms
       64 bytes from 192.168.0.200: seq=1 ttl=128 time=0.517 ms
       ^C
       --- 192.168.0.200 ping statistics ---
       2 packets transmitted, 2 packets received, 0% packet loss
       round-trip min/avg/max = 0.517/5.096/9.675 ms
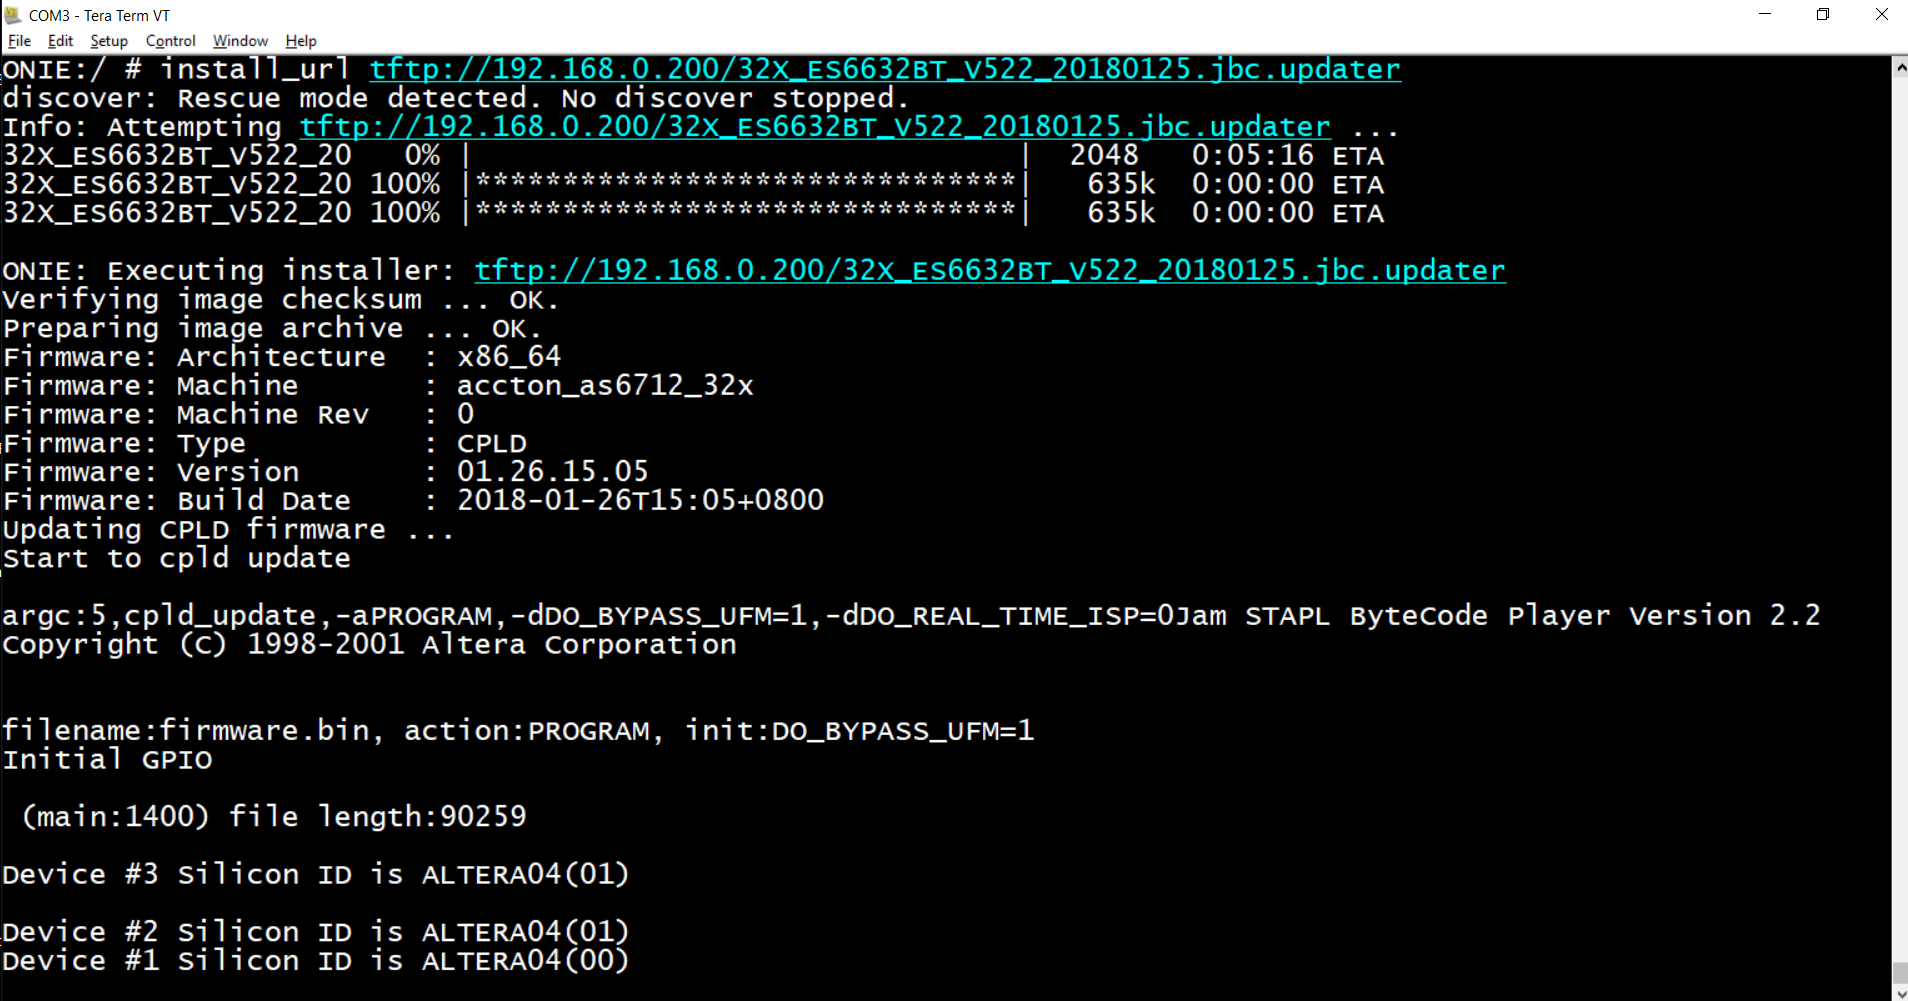
3. Input "install_url [TFTP file location]" command and then switch will start to upgrade the CPLD automatically.
ONIE:/ # install_url tftp://192.168.0.200/32X_ES6632BT_V522_20180125.jbc.updater
- FTP
1. Please connect to the FTP server with Mgmt port. (e.g., AS6712-32X)
Note: Please use 1G port.
![]()
2. Set the IP address in ONIE and and use the ping command to make sure that the FTP server can communicate with switch. (Server IP: 192.168.0.200)
       ONIE:/ # ifconfig eth0 192.168.0.1 netmask 255.255.255.0

       ONIE:/ # ifconfig
       eth0 Link encap:Ethernet HWaddr CC:37:AB:C4:B1:0C
       inet addr:192.168.0.1 Bcast:192.168.0.255 Mask:255.255.255.0
       inet6 addr: fe80::ce37:abff:fec4:b10c/64 Scope:Link
       UP BROADCAST RUNNING MULTICAST MTU:1500 Metric:1
       RX packets:77 errors:0 dropped:0 overruns:0 frame:0
       TX packets:31 errors:0 dropped:0 overruns:0 carrier:0
       collisions:0 txqueuelen:1000
       RX bytes:7619 (7.4 KiB) TX bytes:7134 (6.9 KiB)
       Memory:dff00000-dff1ffff

       ONIE:/ # ping 192.168.0.200
       PING 192.168.0.200 (192.168.0.200): 56 data bytes
       64 bytes from 192.168.0.200: seq=0 ttl=128 time=9.675 ms
       64 bytes from 192.168.0.200: seq=1 ttl=128 time=0.517 ms
       ^C
       --- 192.168.0.200 ping statistics ---
       2 packets transmitted, 2 packets received, 0% packet loss
       round-trip min/avg/max = 0.517/5.096/9.675 ms
3. Input "install_url [FTP account:password@location]" command and and then switch will start to upgrade the CPLD automatically.
ONIE:/ # install_url ftp://edgecore:edgecore@192.168.0.200/32X_ES6632BT_V522_20180125.jbc.updater

- HTTP
1. Please connect to the HTTP server with Mgmt port. (e.g., AS6712-32X)
Note: Please use 1G port.
![]()
2. Set the IP address in ONIE and and use the ping command to make sure that the HTTP server can communicate with switch.. (Server IP: 192.168.0.200)
       ONIE:/ # ifconfig eth0 192.168.0.1 netmask 255.255.255.0

       ONIE:/ # ifconfig
       eth0 Link encap:Ethernet HWaddr CC:37:AB:C4:B1:0C
       inet addr:192.168.0.1 Bcast:192.168.0.255 Mask:255.255.255.0
       inet6 addr: fe80::ce37:abff:fec4:b10c/64 Scope:Link
       UP BROADCAST RUNNING MULTICAST MTU:1500 Metric:1
       RX packets:77 errors:0 dropped:0 overruns:0 frame:0
       TX packets:31 errors:0 dropped:0 overruns:0 carrier:0
       collisions:0 txqueuelen:1000
       RX bytes:7619 (7.4 KiB) TX bytes:7134 (6.9 KiB)
       Memory:dff00000-dff1ffff

       ONIE:/ # ping 192.168.0.200
       PING 192.168.0.200 (192.168.0.200): 56 data bytes
       64 bytes from 192.168.0.200: seq=0 ttl=128 time=9.675 ms
       64 bytes from 192.168.0.200: seq=1 ttl=128 time=0.517 ms
       ^C
       --- 192.168.0.200 ping statistics ---
       2 packets transmitted, 2 packets received, 0% packet loss
       round-trip min/avg/max = 0.517/5.096/9.675 ms
3. Input "install_url [HTTP URL]" command and and then switch will start to upgrade the CPLD automatically.
ONIE:/ # install_url http://192.168.0.200/32X_ES6632BT_V522_20180125.jbc.updater
- SCP
1. Please connect to the openSSH server with Mgmt port. (e.g., AS6712-32X)
Note: Please use 1G port.
![]()
2. Set IP address in ONIE and and use the ping command to make sure that the openSSH server can communicate with switch. (Server IP: 192.168.0.100)
       ONIE:/ # ifconfig eth0 192.168.0.11 netmask 255.255.255.0

       ONIE:/ # ifconfig
       eth0 Link encap:Ethernet HWaddr CC:37:AB:C4:B1:0C
       inet addr:192.168.0.11 Bcast:192.168.0.255 Mask:255.255.255.0
       inet6 addr: fe80::ce37:abff:fec4:b10c/64 Scope:Link
       UP BROADCAST RUNNING MULTICAST MTU:1500 Metric:1
       RX packets:77 errors:0 dropped:0 overruns:0 frame:0
       TX packets:31 errors:0 dropped:0 overruns:0 carrier:0
       collisions:0 txqueuelen:1000
       RX bytes:7619 (7.4 KiB) TX bytes:7134 (6.9 KiB)
       Memory:dff00000-dff1ffff

       ONIE:/ # ping 192.168.0.100
       PING 192.168.0.100 (192.168.0.100): 56 data bytes
       64 bytes from 192.168.0.100: seq=0 ttl=64 time=0.705 ms
       64 bytes from 192.168.0.100: seq=1 ttl=64 time=0.433 ms
       ^C
       --- 192.168.0.100 ping statistics ---
       2 packets transmitted, 2 packets received, 0% packet loss
       round-trip min/avg/max = 0.433/0.569/0.705 ms
3. Use the "SCP" command to copy the CPLD_Updater from the openSSH server.
scp [account@server ip]:[installer_file_path] [local_path]
       ONIE:/ # scp jeff_cheng@192.168.0.100:/Users/jeff_cheng/Desktop/ISO/6712       -32x/CPLD/CPLDv522/32X_ES6632BT_V522_20180125.jbc.updater /tmp

       Host '192.168.0.100' is not in the trusted hosts file.
       (ecdsa-sha2-nistp256 fingerprint md5 be:26:8f:8c:2f:26:69:f5:05:7e:30:d2
       :d2:01:e0:92)
       Do you want to continue connecting? (y/n) y
       jeff_cheng@192.168.0.100's password:
       32X_ES6632BT_V522_20180125.jbc.updater 100% 636KB 635.6KB/s 00:00
4. Upgrade the CPLD by "install_url [CPLD_Updater]" command.
ONIE:/ # cd /tmp
ONIE:/tmp # ls
32X_ES6632BT_V522_20180125.jbc.updater
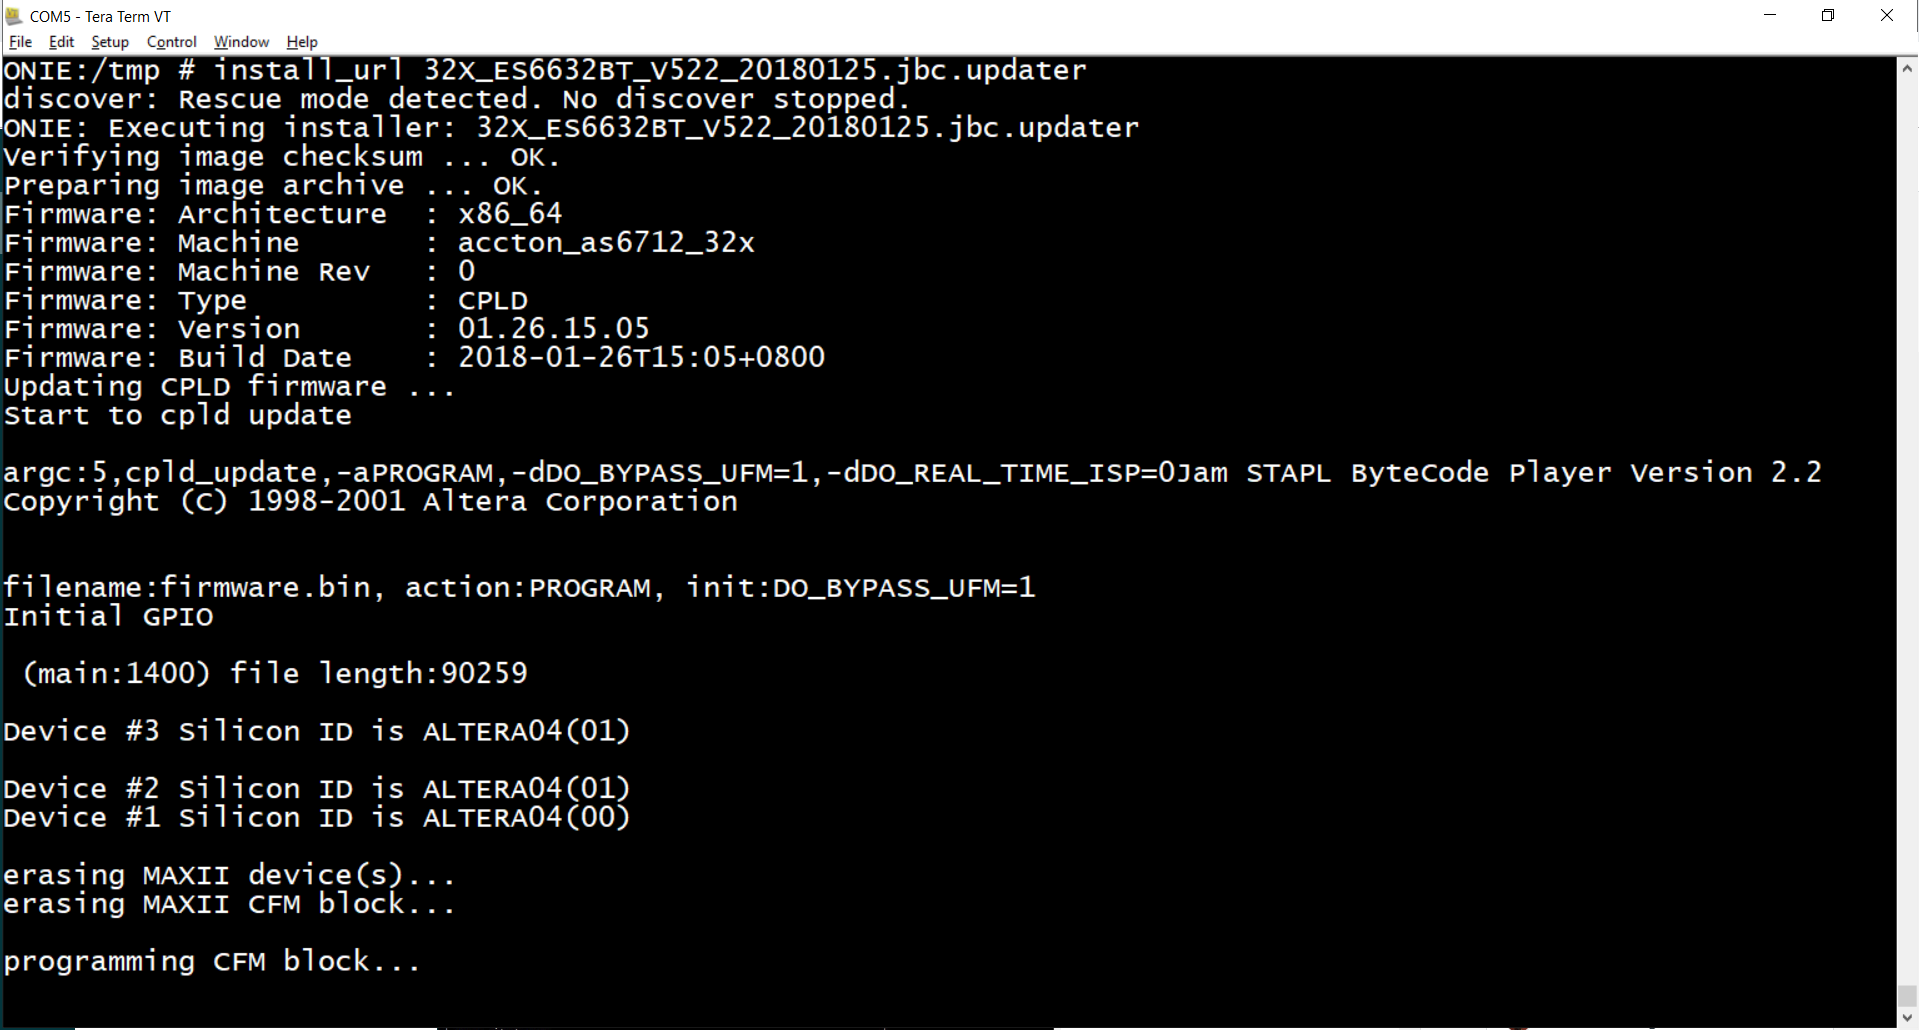
ONIE:/tmp # install_url 32X_ES6632BT_V522_20180125.jbc.updater
STEP6. The system will auto warm restart. However, we recommend cold restart after the upgrade. After that, please follow STEP1 to check if it upgraded successfully.
1. Enter the "Accton Diag" mode.
2. Check the current CPLD version.
- Section A.
diag# diag_main
       Please enter your choice(Enter 0 to quit): 29
       CPLD-1 version : 5
       CPLD-2 version : 2
       CPLD-3 version : 2

       Item (29) test result : SUCCESS
- Section B.
root@(none):/# cpldutil -ver
       root@(none):/# cpldutil -ver
       CPLD#1 Version: 10 (0x0A)
       CPLD#2 Version: 11 (0x0B)
       CPLD#3 Version: 11 (0x0B)
       FAN CPLD Version: 08 (0x08)
STEP7. After the upgrade, please return to STEP3 and then "enable" the setting back.
Purpose:
This post shows the procedures to upgrade FPGA via ONIE on Edgecore switch.
Model:
AS7312-54XS
AS7316-26XB
AS7712-32X
AS7716-32X
Preparation:
A. Personal computer
B. FPGA_Updater
- Download the FPGA-updater image for your own device.
- Reference: How to download the current firmware?
C. Serial Console cable:
- A cable which attached in the original box.
D. Console terminal
- Putty,Teraterm,SecureCRT,etc...
E. Empty USB drive or transport protocol tools
- USB drive
- TFTP server
- FTP server
- Http file server
- OpenSSH
Procedure:
STEP1. Reboot the switch and then press "ESC" to enter the BIOS setting. (e.g., AS7316_26XB)
1. Check the version and then press "ESC".
Note: If your model belongs to AS7316/AS7716 series and the current BIOS version is v36 or later, STEP1 should be processed before the upgrade, else please ignore this step.
*set Lock Chipset to: Disable
*set MSR Lock Control to: Disable
2. Please follow the red marked.
3. Please disable the following red marked
4. Save changes and reset.
STEP2. Start the upgrade process (5 examples)
- USB drive
1. Put the FPGA_Updater to the USB drive. (e.g., AS7712_32X)
2. Insert the USB drive into the data center front panel.
![]()
3. The terminal will show the following message.
4.Input "fdisk -l" command to show the storage status (e.g., /dev/sdb)
ONIE:/mnt/usb # fdisk -l

Disk /dev/sda: 31.4 GB, 31488000000 bytes
255 heads, 63 sectors/track, 3828 cylinders
Units = cylinders of 16065 * 512 = 8225280 bytes

Device Boot Start End Blocks Id System
/dev/sda1 * 1 3829 30749999+ ee EFI GPT

Disk /dev/sdb: 4009 MB, 4009754624 bytes
124 heads, 62 sectors/track, 1018 cylinders
Units = cylinders of 7688 * 512 = 3936256 bytes

Device Boot Start End Blocks Id System
/dev/sdb1 ? 253420 474801 850989111+ 6e Unknown
Partition 1 has different physical/logical beginnings (non-Linux?):
phys=(97, 115, 32) logical=(253419, 0, 14)
Partition 1 has different physical/logical endings:
phys=(107, 121, 32) logical=(474800, 17, 54)
Partition 1 does not end on cylinder boundary
/dev/sdb2 ? 1 1 0 74 Unknown
Partition 2 has different physical/logical beginnings (non-Linux?):
phys=(370, 116, 33) logical=(0, 0, 1)
Partition 2 has different physical/logical endings:
phys=(0, 13, 10) logical=(558658, 74, 4)
Partition 2 does not end on cylinder boundary
/dev/sdb4 3649 3649 220+ 0 Empty
Partition 4 has different physical/logical beginnings (non-Linux?):
phys=(0, 0, 0) logical=(3648, 57, 51)
Partition 4 has different physical/logical endings:
phys=(0, 0, 0) logical=(3648, 64, 57)
Partition 4 does not end on cylinder boundary

Partition table entries are not in disk order
Note: /dev/sda is original hard drive, mSATA, 32G
5. Mount the USB drive and check the mount status.
ONIE:/mnt # mkdir /mnt/usb
ONIE:/mnt # mount -v /dev/sdb /mnt/usb
ONIE:/mnt # mount | grep sdb
/dev/sdb on /mnt/usb type vfat (rw,relatime,fmask=0022,dmask=0022,codep   age=437,iocharset=iso8859-1,shortname=mixed,errors=re
6. Copy the FPGA_Updater to local storage. (e.g., /tmp)
ONIE:/mnt/usb # ls
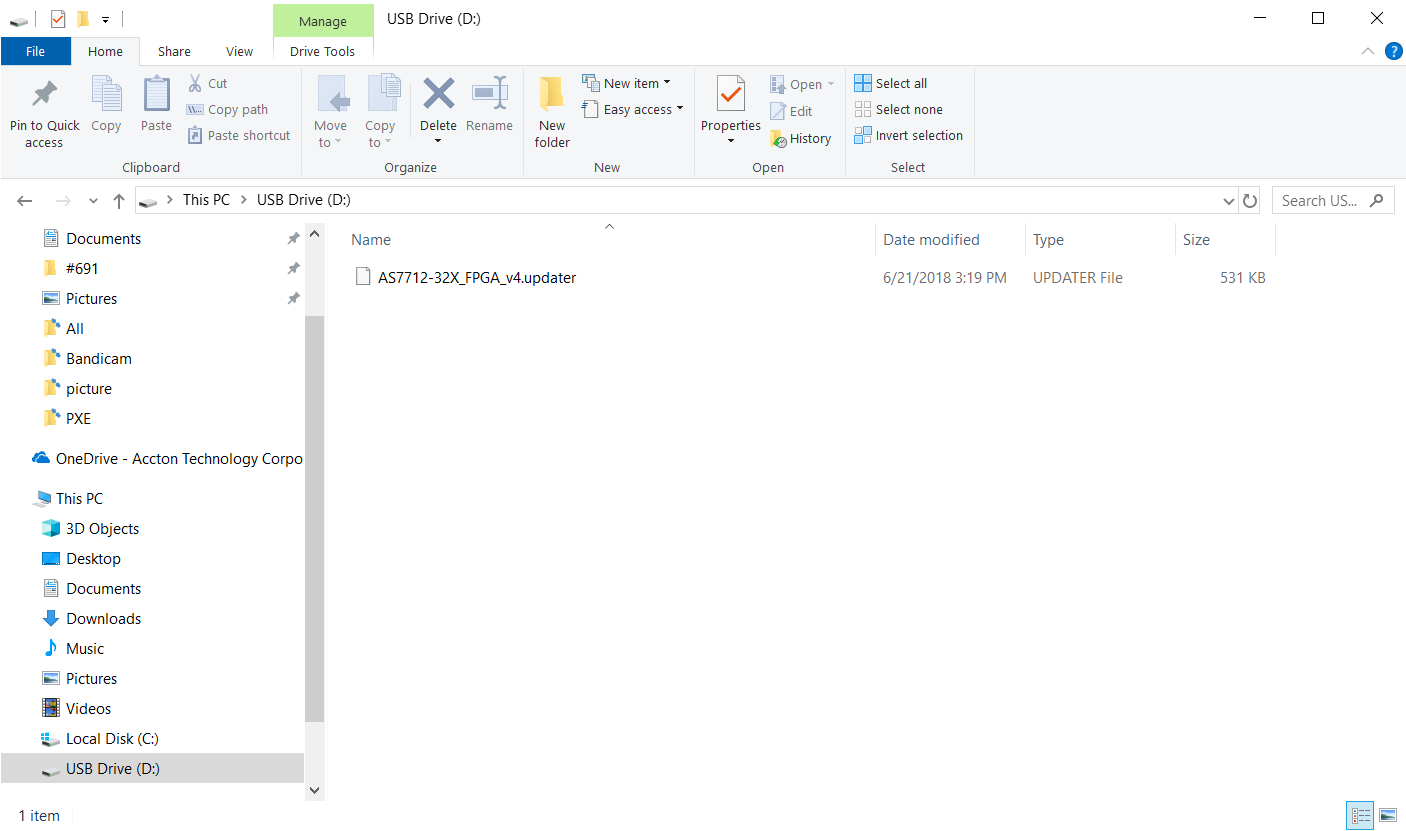
AS7712-32X_FPGA_v4.updater
System Volume Information
ONIE:/mnt/usb # cp AS7712-32X_FPGA_v4.updater /tmp
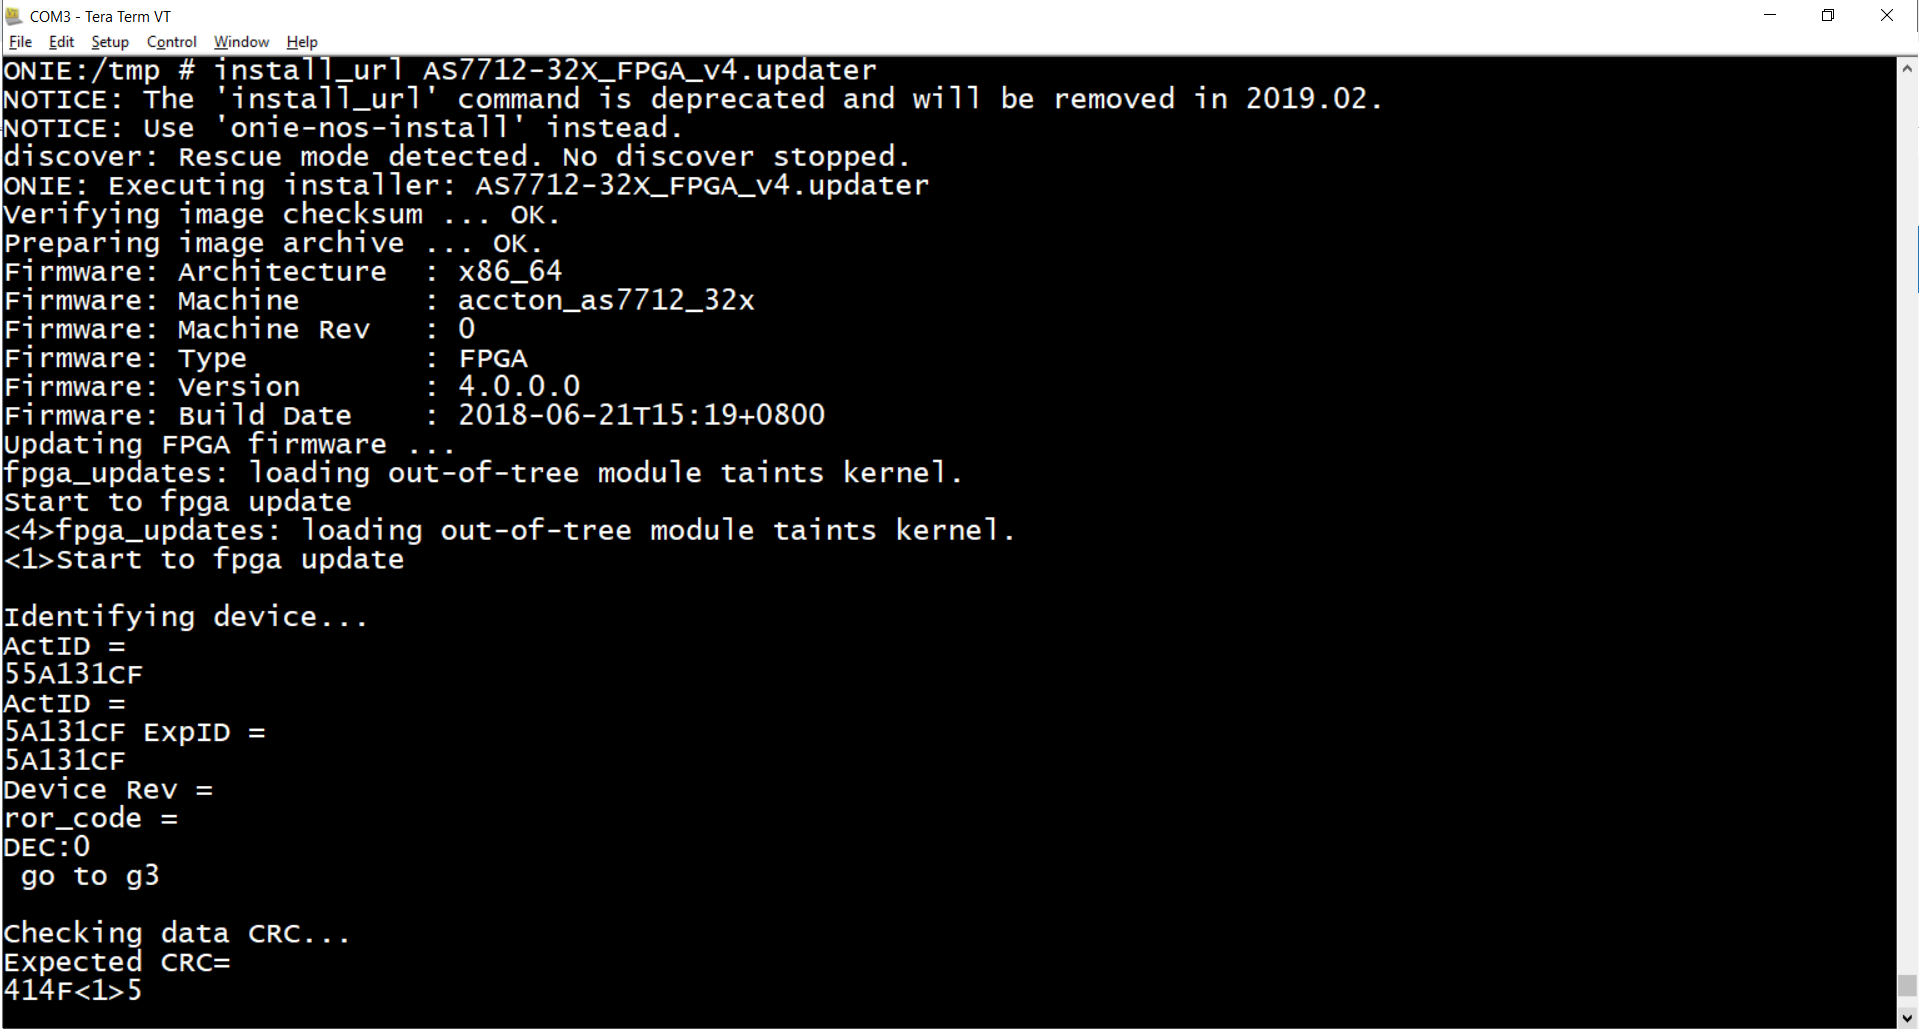
7. Upgrade the FPGA by "install_url [FGPA_Updater]" command.
ONIE:/ # cd /tmp
ONIE:/tmp # ls
AS7712-32X_FPGA_v4.updater
ONIE:/tmp # install_url AS7712-32X_FPGA_v4.updater
8. FPGA will be upgraded immediately.
- TFTP
1. Please connect to the TFTP server with Mgmt port. (e.g., AS7716-32X)
Note: Please use 1G port.
![]()
2. Set the IP address in ONIE and try to ping the TFTP server. (Server IP: 192.168.0.200)
ONIE:/ # ifconfig eth0 192.168.0.1 netmask 255.255.255.0

ONIE:/ # ifconfig
eth0 Link encap:Ethernet HWaddr CC:37:AB:C4:B1:0C
inet addr:192.168.0.1 Bcast:192.168.0.255 Mask:255.255.255.0
inet6 addr: fe80::ce37:abff:fec4:b10c/64 Scope:Link
UP BROADCAST RUNNING MULTICAST MTU:1500 Metric:1
RX packets:77 errors:0 dropped:0 overruns:0 frame:0
TX packets:31 errors:0 dropped:0 overruns:0 carrier:0
collisions:0 txqueuelen:1000
RX bytes:7619 (7.4 KiB) TX bytes:7134 (6.9 KiB)
Memory:dff00000-dff1ffff

ONIE:/ # ping 192.168.0.200
PING 192.168.0.200 (192.168.0.200): 56 data bytes
64 bytes from 192.168.0.200: seq=0 ttl=128 time=9.675 ms
64 bytes from 192.168.0.200: seq=1 ttl=128 time=0.517 ms
^C
--- 192.168.0.200 ping statistics ---
2 packets transmitted, 2 packets received, 0% packet loss
round-trip min/avg/max = 0.517/5.096/9.675 ms
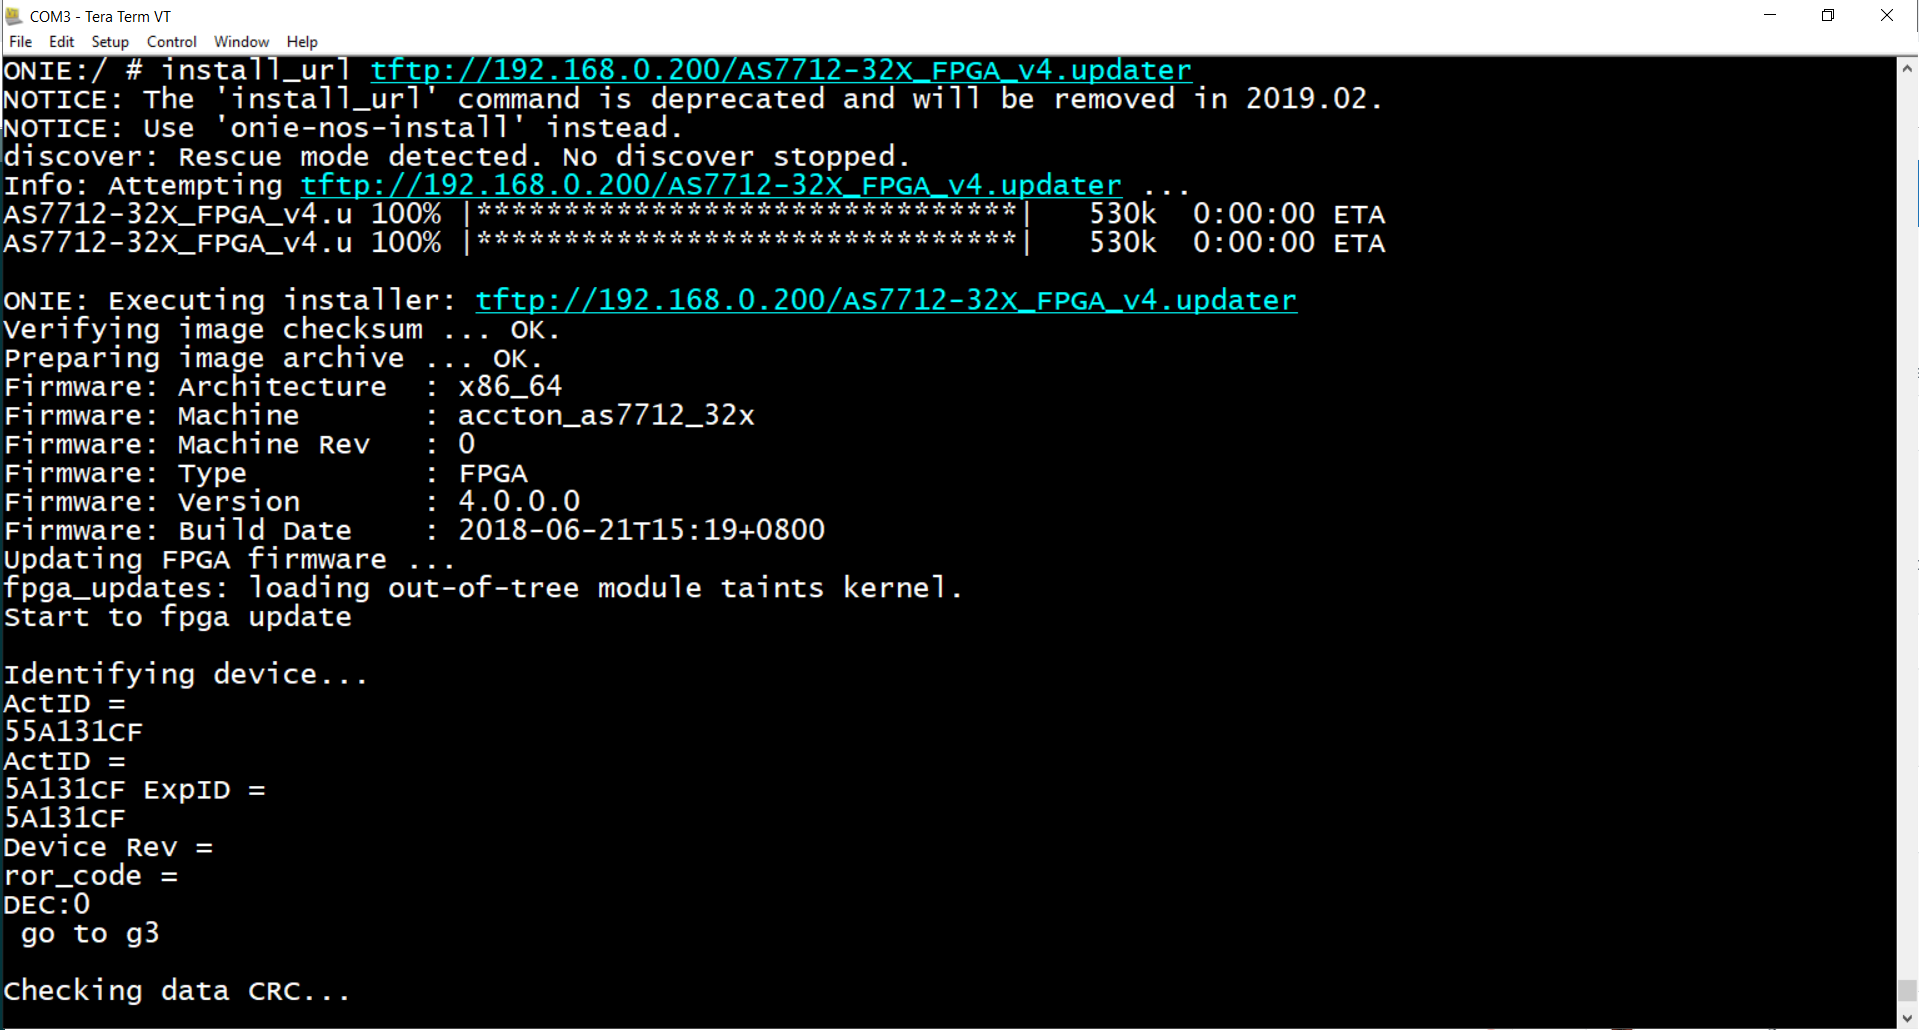
3. Input "install_url [TFTP file location]" command and the upgrade will start.
ONIE:/ # install_url tftp://192.168.0.200/AS7712-32X_FPGA_v4.updater
4. FPGA will be upgraded immediately.
- FTP
1. Please connect to the FTP server with Mgmt port. (e.g., AS7712-32X)
Note: Please use 1G port.
![]()
2. Set the IP address in ONIE and try to ping the FTP server. (Server IP: 192.168.0.200)
ONIE:/ # ifconfig eth0 192.168.0.1 netmask 255.255.255.0

ONIE:/ # ifconfig
eth0 Link encap:Ethernet HWaddr CC:37:AB:C4:B1:0C
inet addr:192.168.0.1 Bcast:192.168.0.255 Mask:255.255.255.0
inet6 addr: fe80::ce37:abff:fec4:b10c/64 Scope:Link
UP BROADCAST RUNNING MULTICAST MTU:1500 Metric:1
RX packets:77 errors:0 dropped:0 overruns:0 frame:0
TX packets:31 errors:0 dropped:0 overruns:0 carrier:0
collisions:0 txqueuelen:1000
RX bytes:7619 (7.4 KiB) TX bytes:7134 (6.9 KiB)
Memory:dff00000-dff1ffff

ONIE:/ # ping 192.168.0.200
PING 192.168.0.200 (192.168.0.200): 56 data bytes
64 bytes from 192.168.0.200: seq=0 ttl=128 time=9.675 ms
64 bytes from 192.168.0.200: seq=1 ttl=128 time=0.517 ms
^C
--- 192.168.0.200 ping statistics ---
2 packets transmitted, 2 packets received, 0% packet loss
round-trip min/avg/max = 0.517/5.096/9.675 ms
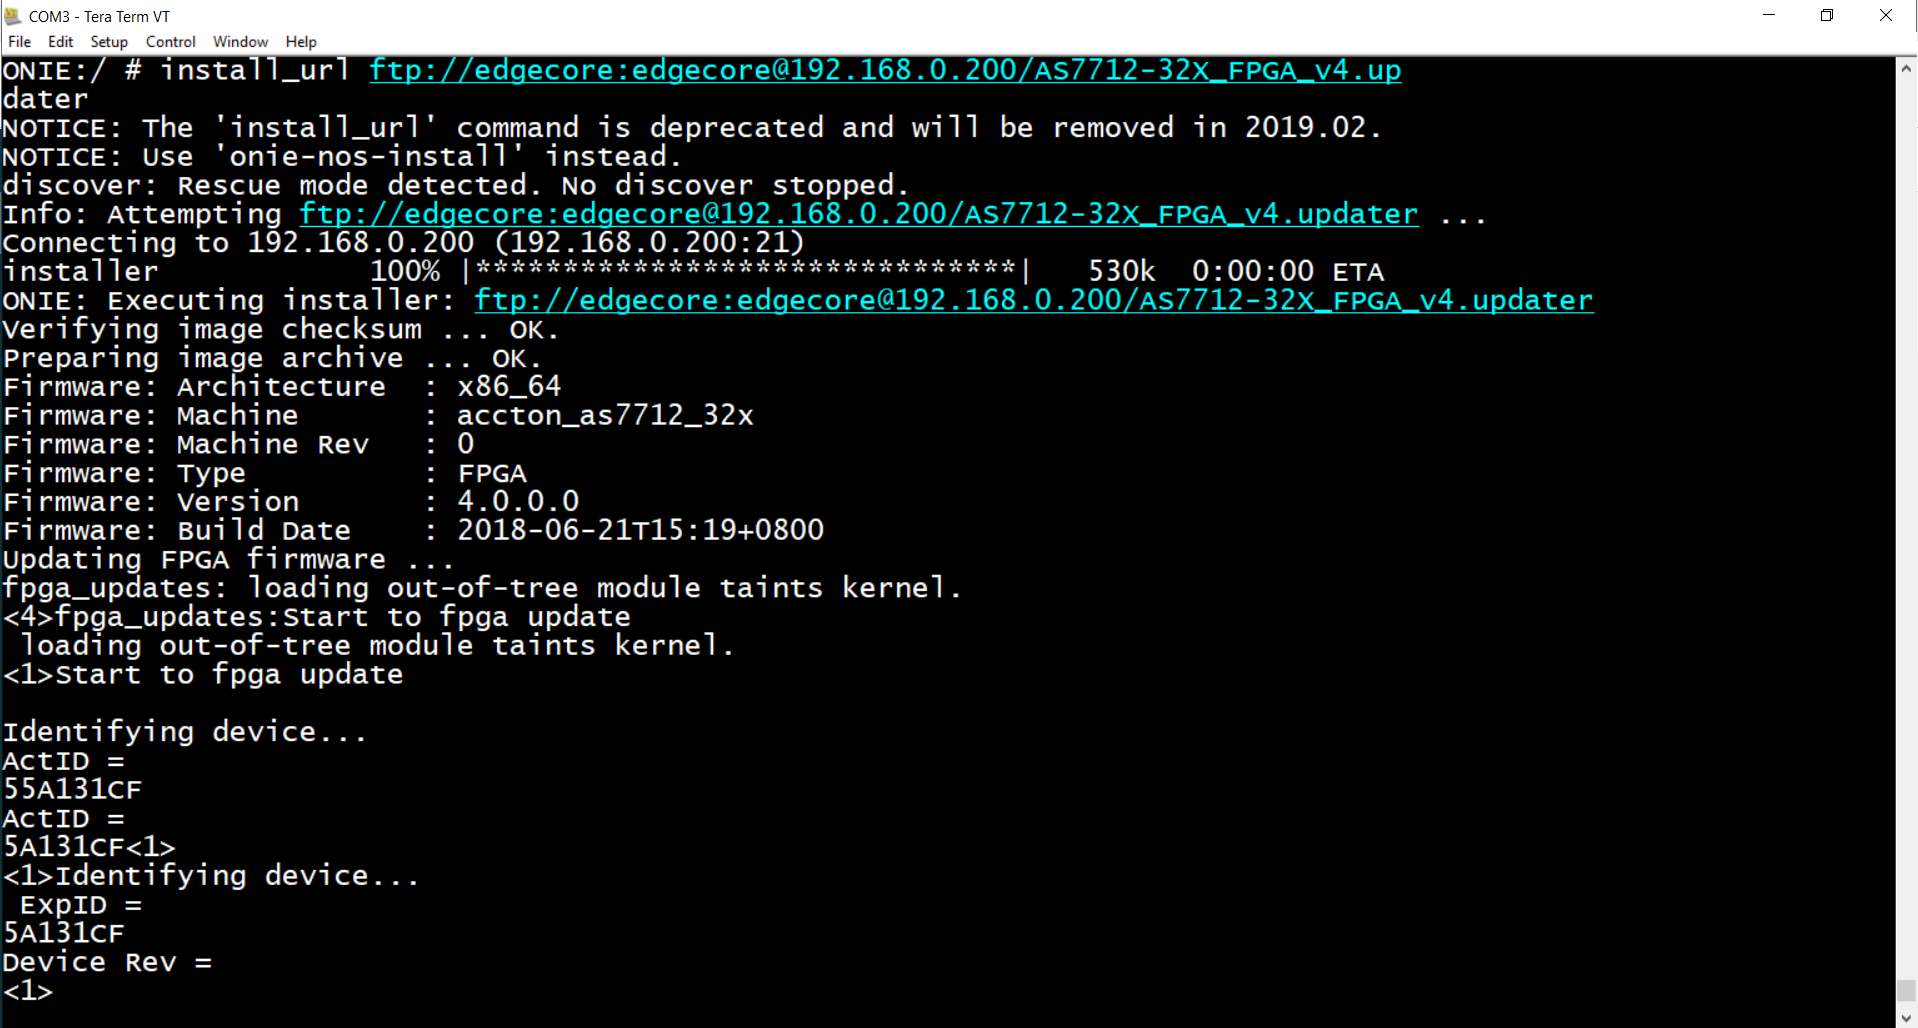
3. Input "install_url [FTP account:password@location]" command and the upgrade will
start.
ONIE:/ # install_url ftp://edgecore:edgecore@192.168.0.200/AS7712-32X_FPGA_v4.updater
4. FPGA will be upgraded immediately.
- HTTP
1. Please connect to the HTTP server with Mgmt port. (e.g., AS7712-32X)
Note: Please use 1G port.
![]()
2. Set the IP address in ONIE and try to ping the HTTP server. (Server IP: 192.168.0.200)
ONIE:/ # ifconfig eth0 192.168.0.1 netmask 255.255.255.0

ONIE:/ # ifconfig
eth0 Link encap:Ethernet HWaddr CC:37:AB:C4:B1:0C
inet addr:192.168.0.1 Bcast:192.168.0.255 Mask:255.255.255.0
inet6 addr: fe80::ce37:abff:fec4:b10c/64 Scope:Link
UP BROADCAST RUNNING MULTICAST MTU:1500 Metric:1
RX packets:77 errors:0 dropped:0 overruns:0 frame:0
TX packets:31 errors:0 dropped:0 overruns:0 carrier:0
collisions:0 txqueuelen:1000
RX bytes:7619 (7.4 KiB) TX bytes:7134 (6.9 KiB)
Memory:dff00000-dff1ffff

ONIE:/ # ping 192.168.0.200
PING 192.168.0.200 (192.168.0.200): 56 data bytes
64 bytes from 192.168.0.200: seq=0 ttl=128 time=9.675 ms
64 bytes from 192.168.0.200: seq=1 ttl=128 time=0.517 ms
^C
--- 192.168.0.200 ping statistics ---
2 packets transmitted, 2 packets received, 0% packet loss
round-trip min/avg/max = 0.517/5.096/9.675 ms
3. Input "install_url [HTTP URL]" command and the upgrade will start.
ONIE:/ # install_url http://192.168.0.200/AS7712-32X_FPGA_v4.updater
4. FPGA will be upgraded immediately.

- SCP
1. Please connect to the OpenSSH server with Mgmt port. (e.g., AS7712-32X)
Note: Please use 1G port.
![]()
2. Set IP address in ONIE and try to ping the OpenSSH server. (Server IP: 192.168.0.100)
ONIE:/ # ifconfig eth0 192.168.0.11 netmask 255.255.255.0

ONIE:/ # ifconfig
eth0 Link encap:Ethernet HWaddr CC:37:AB:C4:B1:0C
inet addr:192.168.0.11 Bcast:192.168.0.255 Mask:255.255.255.0
inet6 addr: fe80::ce37:abff:fec4:b10c/64 Scope:Link
UP BROADCAST RUNNING MULTICAST MTU:1500 Metric:1
RX packets:77 errors:0 dropped:0 overruns:0 frame:0
TX packets:31 errors:0 dropped:0 overruns:0 carrier:0
collisions:0 txqueuelen:1000
RX bytes:7619 (7.4 KiB) TX bytes:7134 (6.9 KiB)
Memory:dff00000-dff1ffff

ONIE:/ # ping 192.168.0.100
PING 192.168.0.100 (192.168.0.100): 56 data bytes
64 bytes from 192.168.0.100: seq=0 ttl=64 time=0.705 ms
64 bytes from 192.168.0.100: seq=1 ttl=64 time=0.433 ms
^C
--- 192.168.0.100 ping statistics ---
2 packets transmitted, 2 packets received, 0% packet loss
round-trip min/avg/max = 0.433/0.569/0.705 ms
3. Use the "SCP" command to copy the FPGA_Updater from the SSH server.
scp [account@server ip]:[installer_file_path] [local_path]
ONIE:/ # scp jeff_cheng@192.168.0.100:/Users/jeff_cheng/Desktop/ISO/7712-32x/FPGA/AS7712-32X_FPGA_v4.updater /tmp

Host '192.168.0.100' is not in the trusted hosts file.
(ecdsa-sha2-nistp256 fingerprint md5 be:26:8f:8c:2f:26:69:f5:05:7e:30:d2
:d2:01:e0:92)
Do you want to continue connecting? (y/n) y
jeff_cheng@192.168.0.100's password:
AS7712-32X_FPGA_v4.updater 100% 636KB 635.6KB/s 00:00
4. Upgrade the FPGA by "install_url [FPGA_Updater]" command.
ONIE:/ # cd /tmp
ONIE:/tmp # ls
AS7712-32X_FPGA_v4.updater
ONIE:/tmp # install_url AS7712-32X_FPGA_v4.updater
5. FPGA will be upgraded immediately.
STEP3. After upgrade, you need power cycle the switch by manual.
STEP4. Enter the "Accton-diag" mode when the switch turns on.
STEP5. Check the FPGA version with "show_chip_ver".
root@(none):/# show_chip_ver
CPLD1 Ver (0x60).0x1 = 0a
CPLD2 Ver (0x62).0x1 = 0b
CPLD3 Ver (0x64).0x1 = 0b
CPLDFAN Ver (0x66).0x1 = 08
FPGA Ver = 0x4
STEP6. After the upgrade, please return to STEP1 and then "enable" the setting back.
Basic Configuration on the switch
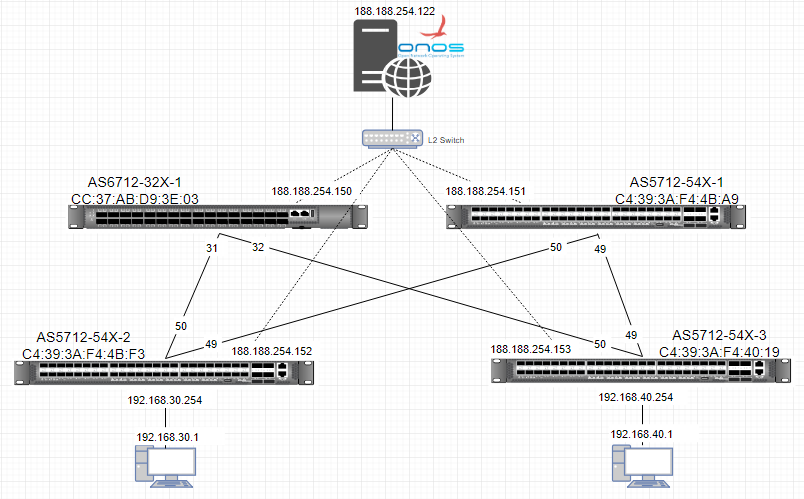
root@localhost:~# vi /etc/network/interfaces
auto ma1
iface ma1 inet static
address 188.188.254.150
netmask 255.255.255.0
root@localhost:~# ifdown ma1
root@localhost:~# ifup ma1
Install the OFDPA to the switch AS5712-54X as example
root@localhost:~# wget http://188.188.254.100/ofdpa_3.0.5.5+accton1.7-1_amd64.deb
root@localhost:~# dpkg -i --force-overwrite ofdpa_3.0.5.5+accton1.7-1_amd64.deb
Specify the controller IP on "/etc/ofagent/ofagent.conf"
root@localhost:~# nano /etc/ofagent/ofagent.conf
# Controller
#-----------------------
CTRL1_IP="188.188.254.122"
CTRL1_PORT="6653"
#CTRL2_IP="127.0.0.1"
#CTRL2_PORT="6653"
#CTRL3_IP="127.0.0.1"
#CTRL3_PORT="6653"
root@localhost:~# service ofagentd restart
ONOS Controller Prepare Work
Hardware (minimum requirements)
2 core CPU
2 GB RAM
10 GB HDD
1 NIC (any speed)
Software
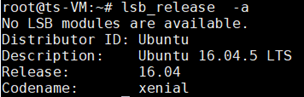
Ubuntu 16.04.5 LTS
Install Oracle Java 8
root@ONOS:~# sudo apt-get install software-properties-common -y && \
sudo add-apt-repository ppa:webupd8team/java -y && \
sudo apt-get update && \
echo "oracle-java8-installer shared/accepted-oracle-license-v1-1 select true" | sudo debconf-set-selections && \
sudo apt-get install oracle-java8-installer oracle-java8-set-default -y
Install curl
root@ONOS:~# sudo apt-get install curl
Some dependencies need to be installed for a fresh Ubuntu.
root@ONOS:~# sudo apt-get update
root@ONOS:~# sudo apt-get install -y gawk texinfo python-pip build-essential iptables automake autoconf libtool
root@ONOS:~# sudo pip install -U pip
root@ONOS:~# sudo pip install ipaddress
Move to /opt
root@ONOS:~# sudo mkdir /opt
root@ONOS:~# cd /opt
Download ONOS (1.12.0)
root@ONOS:/opt# sudo wget -c http://downloads.onosproject.org/release/onos-1.12.0.tar.gz
Untar the ONOS archive into /opt
root@ONOS:/opt# sudo tar xzf onos-1.12.0.tar.gz
Rename the extracted directory to "onos"
root@ONOS:/opt# sudo mv onos-1.12.0.tar.gz onos
Add “ONOS_APPS” environment variable
root@ONOS:~# cat ~/.profile
# ~/.profile: executed by Bourne-compatible login shells.
if [ "$BASH" ]; then
if [ -f ~/.bashrc ]; then
. ~/.bashrc
fi
fi
mesg n || true
export ONOS_APPS=drivers,openflow,segmentrouting,fpm,dhcprelay,netcfghostprovider,routeradvertisement
Running ONOS with its start-stop script
root@ONOS:~# /opt/onos/bin/onos-service start
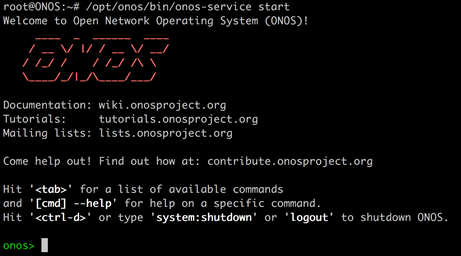
#Now the ONOS controller is running and you will see the CLI of ONOS controller.
Check the running APPs of ONOS
onos> apps -a -s
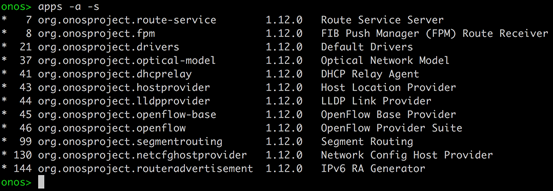
#ONOS needs time to bring up all the applications, therefore, it will not show the all apps immediately.
Download Trellis source code
#Open a new SSH session to connect to the server.
root@ONOS:~# apt-get install git
root@ONOS:~# git clone https://gerrit.onosproject.org/routing
Create trellis json file
root@ONOS:~# vi routing/trellis/trellis_demo.json
trellis_demo.json
root@ONOS:~# cat routing/trellis/trellis_demo.json
#You can refer to the slides to understand how to configure json file via below link.
https://opencord.org/wp-content/uploads/2018/01/Trellis-Tutorial-CORD-Build-2017.pdf
Push trellis configuration to ONOS (onos-netcfg shell script)
root@ONOS:~# /opt/onos/bin/onos-netcfg 188.188.254.122 routing/trellis/trellis_demo.json
#188.188.254.122 is ONOS controller's IP.
#If everything is correct, then there will have no any message printed to the terminal.
Check the current network configuration on ONOS
onos> netcfg
To access the ONOS
#The default username and password is onos / rocks.
CLI: ssh -p 8101 onos@[controller_IP]
WEB GUI: http://[controller_IP]:8181/onos/ui/index.html
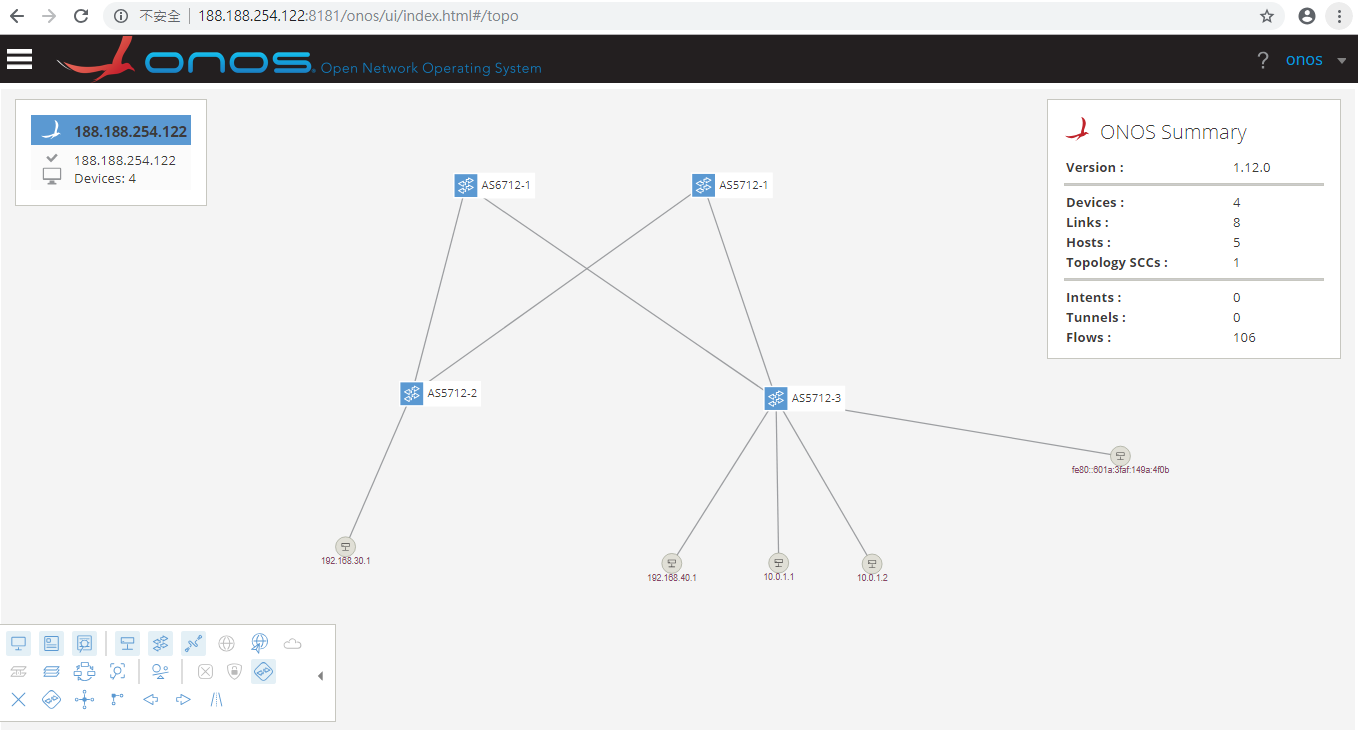
Some basic commands on ONOS for checking status.
onos> devices
onos> links
onos> interfaces
onos> flows -s
onos> hosts –s
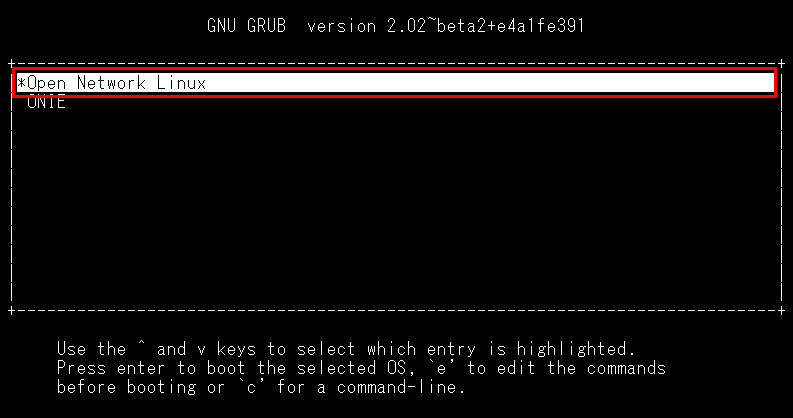
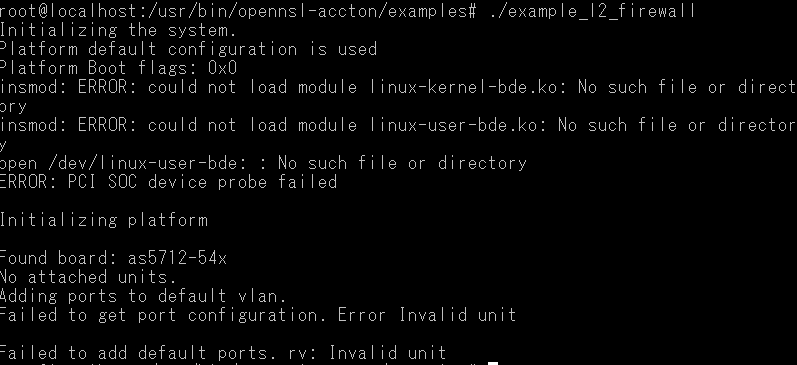
Booting the switch, then choose “ONIE: Install OS”.
You will get into ONIE.
When you get into ONIE, the system will print the messages by itself all the time.
Those messages means the device is searching for the information.
Below are the information which the device is searching for.

You can stop the searching by this command.

Here’s the way to set the management port IP.
Now you could install the ONL. (Open Network Linux)
Open the TFTP Server, and then upload the file to the switch.
After uploading, the switch will install the ONL by itself.

After installing, the switch will reboot by itself.
Please choose the Open Network Linux.
Here’s the way to login.


Before running the OpenNSL, ping from 192.168.1.1 to 192.168.1.2 will fail.

Here’s the steps to install the OpenNSL.
Prepare the FTP server, and connect to the management port of the switch.
Step 1: Setting the IP address on the management port
Ping Server to make sure the switch could contact to the FTP server.
Step 2: Upload the OpenNSL’s package to the switch.
Here’s the way to download the file from FTP server.
Please use this command:
wget ftp://username:password@FTP server IP/file name.
Step 3: Install the OpenNSL.
Run the Script to do packet forward. (example_l2_firewall)
Note: before running the script, please run this command first, or you will fail to run the script.

If you forget to run that command (opennsl_setup), the window will pop-out as below.
If you run this command first

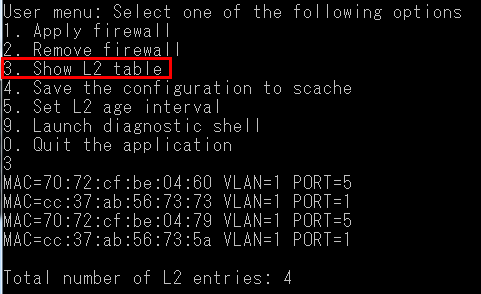
You will see the menu as below, which means the switch can do the packet forward.
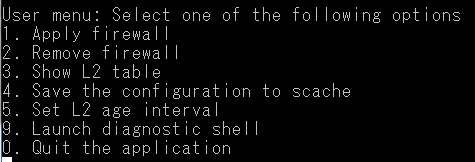
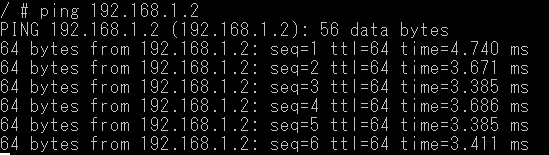
Test:
Ping from 192.168.1.1 to 192.168.1.2.
And you could choose 3 (show L2 table) to check the MAC table.
1. weutil : show switch’s Serial No. / MAC
root@bmc:~# weutil
…
Product Sub-Version: 3
Product Serial Number: AXXXXXXXXX
Product Asset Tag: 000000001
…
Assembled At: Joytech
Local MAC: A8:2B:B5:0C:30:15
…
2. btools.py : show PSU info. / show Temperature etc.
Get help info. : btools.py help
Get PSU info. EX: Get PSU power info. (Only insert PSU 1)
root@bmc:~# btools.py --PSU 1 r p
pfe1100 7-0059: MFR_ID is [PFE600-12-054NA]
pfe1100 7-005a: MFR_ID is [PFE600-12-054NA]
70000.0mW
root@bmc:~# btools.py --PSU 2 r p
0.0mW
Get switch Temperature (Montara for 32X / Mavericks for 65X)
root@bmc:~# btools.py --TMP Montara sh
TMP SENSOR 01 29.500 C
TMP SENSOR 02 28.500 C
TMP SENSOR 03 29.500 C
TMP SENSOR 04 27.000 C
TMP SENSOR 05 25.000 C
TMP SENSOR MAX LOCAL 26.000 C
TMP SENSOR MAX Tofino 38.000 C
3. get_fan_speed.sh
root@bmc:~# get_fan_speed.sh
Fan 1 RPMs: 6150, 3900, (32%)
Fan 2 RPMs: 6150, 3750, (32%)
Fan 3 RPMs: 6150, 4050, (32%)
Fan 4 RPMs: 6150, 3900, (32%)
Fan 5 RPMs: 6000, 3900, (32%)
For 65X: add the key word “Mavericks” will show 10 fans
root@bmc:~# get_fan_speed.sh Mavericks
Fan 1 RPMs: 12150, 9750, (67%)
Fan 2 RPMs: 12300, 9750, (67%)
Fan 3 RPMs: 12300, 9900, (67%)
Fan 4 RPMs: 12150, 9750, (67%)
Fan 5 RPMs: 12300, 9900, (67%)
Fan 6 RPMs: 12150, 9900, (67%)
Fan 7 RPMs: 12300, 9900, (67%)
Fan 8 RPMs: 12300, 9750, (67%)
Fan 9 RPMs: 12150, 9900, (67%)
Fan 10 RPMs: 12300, 9750, (67%)
To specify the number of fan. (1-10 for 65X, 1-5 for 32X)
root@bmc:~# get_fan_speed.sh 1
Fan 1 RPMs: 6300, 3900, (32%)
PS. To find the location of known function, use the command "which".
EX:
root@bmc:~# which sol.sh
/usr/local/bin/sol.sh
Purpose:
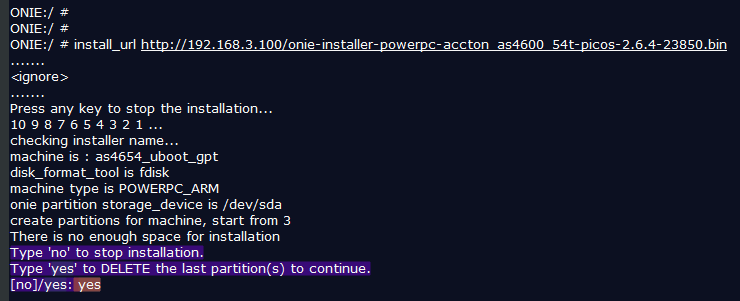
This application note describes the upgrade procedure of PicOS installed on the Edgecore AS4600-54T switch. Typical bare-metal switches usually come with 2GB or more of NAND Flash storage. In these switches, PicOS creates two repositories, namely the PicOS Repository and the Recovery Repository. The Recovery Repository is required for the automated system upgrade process. Usually, the PicOS Repository takes around 1GB and Recovery Repository requires around 600MB.
Background:
The Edgecore AS4600-54T is a special case of bare-metal switch; it comes with limited NAND Flash storage since it was an early design. With only 1GB of NAND Flash, the AS4600-54T only has space to install the PicOS Repository, but no space for the Recovery Repository. Even though PicOS can be installed and operated on the AS4600-54T, users will encounter issues when they try to upgrade the system image because of the missing Recovery Repository.
Solutions:
There are two solutions available:
1. Manual upgrade.
2. Using an additional USB repository.
Manual Upgrade
This solution requires users to set up an environment to copy the configuration files and any user data files before installing the new PicOS image through ONIE. Users should follow this procedure:
1. Set up an environment on a remote FTP or TFTP server.
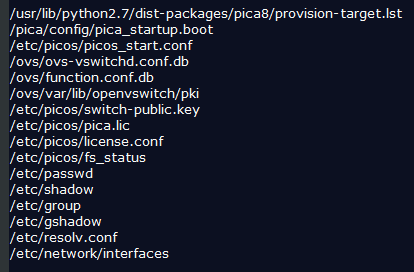
2. Log in to the switch and copy the configuration files under /picos to the remote FTP or TFTP server.
3. Also copy any user data files.
4. Reboot the switch and log in to ONIE.
5. Follow ONIE installation procedures to install the new PicOS image. This will erase all existing data in the PicOS repository. (For details, please refer to page 16 at http://www.pica8.com/wpcontent/uploads/2015/09/picos-system-configuration.pdf. )
6. Please pay attention to the PicOS installer question that asks for deleting the partitions, it will erase all existing data in the partitions. The PicOS installer will stop if your answer is “no,” or if there is no answer for a while. Answer “yes” to continue to install PicOS.
7. Log in to the switch and copy the configuration files and user data from the remote FTP or TFTP server back to /picos. The following configuration files need to be copied and re-installed.
Using an Additional USB Repository
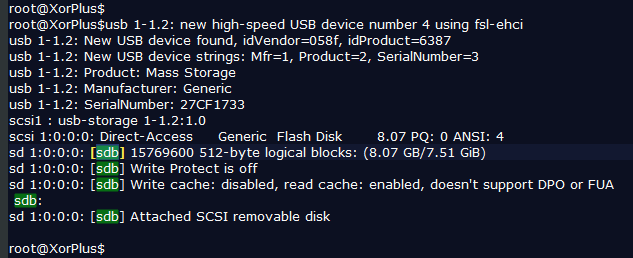
The AS4600-54T has a USB port that can accept most USB sticks as the secondary storage. Users can take the following steps after plugging in a USB stick.
1. Log in to the switch and run ‘blkid’ to identify the current USB stick.

2. If you plug in a USB disk, make sure it is detected as follows:
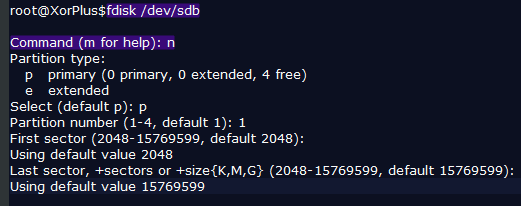
3. If the USB is new, the partition ‘/etc/sdb1/’ needs to be created.
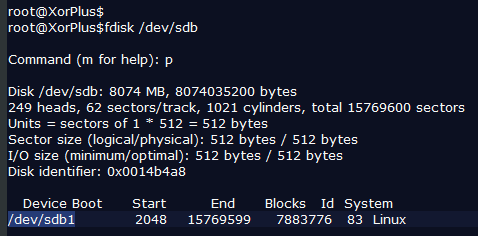
If there is no partition, use fdisk /dev/sdb and then press ‘n’ to add a new partition.
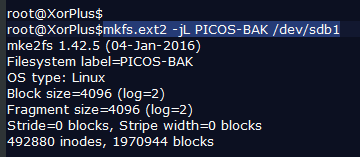
4. Under the Linux prompt, set the label name of the USB stick to PICOS-BAK.
5. Run ‘blkid’ to identify the current SSD again. The label name of the USB stick will change to PICOS-BAK.

6. Now PicOS should be able to recognize the additional disk space. Check the file /etc/picos/fs_status.

Make sure the secondary status is undefined.
7. Reboot the switch and check /etc/picos/fs_status.

At this time, users can follow the typical upgrade schedule to upgrade the system. For more details, please refer to page 20 at: http://www.pica8.com/wp-content/uploads/2015/09/picos-system-configuration.pdf
Notes
Prior to 2.6.4, users need to also change the file /etc/functions_hw to enable the USB upgrade on the AS4600-54T. This procedure can be waived after 2.6.5 where the software is enhanced to handle this limitation.

We have recently become aware of an issue with a component Exhibiting Clock -Signal Issue that may lead to a system failure. In most cases, switches will perform normally and may never experience a failure. The switches that are affected include AS5712-54X, AS5812-54X, AS5812-54T, AS6712-32X, AS6812-32X and AS7712-32X.
1. Edgecore Networks has crossed referenced all RMA reports, but has not seen any failures related to the supplied component clock-signal issue.
2. Edgecore Networks is conducting and will continue conducting ongoing internal testing and simulation. So far, no clock failure has been found. We will continue with our internal testing and update our customers with our findings, if any and accordingly.
3. Based on information that the chipset vendor has provided to us, thus far, the chances of failure is low.
4. We believe it only (or may) happen after non-stop running for many months; ~ 18 + months.
As always, we firmly stand behind all the switches we build and continue to support our customers. If you believe you have been affected by this issue, please send an email to our customer support department at support@edge-core.com
Purpose:
This application note describes procedures that how to check Hardware ID in all Edgecore datacenter switch platforms which is installed PicOS.
Contents:
◆ How to check Hardware ID in Edgecore switches with PicOS system
◆ How to install PicOS license in Edgecore platforms.
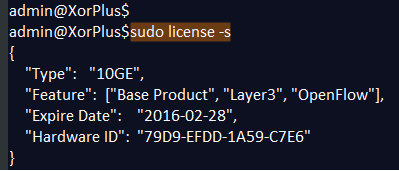
How to check Hardware ID in PicOS
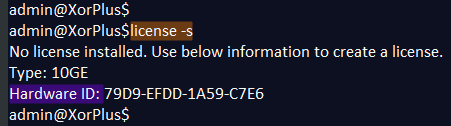
1) Accessing your Hardware ID
User has to get hardware ID available to download a license from Edgecore.
Use the command license -s to check if the license has been installed or not.
How to install license in PicOS
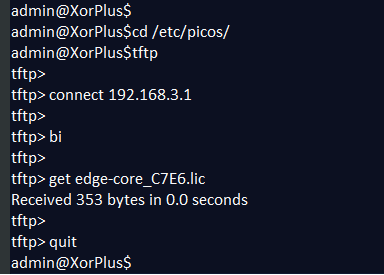
1) Download license file and copy it to the /etc/picos/ directory.
2) Run ‘sudo license –i

3) Run ‘sudo license –s’ to check the status of license.
Purpose:
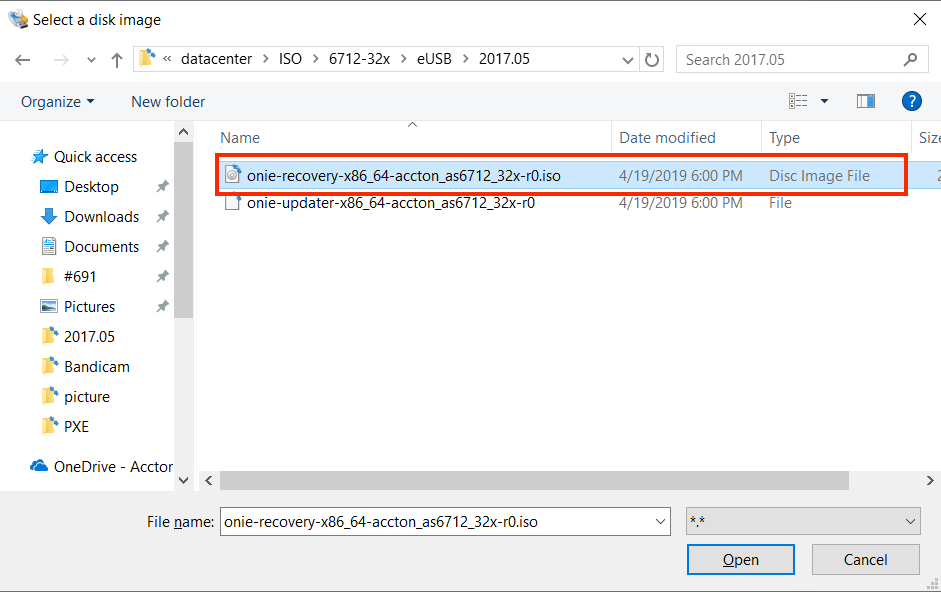
This application note describes the procedure how to recover ONIE in Edgecore X86 platform switches: AS5712-54X, AS6712-32X, AS7712-32X
Procedures:
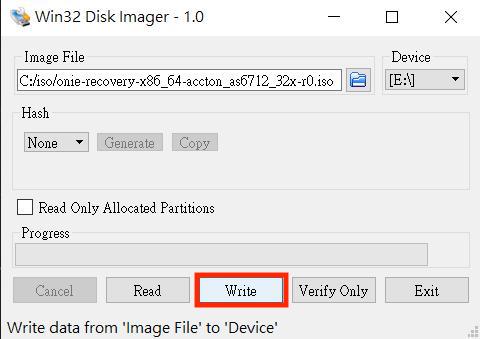
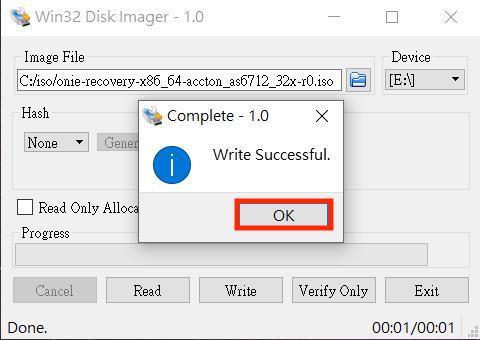
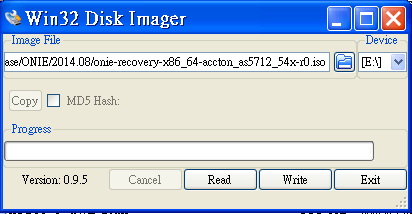
Step 1: Use a tool, e.g. Win32 Disk Imager for writing ONIE recovery ISO image to USB drive. In the "Image File" area, please choose the xxxxx.iso which is provided by Edgecore. Press the "Write" button.
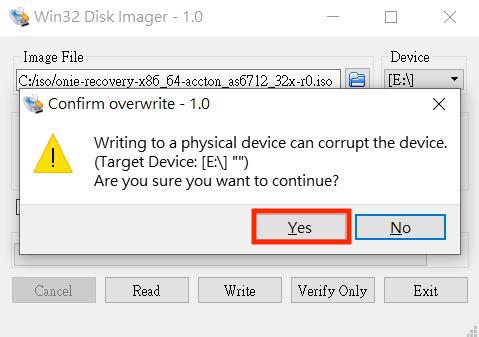
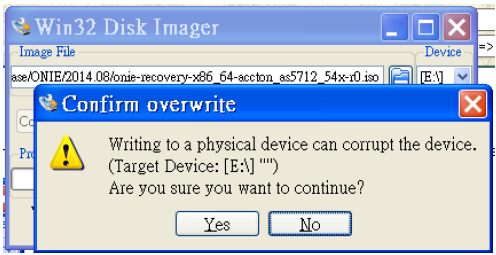
Step 2: Press the “Yes” button to continue. Please note that all the data in the USB drive will be erased.
Step 3:
a. Plug in the USB drive in the box (AS5712/AS6712/AS7712).
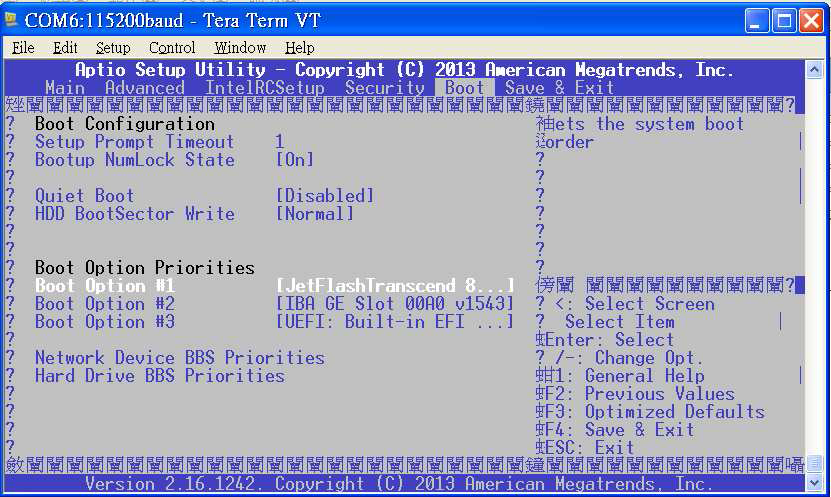
b. Power on switch, and then press

c. In the BIOS menu under the Boot submenu choose the USB drive as boot option #1.
Note: User needs to enter the "Hard Drive BBS Priorities" to choose the USB drive as option #1 first.
d. Do the "Save & Exit" to boot up from USB drive
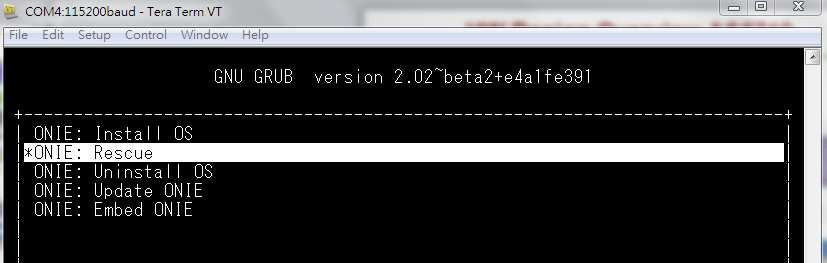
Step 4: The ONIE Installer screen will pop up, choose the "ONIE Rescue". System will start ONIE Rescue mode.
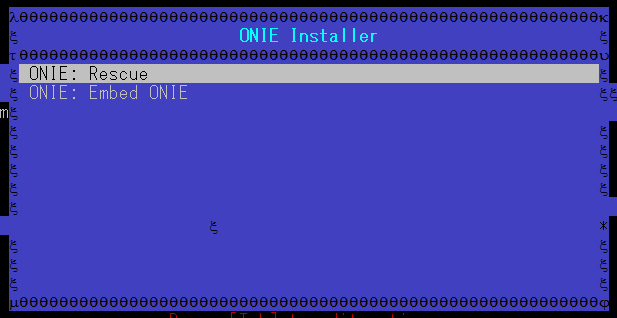
Step 5: Run following command to erase flash, and make sure the message as following diagram.
sgdisk –Z /dev/sdb
Note:Please make sure the /dev/sdb is the flash but not recover USB drive.

Step 6: Reboot system and then following Step 3 to wait ONIE Installer screen prompt.
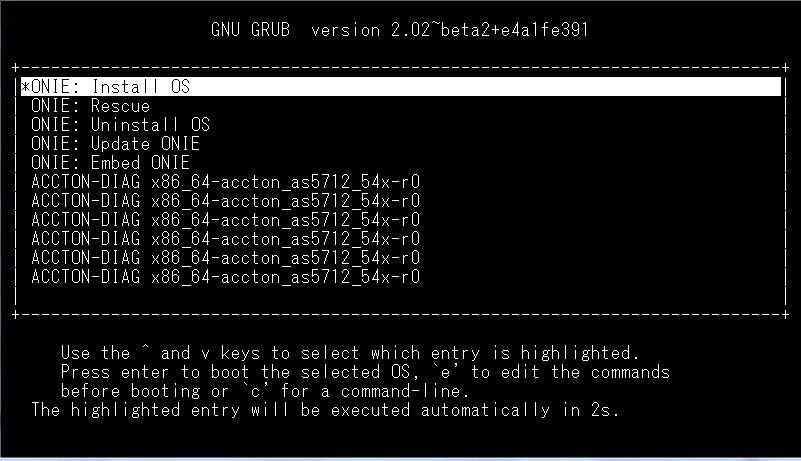
Step 7: Choose the "ONIE: Embed ONIE". System is going to starting to install ONIE.
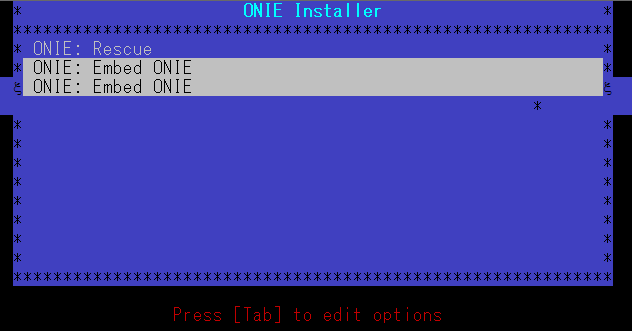
Step 8: Quickly remove the USB drive while the system is rebooting, otherwise system will boot from USB drive again.
Note: User can follow step 3 to reset the boot menu.
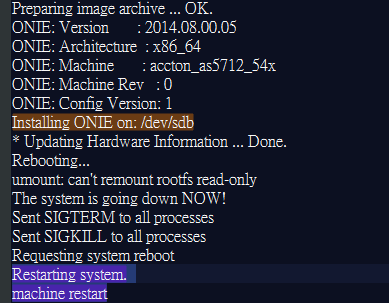
Step 9: ONIE is recovered as following diagram.
Click “product selector tool”
to help you to find what you need.
